
ATS360™ User Guide: Interview Hub (July 2026)
Last updated
Page Overview
The Interview Hub serves as your centralized command center for managing the end-to-end interview lifecycle within the ATS360™ SuiteApp. It provides recruiters and hiring managers with real-time visibility into daily schedules, pending feedback, and outstanding coordinator requests. From this single dashboard, users can track interview progression across various hiring stages and quickly execute essential scheduling actions.

Key UI Elements & Fields
| UI Element/Field Name | Type | Description & Purpose for the User |
|---|---|---|
| FEEDBACK PENDING | Metric Card | Displays the total number of completed interviews awaiting interviewer evaluation and feedback submission. |
| REQUEST PENDING | Metric Card | Shows the number of outstanding interview coordination or availability requests waiting to be processed. |
| SCHEDULED TODAY / MY INTERVIEWS TODAY | Metric Cards | Tracks the volume of total corporate interviews happening today versus the interviews specifically assigned to you. |
| EXPIRED REQUESTS | Metric Card | Displays candidate availability requests that have passed their expiration deadline without a response. |
| Interview Events / Requests / Feedback / Questions / Groups | Sub-tabs | Main navigation filters to toggle between the calendar events list, candidate requests, feedback forms, evaluation question pools, and configured interviewer panels. |
| New / Today / Upcoming | Quick Filters | Time-based filters to instantly narrow down the event list based on scheduling urgency. |
| Hiring Stage Timeline (All Steps, 1st Interview, Final Round, etc.) | Stage Trackers | Visual workflow badges that filter the list to display candidates currently sitting in specific interview stages. |
| Search job application... | Text Search Field | Allows you to quickly find a specific candidate's schedule by typing their name or application ID. |
| Job Posting Dropdown | Dropdown | Filters the entire hub to display interview data associated with a specific open requisition (e.g., JO-0012065 - Director of Personnel Mixology). |
| Recruiter Dropdown | Dropdown | Filters the hub view by the specific recruiter assigned to the job application. |
| Send meeting invite | Button | Launches the calendar invite creation workflow to lock in an interview time slot. |
| Interview availability request | Button | Triggers an automated email to the candidate requesting their preferred dates and times for scheduling. |
| View | Button | Opens the comprehensive details of a scheduled interview event. |
| Complete | Button | Moves the interview to a completed state and prompts the assignment of feedback forms. |
Step-by-Step Instructions
Managing Your Daily Interview Workflow
- Review Your Schedule: Log into the Interview Hub and look at the Scheduled Today and My Interviews Today metric cards to assess your immediate daily workload.
- Filter Your Dashboard: Use the Job Posting or Recruiter dropdown menus to narrow down the queue to your specific department or active requisitions.
- Check the Status Timeline: Click on Today under the quick filters, and ensure the All Steps or Phone Screening status badges are highlighted to view current active tracks.
- Access Event Details: Locate the candidate's row under the Today list (e.g., Human Person). Click View to inspect resume attachments, interview panels, or internal notes before the session begins.
- Finalize the Interview: Once the interview concludes, click the Complete button next to the event time slot. This logs the completion in NetSuite and shifts the event into the Feedback Pending status pool for evaluation collection.
Pro-Tips / Important Notes
💡 Important Notes & Best Practices
- Time Zone Synchronization: Ensure your NetSuite user profile preferences match your physical location. The hub displays an active local time stamp (e.g., GMT-04:00 Eastern Time) which determines how interview times align with your integrated calendar tools.
- Feedback Dependency: Leaving interviews uncompleted via the Complete button will prevent automated feedback reminders from being sent to interviewers, slowing down the overall candidate evaluation cycle.
- The "New" Badge: The New quick filter badge highlights freshly created schedules or requests that haven't been opened or reviewed yet—make checking this your first task every morning!
The Interview Events tab is the primary default workspace within the Interview Hub. It acts as an operational dashboard for tracking active, scheduled, and completed interview events across your organization's entire recruitment pipeline.
1. Top-Level Metrics & Status Filter Ribbons
Directly tied to the Interview Events tab are status metrics and cascading filters that let you drill down into specific data segments:
The Metric Cards
- Scheduled Today: Tracks the overall volume of interviews happening across the organization for the current day.
- My Interviews Today: Isolates the specific interviews where you are explicitly listed as an interviewer or host today.
- Feedback Pending: Shows a running tally of completed interviews awaiting evaluation submissions.
The Time-Based Quick Filters

- New: Filters the list to show recently confirmed schedules or unreviewed events.
- Today: Restricts the view to events happening within the current calendar day.
- Upcoming: Displays scheduled interviews locked in for future dates.
The Hiring Stage Timeline

- A sequential badge system (All Steps, 1st Interview, Final Round, Not Started, Phone Screening) that lets you filter the active event list based on the candidate's exact phase in the interviewing lifecycle.
2. Advanced Search and Categorization Dropdowns

To easily find and manage individual entries, the tab provides three global filters:
- Search job application...: A text field to instantly locate an event by typing the candidate’s name or application ID.
- Job Postings Dropdown: Filters all visible event lists to match a specific requisition (e.g., JO-0012065 - Director of Personnel Mixology).
- Recruiters Dropdown: Narrows the dashboard focus to events managed by specific hiring team owners (e.g., Cynthia Diaz).
3. Global Scheduling Actions
Two prominent quick-action buttons sit on the right side of the filter panel to initiate scheduling workflows:
- Send meeting invite: Launches a manual scheduling panel to build a calendar event, designate interviewers, and lock in specific room resources or video links.
- Interview availability request: Triggers an automated outgoing communication link to the candidate so they can submit their preferred time blocks.

4. The Event Queue Layout & Contextual Actions
The core of this tab is the real-time event queue, which populates candidate data dynamically based on your selected filters. Each row provides a snapshot of an interview event:
| Column Name | Element Type | Description & Purpose |
|---|---|---|
| Job Application | Hyperlink | Displays the Candidate's Name and their targeted Job Title. Clicking the link takes you directly to the master Job Application record. |
| Interview Time | Text Field | Shows the designated date, start time, and end time adjusted to your local profile time zone (e.g., Jul 6, 2026 4:00 PM - 4:30 PM). |
| Interview Step | System Tag | Labels the exact round being conducted (e.g., PHONE SCREENING). |
| Actions | Buttons | Contextual controls to process the event: |
| • View: Opens full meeting logistics, calendar details, and panel assignments. | ||
| • Complete: Logs the interview as finished and moves it to the feedback cycle. |
5. Summary Workflow Step-by-Step
[Filter Queue by Today/Upcoming] ➔ [Click View to Prep for Candidate] ➔ [Conduct Interview] ➔ [Click Complete to Trigger Feedback Form]
💡 Pro-Tip: The time blocks displayed under Interview Time automatically align with the Local time stamp specified right above the queue (e.g., GMT-04:00 Eastern Time). If your cross-coastal team members notice discrepancies, verify that their individual NetSuite Set Preferences time zones are configured correctly.
Learn more about Booking Interviews
The Interview Requests Tab
The Interview Requests tab is a dedicated workspace within the Interview Hub designed to track, manage, and audit candidate availability workflows. When a recruiter or coordinator sends a request asking a candidate to select interview times, those active communications live here until they are scheduled, expired, or cancelled.
1. Functional Overview & Status Sub-filters
At the top of the workspace, four primary status sub-filters categorize requests based on their real-time state:
- Pending Response: Displays outstanding requests that have been sent to candidates but have not yet been completed or answered.
- Expired: Shows requests where the candidate failed to provide their availability before the specified response deadline.
- Cancelled: Tracks requests manually retracted by your hiring team before the candidate could respond.
- Unavailable: Captures instances where a candidate explicitly responded indicating none of the proposed times work, or flagged themselves as no longer available.
2. Advanced Pipeline & Search Filters
To help high-volume teams quickly pinpoint specific coordination tasks, the tab features multi-layered filtering options:
- Hiring Stage Ribbon: A visual pipeline tracker (ranging from Not Started and Phone Screening to Final Round) that filters requests depending on where the candidate sits in the recruitment cycle.
- Search Job Application: A contextual text search field to look up requests instantly by candidate name or application identifier.
- Requisition & Owner Dropdowns: Dropdowns to filter the request workspace by specific job titles (e.g., Director of Personnel Mixology) or assigned Recruiters.
3. Interview Request Card
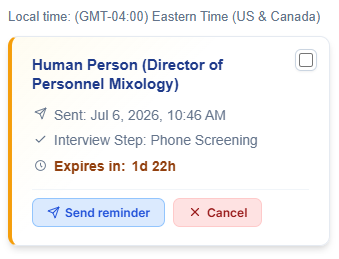
Each pending item is displayed as an individual, actionable item card summarizing key transaction details:
- Candidate & Job Info: Boldly highlights the candidate’s name alongside their target job title.
- Sent Timestamp: Tracks the exact date and time the coordination link was emailed to the candidate.
- Interview Step: Confirms the exact interview round being coordinated (e.g., Phone Screening).
- Expiration Countdown: An automated clock showing precisely how much time remains (e.g., 1d 22h) before the link deactivates.
4. Key Actions & Workflows
From individual request cards, users can execute immediate logistical workflows:
- Send Reminder: Clicking Send reminder instantly triggers a follow-up email to the candidate, gently prompting them to submit their availability before the link expires.
- Cancel Request: Clicking Cancel voids the active scheduling link immediately, preventing the candidate from choosing a time slot if hiring priorities shift.
💡 Pro-Tip: Keep a close eye on the Expiration Countdown. If a high-priority candidate's request drops below 24 hours, utilizing the Send reminder button is a best practice to keep the hiring momentum moving forward without having to reissue a brand-new link.
The Interview Feedback tab is the operational command center for tracking, auditing, and chasing down candidate evaluations within the Interview Hub. This workspace ensures that after interviews are completed, the corresponding feedback forms are collected from the panel timely, keeping the hiring pipeline moving.

1. Top-Level Evaluation Sub-Filters
Directly below the main tab selection, you can toggle between two primary categories to manage your feedback queue:
- Pending: Displays completed interviews where one or more assigned interviewers have not yet submitted their evaluation forms.
- Scored: Tracks successfully completed and submitted feedback forms, displaying final scores and evaluator notes.
2. Queue Search & Contextual Filtering
To locate evaluations in a high-volume hiring environment, use the multi-layer filtering options:
- Hiring Stage Ribbon: A quick-filter pipeline (All Steps, Phone Screening, Hiring Manager Interview, Panel Interview, Final Round) that filters the feedback items down based on the exact step of the interview process.
- Search feedback...: A text field allowing you to search directly by candidate name or interviewer name.
- Job Posting & Recruiter Dropdowns: Dropdowns that let you isolate evaluations associated with a single open requisition or a specific recruiter's portfolio.
3. the Feedback Queue Table
The core grid layout provides clear visibility into outstanding feedback requirements:
| Column Name | Element Type | Description & Purpose |
|---|---|---|
| APPLICANT | Hyperlink | Displays the Candidate’s Name and the target job in parentheses (e.g., Hello Summer (Assembler)). Clicking the link opens the primary Job Application record. |
| INTERVIEW | Hyperlink | Lists the date and time the interview took place (e.g., Jul 4, 2026 6:00 PM). Clicking it directs you to the original Interview Event record. |
| INTERVIEWER PANEL | Text Block | Identifies the specific team members assigned to evaluate the candidate, along with the precise date and time their form link was originally issued. |
| FORM LINK | Action Controls | Contains direct shortcuts to manage the feedback loop: |
| • Feedback form: Allows an HR user or Admin to manually input or view the form. | ||
| • Send Reminder: Instantly re-sends the evaluation link to that specific interviewer's email. | ||
| STATUS | System Tag | Displays the live evaluation state. A yellow UNFILLED tag indicates that the specific interviewer has yet to submit their feedback. |
4. Key Workflows
How to Chase Outstanding Evaluations
- Go to the Interview Feedback tab and select the Pending sub-filter.
- Locate the applicant row displaying a yellow UNFILLED status badge next to an interviewer's name.
- Click the Send Reminder button located inside that interviewer's row.
- The system will automatically trigger a clean, automated notification email to that employee containing their direct link to complete the form, minimizing manual email follow-ups.
5. Pro-Tips / Important Notes
💡 Important Notes & Best Practices
- The Discrepancy Warning Icon (⚠): If you see a warning triangle next to a candidate's name, it indicates a bottleneck—such as an interview that has passed its scheduled date and time but has not yet received its required panel evaluations.
- Multi-Interviewer Isolation: Notice that a single candidate row can list multiple interviewers stacked vertically (e.g., Employee #1513 and Matthew Gardiner). The Send Reminder action is entirely independent; clicking it for one panelist will not bother the other panel members who may have already submitted their forms.
The Feedback Pending tile is a critical operational metric card located at the top of the Interview Hub dashboard. It serves as an immediate visual indicator of bottlenecks in the post-interview evaluation phase.
1. Functional Overview
The primary purpose of the Feedback Pending tile is to track the total volume of completed interviews across the company that are currently stuck awaiting formal scorecards or written evaluations from your assigned interviewer panels.
When an interview time block concludes and a team member clicks the Complete button on an event, the system automatically shifts that transaction into the "Feedback Pending" count. It will remain aggregated in this tile's total until every assigned panelist submits their respective feedback form.
2. Metrics & Visual Indicators
- The Large Metric Counter: The bold number prominently displayed on the card (e.g., 5 in your current queue) gives recruiters an instant snapshot of how many candidate files are stalled. A high number indicates that hiring decisions are at risk of slowing down.
- Contextual Color Tagging: The tile uses a distinct purple boundary and clock icon to differentiate it from logistical requests (blue), active schedules (green), or system errors/deadlines (red).
3. Interactive Dashboard Workflow
Clicking directly on the Feedback Pending tile acts as a global macro filter for the entire Interview Hub. When clicked:
- Automatic Tab Switch: The dashboard instantly navigates you to the Interview Feedback sub-tab.
- Sub-Filter Selection: It automatically toggles the sub-view to Pending mode.
- Queue Isolation: The main table layout dynamically repopulates to display only the specific candidates (such as Hello Summer or Sara Jenkins) whose profiles are missing active evaluator scorecards.
4. Operational Best Practices
💡 Pro-Tips for Managing Pending Feedback
- The Discrepancy Alert (⚠): If a candidate's file remains in the Feedback Pending state past your organization's internal SLA (e.g., 24–48 hours after the interview time stamp), a yellow warning triangle will appear next to their name in the filtered list.
- Targeted Chase Actions: Instead of emailing the entire panel, click the tile to open the list, look under the Interviewer Panel column to see which specific employee has an UNFILLED tag, and click Send Reminder to nudge only that individual.
The Feedback Questions tab is the administrative repository within the Interview Hub where hiring teams manage evaluation criteria. This workspace allows recruiters and administrators to create, organize, and assign structured evaluation questions tailored to specific hiring stages and job postings, ensuring consistent scorecard rubrics across all candidate interviews.
The New Question Configuration Form
The New Question form opens as an interactive modal wizard directly on top of the Feedback Questions tab. It allows recruiters and administrators to create structured, targeted evaluation criteria and instantly map them to specific stages and job requisitions.
1. Key UI Elements & Fields
| UI Element/Field Name | Type | Description & Purpose for the User |
|---|---|---|
| Close (✕) | Button | Closes the modal configuration window and returns you to the main questions grid without saving changes. |
| Question Text * | Rich Text Area | The core text box where you enter the precise question or prompt the interviewer must answer (e.g., "Are you willing and able to travel for work each day?"). This field is required. |
| Interview Stage | Dropdown | Sets the specific milestone in the interview lifecycle where this question will automatically appear on scorecards (e.g., Phone Screening, Hiring Manager Interview, Final Round). |
| Job Posting(s) * | Search & Filter Matrix | A dual-purpose search field and multi-selection grid block. Allows you to assign the question globally or pick specific active job openings. This field is required. |
| All Recruiters | Dropdown Filter | Filters the lower job selection table to only display requisitions managed by a specific recruiter. |
| Clear () | Button | Resets any active search strings or selection filters within the Job Posting segment. |
| Cancel | Button | Discards all active form inputs and safely exits the creation wizard. |
| Save | Button | Commits the new question to the active repository database and automatically links it to the designated scorecards. |
2. Step-by-Step Instructions
Authoring and Assigning a Question Matrix
- Enter the Prompt: Type your target question clearly into the Question Text box. Make sure it provides clear direction for the interviewer who will be rating the candidate.
- Assign the Stage: Click the Interview Stage dropdown and select the exact milestone layer where this criteria is relevant.
- Isolate or Scale the Job Scope: * If the question applies to every position in your company, select the top global option.
- If it is a localized role dependency, type the job title into the Search by job posting or recruiter bar to find the target requisition.
- Select Target Positions: Check the activation boxes next to the appropriate rows in the Job Posting sub-table grid (e.g., checking the box for Senior Plumbing Technician or Assembler).
- Commit Configuration: Click the blue Save button. The window will close, and your structured question is now actively live for any newly initiated evaluation links in that stage.
3. Pro-Tips / Important Notes
💡 Important Notes & Best Practices
- The Red Asterisk (*): Both Question Text and Job Posting(s) require valid input before the Save button becomes active. If the button appears grayed out or fails to execute, double-check that you selected at least one target job posting row from the checkbox list below.
- Recruiter Filter Alignment: Utilizing the All Recruiters filter dropdown inside this modal does not auto-select the check-boxes; it merely clean-filters the table below to help high-volume teams find their specific postings faster. Always remember to physically check the left-hand activation box!
1. Top-Level Filters & Matrix Metrics
Directly below the sub-tab menu, you can refine your view of the question bank using stage badges and specific drop-down fields:
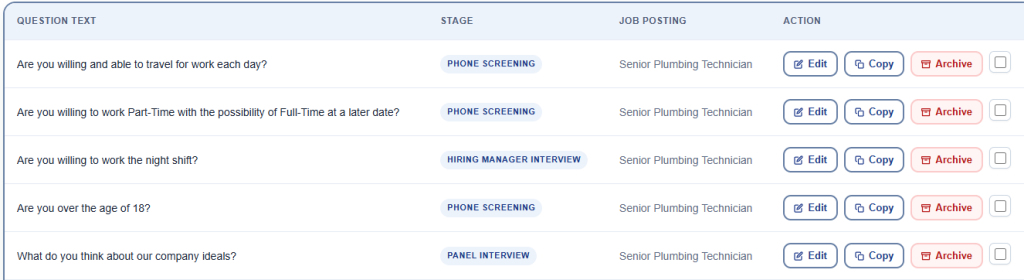
- Stage Filter Ribbon: Displays the volume of active questions assigned to each phase of your interview lifecycle (e.g., All Steps (8), Phone Screening (4), Hiring Manager Interview (3), Panel Interview (2), Final Round (2)). Clicking a badge immediately limits the table to questions mapped to that stage.
- Search questions...: A free-text search field that filters the evaluation table in real time as you type keywords.
- Job Posting Dropdown: Narrows down visible questions to only those associated with a specific open requisition (e.g., Senior Plumbing Technician).
- Recruiter Dropdown: Filters the list to show questions mapped to requisitions managed by a specific recruiter.
2. Key UI Elements & Fields
| UI Element/Field Name | Type | Description & Purpose for the User |
|---|---|---|
| + New | Button | Launches the configuration modal to author a brand-new interview evaluation question. |
| View Archived | Button | Opens a historical repository of deactivated questions, allowing users to restore or reference old scorecards. |
| Question Text | Table Column | Displays the exact question or prompt the interviewer will see on their candidate evaluation form. |
| Stage | Table Column | Indicates the specific recruiting milestone where this question will be asked. |
| Job Posting | Table Column | Specifies whether a question is globally available or restricted to a specific job opening. |
| Edit | Button | Re-opens the question configuration panel to modify the question text or update its stage assignment. |
| Copy | Button | Duplicates an existing question to quickly clone it for use in another hiring stage or job posting. |
| Archive | Button | Deactivates the question and removes it from future interview scorecards without deleting historical data. |
| Preview Form | Button | Generates a live mock-up view of the evaluation scorecard exactly as an assigned interviewer will see it. |
3. Step-by-Step Instructions
Authoring and Assigning a New Evaluation Question
- Navigate to the Repository: Open the Interview Hub and click on the Feedback Questions tab.
- Initiate Creation: Click the blue + New button to open the question builder wizard.
- Define Question & Parameters: Enter your target question text, select the appropriate hiring stage tag from the dropdown, and specify whether this applies to All open job postings or an isolated requisition.
- Save and Validate: Save your new entry to add it to the active grid block.
- Verify the Scorecard Layout: Select the target Job Posting from the main dashboard filter dropdown, ensure your stage is highlighted, and click Preview Form at the bottom of the screen to verify how the final structured scorecard renders for your interviewers.
4. Pro-Tips / Important Notes
💡 Important Notes & Best Practices
- Global vs. Local Scope: Setting the Job Posting field to All open job postings creates a global question that automatically appends to every active scorecard in the system for that specific stage. Use this for standard compliance or behavioral questions.
- Scorecard Integrity: Archiving an active question will instantly remove it from future, uninitiated interview feedback loops. However, it will not alter or corrupt historical data on evaluations that have already been submitted by interviewers.
- Multi-Selection Checkboxes: The empty checkbox column next to the Archive actions allows you to select multiple items simultaneously for rapid, bulk management workflows.
The Interviewer Groups tab is the administrative workspace within the Interview Hub where recruitment teams create, organize, and manage reusable panels of interviewers. Instead of manually adding individual team members every time an interview is scheduled, users can group employees by department, technical specialty, or hiring level to streamline the scheduling workflow.
1. Page Overview
The Interviewer Groups tab provides an organized view of all configured interviewer panels within the ATS360™ SuiteApp. This page enables users to quickly search existing groups, review assigned group members, see when a panel was last updated, and build new cross-functional teams to ensure consistent and balanced evaluation loops.
2. Key UI Elements & Fields
| UI Element/Field Name | Type | Description & Purpose for the User |
|---|---|---|
| Search interviewer groups or members... | Text Search Field | Allows you to dynamically filter the group list by typing a group name (e.g., "Sales") or a specific employee's name. |
| + New | Button | Opens the configuration modal to create a brand-new interviewer panel group. |
| NAME | Table Column | Displays the descriptive name assigned to the panel (e.g., Sales Interview, Subsidiary 3). |
| MEMBERS | Table Column | Lists all internal employees and interviewers assigned to that specific group block. |
| LAST MODIFIED | Table Column | Displays the timestamp of when the group's name or membership roster was last altered. |
| Edit | Button | Opens the group modification panel to add or remove members or rename the group. |
| Delete | Button | Permanently removes the interviewer group from the system (does not affect individual employee records). |
3. Step-by-Step Instructions
Creating a New Interviewer Group
- Navigate to the Interview Hub and click on the Interviewer Groups tab.
- Click the blue + New button on the right side of the workspace.
- In the setup window, enter a clear, standardized Name for the group (e.g., Engineering Round 2 Panel).
- Use the employee lookup dropdown to select and add team members to the group roster.
- Click Save. The group will instantly appear in the table queue and become available for selection during the scheduling process.
4. Pro-Tips / Important Notes
💡 Important Notes & Best Practices
- Standardize Your Naming Conventions: To make the text search field highly effective, name your groups by department or function first (e.g., Marketing - Copywriters or Finance - Leadership).
- The Sync Calendar Overlap: Before creating large groups, ensure that all intended members have synced their calendars via the main Sync Calendar button at the top right of the hub. This guarantees that pool availability will register correctly when the group is pulled into a scheduling event.
- No Historical Disruption: Deleting or editing an active group will not disrupt or remove past or currently scheduled interview events that used that panel template; it only controls future scheduling choices.