
ATS360 User Guide: Booking Interviews (July 2026)
Last updated
This section of the user guide outlines how to use the Send Meeting Invite module to directly schedule and send an interview invitation to a candidate.
Part 1: The "Send Meeting Invite" Module
The Send Meeting Invite module is used when you have a fixed date and time in mind for an interview and want to send a direct calendar invitation to the candidate and your internal interview panel simultaneously.

Step-by-Step Instructions
Step 1: Review the Candidate Summary
Before filling out the schedule, verify that you are working with the correct record by checking the Candidate Summary panel on the left:
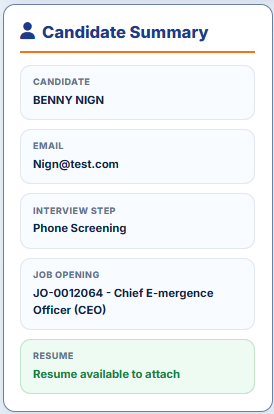
- Candidate Name & Email: Ensure the candidate's contact details match.
- Job Opening: Verify the job title and requisition number
- Interview Step: Confirm their current stage in the hiring workflow.
Step 2: Set the Interview Time
Navigate to the Interview Time section to input the exact timing for the meeting:
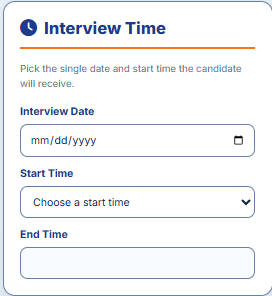
- Interview Date: Click the date field and select the specific day from the calendar picker ($mm/dd/yyyy$).
- Start Time: Select a time from the dropdown menu (available in 30-minute increments).
- End Time: Define the conclusion time for the meeting based on your desired duration.
Step 3: Configure the Invite Setup
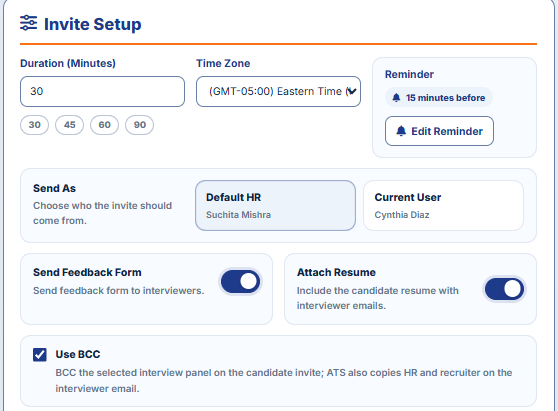
Customize how the meeting will be handled in the Invite Setup section:
-
Duration (Minutes): Choose from the quick-select buttons (30, 45, 60, or 90 minutes) to automatically calculate the end time, or type it in manually.
-
Time Zone: Select the appropriate time zone from the comprehensive dropdown menu (defaults to your local time zone, e.g., Eastern Time).
-
Reminder: If you need to set up an alert prior to the meeting, click the Edit Reminder button to enable it.
-
Send As: Choose whose identity/email alias will be used to send the invite:
-
Default HR
-
Current User
-
Hiring Manager
-
Administrative Toggles: * Send Feedback Form: Check this box to automatically deliver a feedback scorecard to your interviewers after the session.
-
Attach Resume: Check this box to include a copy of the candidate's resume in the interviewers' calendar invites.
-
Use BCC: Check this box to hide the interview panel's email addresses from the candidate's view while keeping HR and recruiters copied.
Step 4: Build Your Interview Panel
Select the internal team members who will conduct the interview:
- (Optional) Filter the list using the Department dropdown or type a name into the Search by name or email bar.
- Check the box next to each employee who needs to attend the interview.
- If an interviewer is missing from the system, use the [+ New] button to add them, or click [Manage] to adjust existing interviewer groups.
Step 5: Compose the Email
Draft the message that will accompany the calendar invite in the Email Composer:
- Email Template: Choose a pre-built template from the dropdown menu (e.g., Initial Assessment Invitation) to automatically populate the message, or choose Default Template.
- Subject & Body: Review, edit, or manually type your personalized subject line and email text.
Step 6: Preview and Send
- Scroll to the bottom Preview & Send section.
- Click [Preview Email] to visually double-check how the final invitation looks to ensure formatting and variables are correct.
- If everything looks correct, click [Send Meeting Invite].
(Note: If you make a mistake and need to clear your inputs, you can click [Reset] to start fresh).
Part 2: The "Interview Availability Request" Module
The Interview Availability Request module is used when you want to give the candidate flexibility to select their own interview slot from a set of pre-approved dates or directly from your team's real-time calendar availability.
Step-by-Step Instructions
Step 1: Verify the Candidate Summary
Before modifying any settings, confirm you are processing the correct applicant by checking the Candidate Summary side panel:
- Candidate details: Review the applicant's name (e.g., testsub Cuatro) and email.
- Context: Confirm the current Interview Step (e.g., Not started) and the Job Opening title.
Step 2: Configure the Request Setup
Define the foundational constraints of the scheduling link that will be generated for the candidate:
- Duration (Minutes): Select the length of the interview. You can use the quick-select buttons (30, 45, 60) or type a custom length.
- Time Zone: Set the reference time zone for the meeting via the comprehensive dropdown menu.
- Expires In (Hours): Decide how long the scheduling link remains valid before it times out. You can quick-select 24, 48, or 72 hours.
- Candidate Permissions: Toggle Allow candidates to cancel/reschedule to On if you want them to have self-service management over their booking.
- Feedback Automation: Toggle Send feedback form to interviewers to On to automatically dispatch scorecard evaluations to your panel once the session ends.
Step 3: Build Your Interview Panel
Specify the internal team members who need to be present for the interview:
- (Optional) Select a pre-saved group from the Interview Panel dropdown, or use [+ New] / [Manage] to create new combinations.
- Filter the interviewer roster by typing a name/email into the Search by name or email field or filtering by Department.
- Check the checkbox next to each required interviewer's name to add them to the pool.
Step 4: Define Available Interview Times
Provide the time ranges the candidate can choose from using one of two methods:
Method A: Automated Syncing (Experimental)
- Check the box for Auto-generate from interviewer calendars.
- The system will look at the calendars of the checked panel members and automatically identify shared free time blocks.
Method B: Manual Slot Selection
- Under Interview Dates, type or select dates ($mm/dd/yyyy$) you wish to offer, then click [+ Add Date].
- Click on a specific date row you just added to highlight it.
- On the right-hand Shared Time Slots panel, click [+ Add Slot] to manually input specific time windows available for that day.
Step 5: Finalize the Email Composer
Review the electronic invitation that delivers the booking link to the candidate:
- Email Template: Select an existing template (like Onboarding Process) or keep it on Default Template.
- Dynamic Link: The template will automatically inject a tracking hyperlink (e.g., Please click here to select the date and time...). Do not delete or alter this placeholder text, as it contains the unique booking mechanism for the candidate.
- Edits: Modify the Subject line or Body text as needed to match your tone.
Step 6: Preview and Send
- Scroll to the Preview & Send section at the base of the page.
- Click [Preview Email] to see exactly how the email variables and links will render for the recipient.
- Click [Send Request] to generate the active invitation and email it out.
- (If you need to clear all selections and start over, click [Reset]).