
ATS360™ Dashboard User Guide (July 2026)
Last updated
Module 1: The Recruitment Dashboard
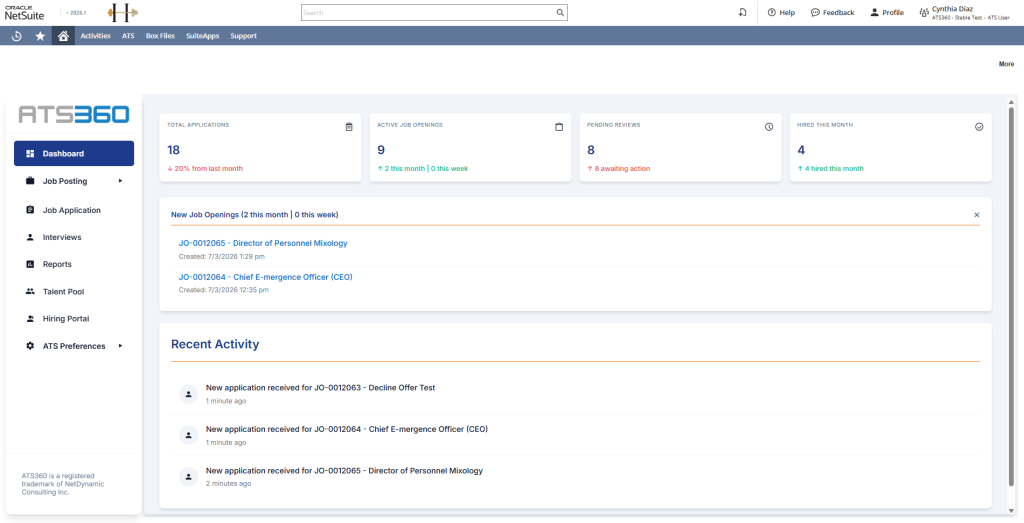
The ATS360™ Dashboard serves as your daily recruitment command center. It consolidates scattered applicant tracking data into a single, high-level intelligence screen inside NetSuite. Instead of digging through individual records to find out where your hiring stands, the dashboard instantly highlights your immediate action items, overall workload volume, and recent pipeline activity.
1. High-Impact KPI Cards
At the top of the dashboard sit four core Key Performance Indicators (KPIs). These numbers give teams an instant pulse on recruitment health and team capacity.
📊 Total Applications
- What it is: A cumulative counter of every resume or application currently sitting in the system.
- Why it matters: It displays a month-over-month trend indicator (e.g., a 50% decrease compared to last month). This tells leadership at a glance whether your sourcing strategies are yielding more volume or if application rates are slowing down.
- How to use it: Use this trend line to back up resource requests. If total applications are spiking sharply, it justifies a need for extra screening support; if they are dropping, it indicates a need to ramp up job board spend or active sourcing.
💼 Active Job Openings
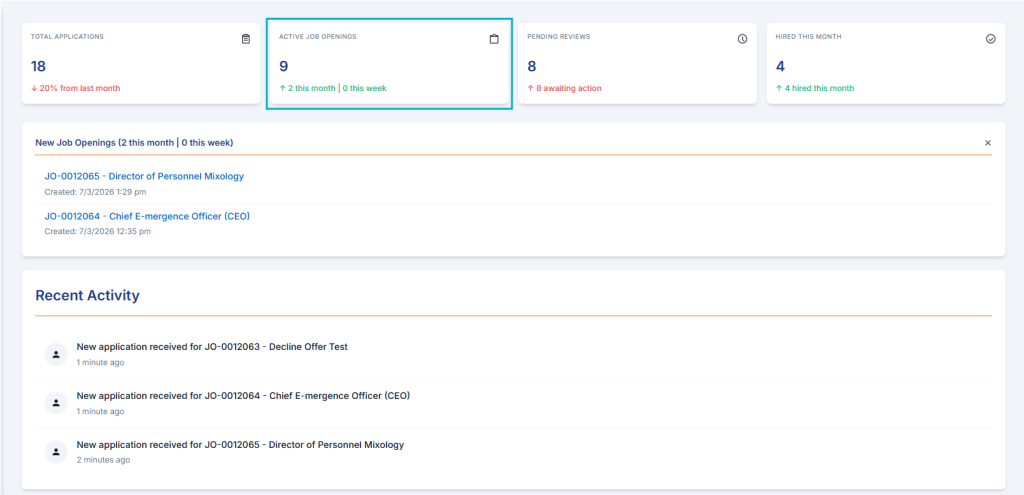
- What it is: The live count of approved requisitions currently accepting candidates.
- Why it matters: It keeps team workloads transparent by clearly showing how many roles are being actively managed, along with sub-metrics tracking how many new jobs were added this week vs. this month.
- How to use it: Cross-reference this with your active recruiter count. If you have 12 active openings but only 1 recruiter, it signals a potential bottleneck in time-to-hire.
⏱️ Pending Reviews
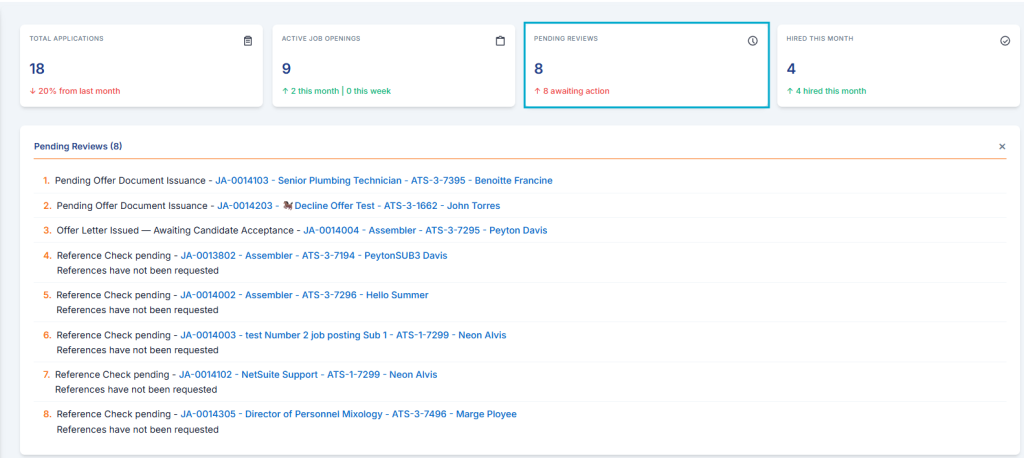
- What it is: The total number of unread or unscreened candidate applications waiting for recruiter action.
- Why it matters: This is your most critical operational metric. A high number here directly correlates to a slow candidate experience and a higher risk of top talent dropping out of your pipeline to accept other offers.
- How to use it: Treat this as your team's daily "Inbox Zero" goal. Clicking into this card should be a recruiter's very first action item every morning to clear out the screening queue.
🏆 Hired This Month
- What it is: A real-time tracker of successful placements that have officially closed out within the current calendar month.
- Why it matters: It serves as the ultimate success metric for the recruiting team, keeping the end goal highly visible to everyone.
- How to use it: Use this number in weekly leadership syncs to track progress against monthly or quarterly company headcount goals.
2. Navigating the Core Workflow Modules
The sidebar and top navigation panels organize the end-to-end recruitment lifecycle into clean, logical segments.
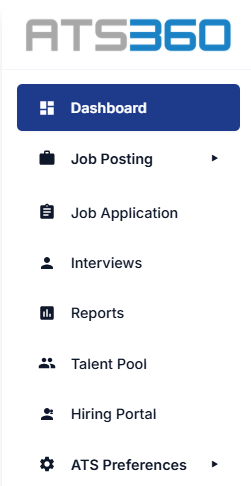
- Job Posting / Post a New Job: Used to draft, approve, and push out new requisitions to your portals.
- Job Application: The workspace where recruiters read resumes, leave internal notes, change candidate statuses, and move people through the hiring stages.
- Interviews & SMS Interviews: Houses your interview schedules and evaluator scorecards. The SMS feature allows you to text candidates directly from the system, drastically increasing response rates compared to standard email.
- Talent Pool: A built-in silver-medalist database. Instead of paying to source new candidates for every role, teams use this to search through past applicants who were qualified but didn't get the job.
- Portals (Career, Internal, and Hiring): Controls the look, feel, and listings on your external job board, your internal employee transfer board, and the portal where your busy Hiring Managers can log in to view their specific candidates.
- ATS Preferences & Email Templates: Admin tools used to customize hiring stages, disposition codes, and pre-write automated emails (like application confirmations) to save hours of manual typing.
3. The Recent Activity Feed
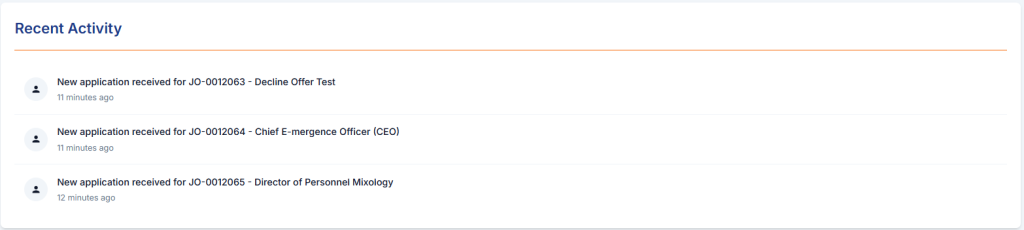
- What it is: A dynamic, streaming timeline located at the bottom of the dashboard that updates as events happen.
- Why it matters: Rather than manually refreshing lists to see if an interview was confirmed or a new resume came in, the feed surfaces it instantly.
- How to use it: Use it for quick mental context mid-day to catch immediate updates (like "No applications received today" or "New application received for NetSuite Consultant") without leaving your main page.
Module 2: The Job Posting Tab
The Job Posting workspace is where you manage the entire lifecycle of your company’s employment requisitions. Rather than dealing with disjointed job boards, this tab serves as a single pipeline management screen to draft, publish, search, and track every active or planned opening across your organization.
1. High-Level Summary & Pipeline Pipeline States
The top header of the Job Posting tab breaks your requisitions down into distinct functional states. This allows recruitment leads to instantly assess the current queue and distribution of open requisitions.
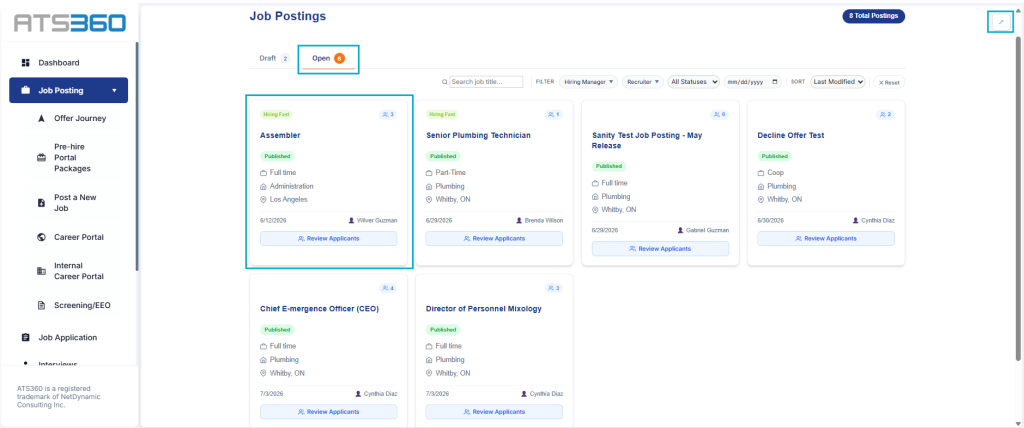
- Total Postings: The cumulative volume of all requisitions currently sitting in your ATS history. This is your master archive.
- Draft State: Requisitions that are currently work-in-progress. They may be undergoing description tweaks or awaiting executive headcount/budget approval. They are completely hidden from the public eye.
- Open State: Live, fully published job descriptions. These roles are actively synced to your career portals and are ready to accept candidate applications.
🎯 Why & How to Use It:
Use these status counts for resource allocation. For example, if you notice the Draft number creeping up significantly while Open roles are declining, it signals a bottleneck in your internal approval workflows rather than a sourcing issue.
2. Global Filters and Search Utility Bar
As your company scales, scrolling through a massive list of jobs becomes inefficient. The filter panel acts as a sorting mechanism so recruiters and hiring managers can isolate the exact subset of data they need.

- Keyword Search Box: Instantly filters job titles as you type. Use this to find specific roles or matching families (e.g., typing "NetSuite" immediately isolates all related consulting or engineering roles).
- Hiring Manager & Recruiter Dropdowns: Filters the master list down to individual portfolios.
- Date Filter Picker: Narrows down results based on when a requisition was created or last updated.
- Sorting Dropdown: Toggles how the list is organized (e.g., Last Modified, Newest First vs. Oldest First).
🎯 Why & How to Use It:
- The Recruiter’s Morning Routine: Set the Recruiter filter to your own name and sort by Last Modified, Newest First to instantly spot which of your positions have had recent updates or candidate movements.
- The Reset Feature (✕ Reset): If your list looks empty, a filter might still be active. Hit the reset button to instantly clear all parameters and return to the complete global view.
3. The Job Posting Card
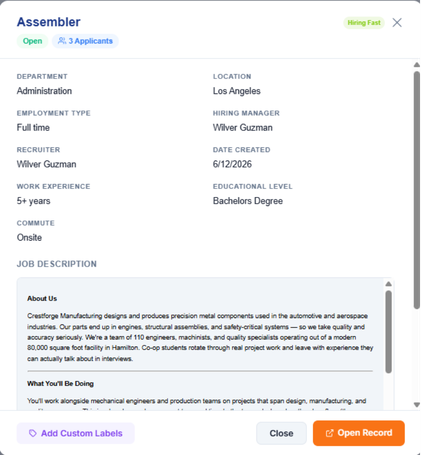
Every job posting is represented by a dedicated tracking card. These cards summarize critical metadata so you can evaluate a role's parameters without having to click open a detailed record.
Job Title & Employment Type: Clearly outlines the role name alongside its classification (e.g., Full time, Internship).
- Department / Team Mapping: Identifies which internal business unit owns the requisition (e.g., Assembly, IT).
- Location Tracking: Displays geographic placement (e.g., Mississauga Office, Default). This is critical because it dictates where the position maps on external geo-targeted job boards.
- Assigned Owner Indicator: Explicitly shows the user account managing the requisition. Unassigned roles are marked with a dash (—), indicating that a team lead needs to step in and assign ownership.
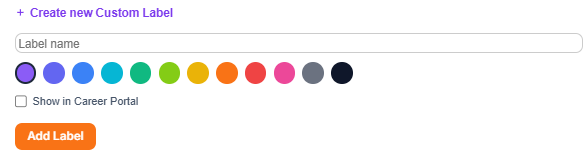
- Manage Custom Labels: Custom labels are visual tags or indicators that you can apply to your job postings. They help you categorize, filter, and draw attention to specific jobs based on your unique organizational needs. For example, on your current dashboard, the label "Hiring Fast" is used to highlight urgent openings.
🎯 Why & How to Use It:
Use the card layout for structural auditing. A quick glance down the list will immediately surface data gaps—such as an internship missing an assigned recruiter or a core role mapped to a "Default" location. Correcting these directly protects your job placement accuracy.
4. Next Steps & Quick Actions
- Launching a New job posting: When a department head requests a new hire, bypass the master list entirely by clicking the "Post a New Job" shortcut link in the left sidebar menu.
Module 2.1: Offer Journeys
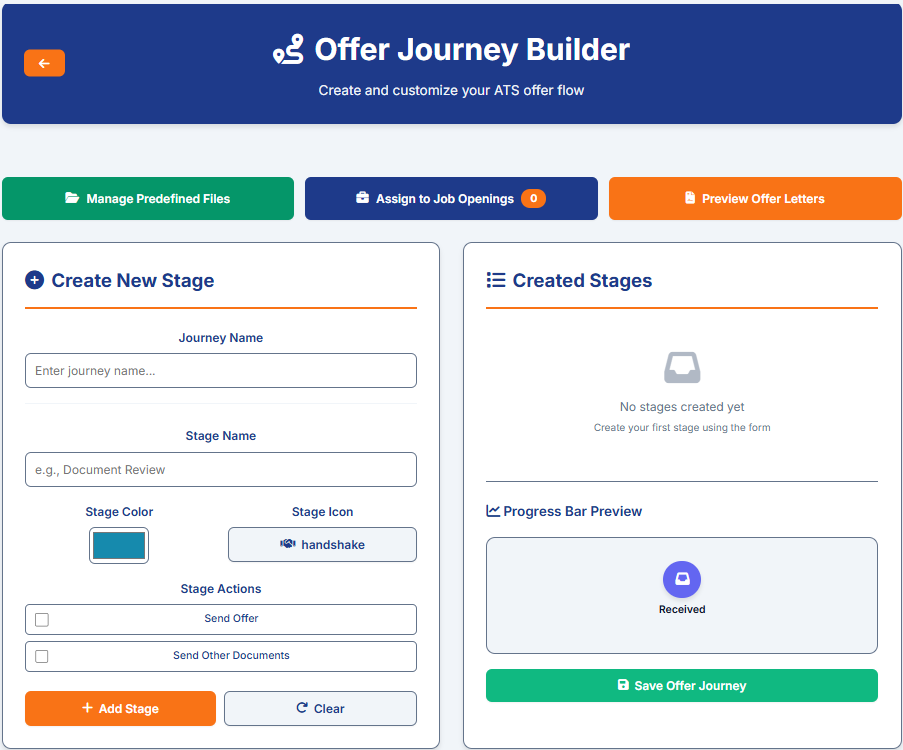
Once a candidate successfully clears the interview process, the transition from "applicant" to "new hire" requires clear, compliant, and structured communication. The Offer Journeys sub-tab is the blueprint editor where you build, customize, and manage your organization's formal onboarding and offer-letter pipelines before a candidate is officially pushed to your core payroll/HR system.
Instead of relying on disconnected email threads and manually attached PDFs, Offer Journeys digitize and automate the progression of paperwork, electronic signatures, and pre-hire compliance forms.
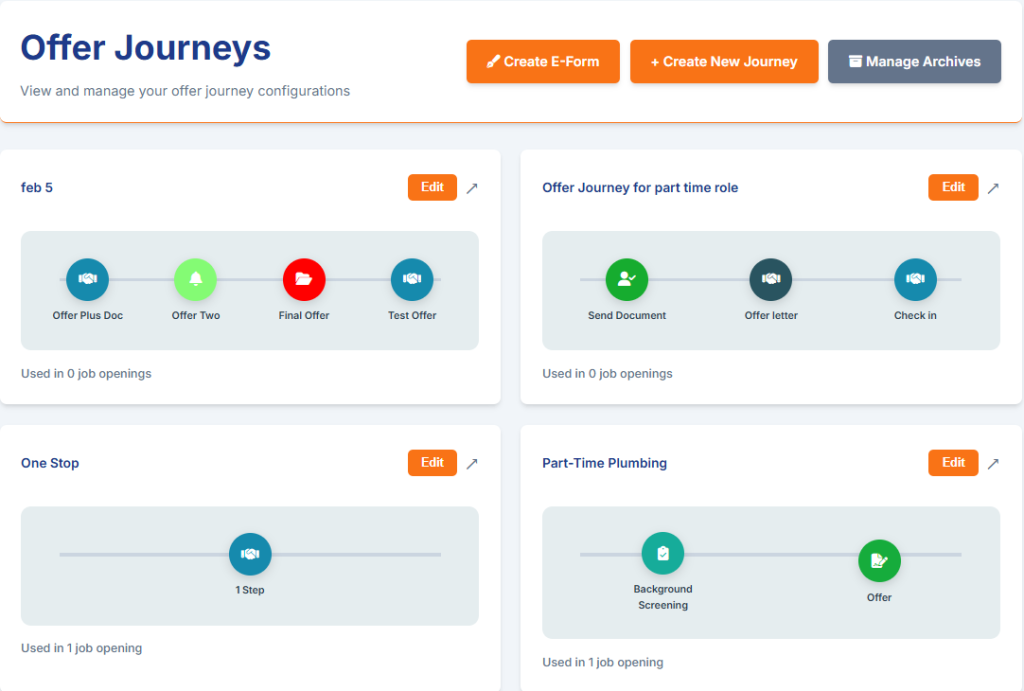
1. Digital Document Assembly & Templates
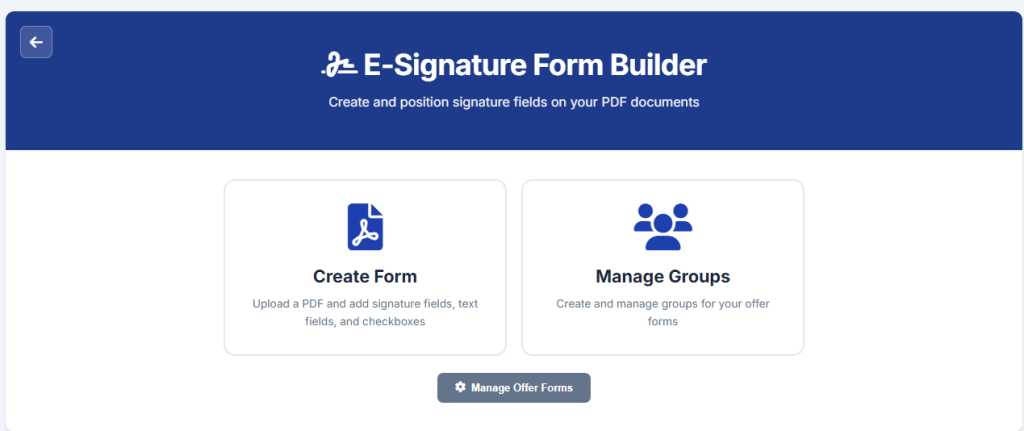
At the top right of the Offer Journey workspace, you have two primary administrative quick-actions:
- Create E-Form: This utility allows you to build interactive digital questionnaires (e.g., direct deposit authorizations, emergency contact forms, equipment preference checklists). Candidates can fill these out securely online rather than printing and scanning paper documents.
- Create New Journey: Click this to assemble an entirely new workflow sequence from scratch when introducing a new hire type or a new regional entity.
2. Journey Card
Every offer pipeline is managed via a dedicated visual workflow card. These cards map out the exact sequence of events a candidate experiences, keeping your operations fully transparent.
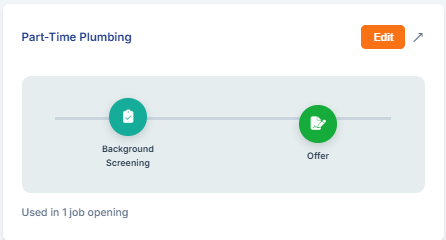
Each card surfaces three critical pieces of metadata:
- The Workflow Map: A visual timeline displaying the custom stages an offer must pass through (e.g., step 1, step 2, step 3). Different icons indicate what occurs at that stage—such as a Heart icon for cultural/welcome touchpoints, an ID Badge icon for background screening, or a Checkmark for formal contract signing.
- The Edit Trigger (Edit): Clicking this opens the sequence builder, allowing you to drag, drop, rename, or reorder the administrative steps required before day one.
- Utilization Counter (e.g., "Used in 6 job openings"****): An essential safeguard showing exactly how many live job requisitions are actively bound to this specific journey map.
3. Why & How to Use Offer Journeys
🎯 Standardizing the Candidate Experience (The "Why")
Different roles require entirely different hiring and legal guardrails. A standard retail associate might only need a basic offer letter and tax forms, whereas an executive or software engineer might require non-compete agreements, background checks, and hardware provisioning requests.
By defining distinct journeys, you guarantee that your recruitment team never forgets to send a critical legal document or policy sign-off.
⚙️ Operational Best Practices (The "How")
- Check the Utilization Counter Before Editing: Never modify a journey map without checking the "Used in X job openings" label. If a journey is actively tied to multiple open roles, altering a step will instantly change the onboarding experience for all candidates currently in that pipeline. If you need a variation, it is safer to create a new journey.
- Tailor by Location or Subsidiary: Because your company operates across different regions (such as your Mississauga Office), use separate journeys to dynamically serve region-specific legal disclosures or tax forms based on where the position is located.
- Keep Steps Lean: Avoid over-complicating the journey maps. Group small, related administrative forms into a single E-Form step rather than creating five separate sequential stages, reducing friction for your future employee.
Learn more about the Offer Journey
Module 2.2: Pre-hire Portal Packages (Add-On)
Once your Offer Journeys (Module 2.1) are established, you need a way to group your digital onboarding assets and deploy them cleanly to an incoming employee. The Pre-hire Portal Packages workspace is where you bundle offer workflows, custom orientation text, and required legal documentation into structured onboarding "kits."
Instead of treating background checks, policy handbooks, and direct deposit setups as independent emails, Packages roll them into a single, cohesive pre-hire experience.
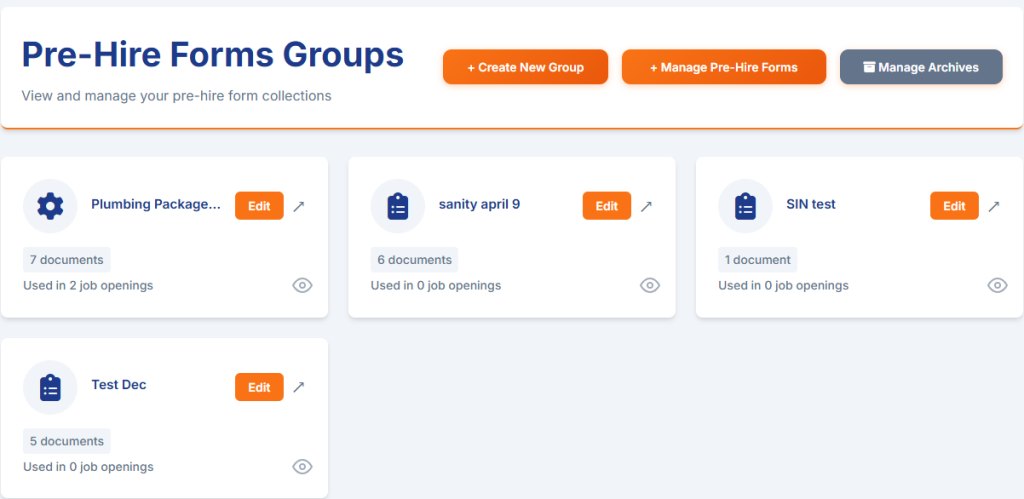
1. What is a Pre-hire Package?
A Pre-hire Package is an administrative container. Think of it as a digital folder prepared for a specific tier of employees. When a candidate accepts a verbal offer, a recruiter assigns them a pre-configured Package.
This package automatically triggers what the candidate sees when they log into their private Pre-hire Portal, guiding them step-by-step from contract signature to Day One preparation.
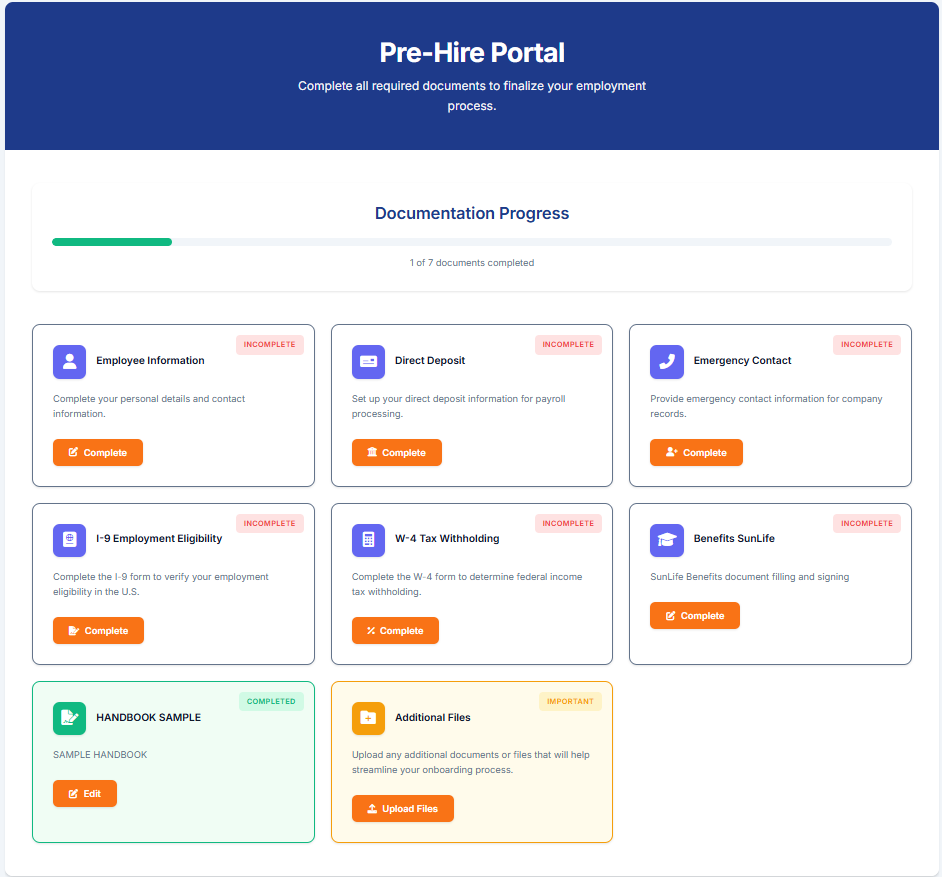
Learn more about the Pre-hire Portal Pro
2. Core Components of a Package Builder
When building or modifying an onboarding package within ATS360™, you configure four essential areas:
📑 Package Details & Metadata
- Package Name: The internal naming convention used to identify the asset bundle (e.g., US Executive Package, Ontario Hourly Onboarding).
✍️ Portal Welcome Content
- Welcome Message: A rich-text field where you draft the opening greeting candidates see upon their first login.
- Instructions & Guidance: Clear, step-by-step text telling the future hire what documents they need to gather (e.g., void checks, government identification) before starting the digital forms.
🗂️ Document Packets
- Standard Templates: Upload or link standard, non-interactive company documents such as employee handbooks, code of conduct policies, or parking maps.
- Interactive E-Forms: Attach the specific digital documents that require data input and or signature from the user.
3. Why & How to Use Packages
🎯 Eliminating Manual Preparation
Without packages, a recruiter must manually assemble every new-hire email, often forgetting region-specific forms or attaching outdated versions of the company policy manual. Packages standardize this entirely. Once an admin updates the company handbook inside a master Package, every future hire automatically receives the newest version.
⚙️ Operational Best Practices
- Role-Based Bundling: Create packages based on employment tracks rather than individual jobs. For example, design an Internship Package, a Standard Salaried Package, and a Remote-Worker Package. This keeps your package inventory clean and highly reusable.
- Review Content Periodically: Because the Welcome Content supports rich text, embed helpful external links (like office location maps, dress code boards, or introductory team videos) to build excitement before day one.
- Coordinate with HR/Payroll: Ensure the E-forms tied to your packages match the exact field requirements of your primary payroll system, minimizing manual data re-entry once the candidate transitions from "Pre-hire" to active employee status.
Module 2.3: Creating and Posting a New Job
The Post a New Job workspace is the intake engine of the ATS360™ platform. Embedded directly within NetSuite, this module ensures that every newly created position instantly links to your headcount budgets, corporate structures, legal subsidiaries, and compliance parameters.
When you launch this workspace, the system initializes a DRAFT record, allowing you to build out your target requirements completely before publishing the role to the public.
1. Section-by-Section Form
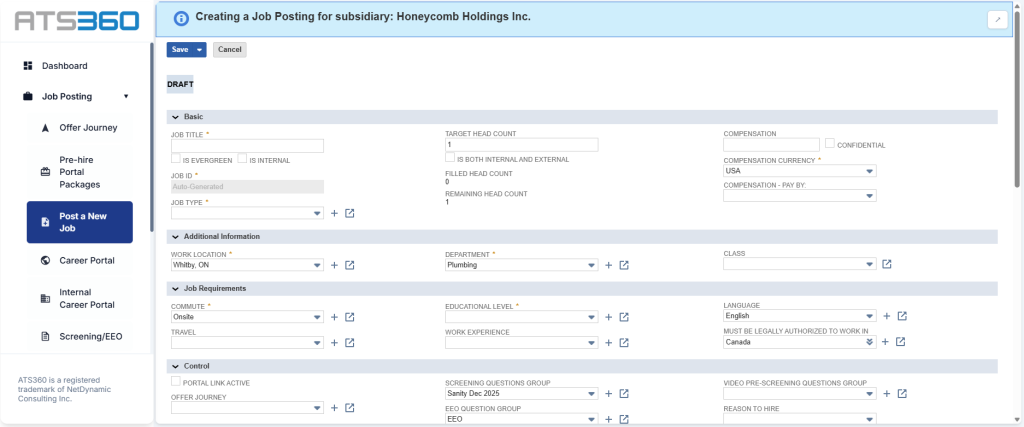
📁 Basic Information
This section establishes the core tracking data and structural identity of the position.
- Job Title: The formal title displayed on your internal and external job boards.
- Is Internal (Checkbox): Toggling this flag restricts visibility, ensuring the position only publishes to your internal employee career portal rather than public channels.
- Job ID: Automatically generated by NetSuite to ensure system-wide tracking integrity.
- Job Type: A mandatory classification defining the nature of the employment contract (e.g., Full Time, Part Time, Internship).
- Headcount Trackers (Target / Filled / Remaining): Active accounting controls linked directly to your organization's hiring budget. Setting a Target Headcount of 1 caps the requisition, automatically closing the job card once a candidate successfully reaches an active hire state.
- Compensation Fields: Sets the numeric pay scale, currency denominations (defaulted to USA), and frequency (Pay By). Toggling the Confidential checkbox hides these data points from public job boards while preserving them on the backend for equity auditing.
📍 Additional Information
These dropdown menus link the job card directly to your primary NetSuite accounting segments.
- Work Location: Assigns the physical or geographic headquarters for the position (defaulted to Default, but customizable to specific offices like your Mississauga Office).
- Department: Maps the role to its specific corporate business unit (e.g., IT, Assembly).
- Class: Provides secondary structural categorization for advanced ledger reporting.
🎓 Job Requirements
This section acts as the automated gatekeeper, mapping out applicant criteria.
- Commute: Explicitly defines structural expectations (e.g., Onsite, Hybrid, Remote).
- Travel: Anticipated travel percentages or expectations.
- Educational Level & Work Experience: Establishes the core screening thresholds for candidate mapping.
- Language & Legal Authorization: Sets explicit geographic guardrails (defaulted to Language: English and Must be legally authorized to work in: United States).
⚙️ Control & Advanced Configurations
This section binds your job posting to the automated recruitment assets built in previous modules.
- Portal Link Active (Checkbox): The master toggle. Checking this box officially pushes the job live to external portals once saved.
- Offer Journey: Binds this job card to a specific offer sequence built in [Module 2.1](Module 2.1: Offer Journeys) (e.g., automated background checks or legal contracts).
- Screening & EEO Question Groups: Attaches custom pre-screening questionnaire forms that candidates must fill out during the application process.
- Enable Pre-Screening Videos: Enables advanced asynchronous video interview prompts directly within the application pipeline, linked to a specific Video Pre-Screening Questions Group.
- Reason for Closed Opening: Administrative tracking field used when spinning down a role.
📅 Milestone Dates
- Open/Published Date: Tracks exactly when the position went live to capture clean time-to-fill metrics.
- Target Hire Date: Establishes the project timeline (defaulting automatically to a standard target window, such as a 30-day corporate window like 6/24/2026).
- Closed / Actual Hire Date: Populated automatically by the system upon requisition completion.
👥 Hiring Staff Allocation
This critical block designates system permissions and notification mapping for the entire hiring committee.
- Hiring Manager & Recruiter: Establishes the core owners who hold ultimate approval and viewing rights over incoming applications (defaulted to the creator, e.g., Cynthia Diaz).
- Approval Group: Maps the requisition to an internal executive sign-off sequence if budget approvals are required.
- Hiring Managers Grouped & ATS Multi-Recruiter: Multi-select panels that allow you to add cross-functional team members, interview panelists, or secondary recruiters (such as Adam Durrani, Matthew Gardiner, or Scott Lee) to the role's viewing group without transferring primary ownership.
2. Dynamic Workflow Sub-Tabs (Lower Panel)

Beyond the main fields, the lower workspace houses several operational tables that expand as the job progresses:
- Job Applications: A live grid showing every applicant who has thrown their hat in the ring for this specific role, including their source, ranking, and AI Match Score.
- Job Posting Description: Features a rich-text editor where you can paste the public-facing description or pull from a pre-configured Description Template.
- Files & Notes: Secure repositories to attach internal alignment documentation, intake meeting notes, or specific recruiter logs.
- System Tab: Tracks technical configurations, including custom forms (e.g., ATS Job Posting Preferred), expiration statuses, and options like Enable AI Match Notification.
- Career Portal & Job Board: Tracks the exact live URLs generated for this posting and monitors active ATS Campaigns pushed out to external job boards.
3. Why & How to Use the Posting Engine
🎯 Data Continuity & System Safety
Building your jobs directly inside this architecture ensures complete data alignment. Because the form pulls its dropdowns directly from your live NetSuite database, it eliminates typographical errors, prevents unmapped headcount spending, and automates compliance checking before a candidate ever submits a resume.
⚙️ Operational Best Practices
- Leverage the Draft State Safely: Utilize the Draft status to collaborate with department heads. You can populate the basic fields, assign the hiring manager, and save the record without fear of it publishing prematurely to external job boards.
- Always Bind the Journey Early: Ensure you select your Offer Journey and Pre-Hire Portal Forms Groups during the creation stage. Binds made at creation guarantee that when a fast-moving candidate reaches the final stages, their onboarding packages deploy seamlessly without administrative delays.
- Audit the Remaining Headcount: If a team reports that a job isn't accepting new applications, verify the Remaining Headcount field. If a placement was previously made and the counter hit 0, the ATS safety guardrails will automatically spin down active portal links to prevent over-hiring.
Module 2.4 & 2.5: Career Portals (External vs. Internal)
The Career Portal and Internal Career Portal workspaces function as the public-facing storefronts of your recruitment engine. While previous modules focused on backend compliance, data mapping, and requisition drafting, these portal modules dictate how your vacancies are visualised, searched, and applied to by live candidates.
ATS360™ automatically separates these into two distinct streams to protect internal mobility workflows while maintaining an optimized external employer brand.
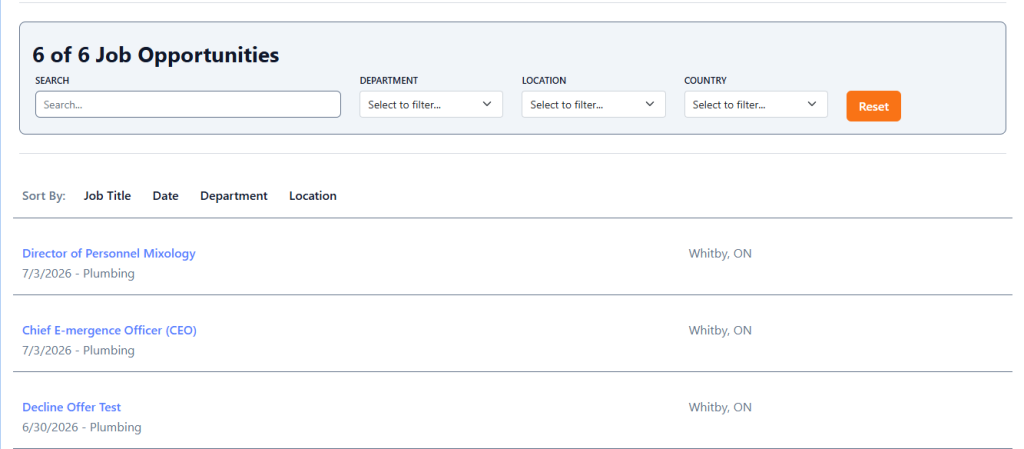
1. Module 2.4: The External Career Portal
The external portal is your public talent acquisition landing page. It dynamically pulls live positions from your NetSuite ledger—such as your active Senior NetSuite Consultant or Technical Solutions Specialist roles—the absolute moment the Portal Link Active toggle is checked on a requisition.
🔍 Candidate Search & Core Architecture
To prevent applicant drop-off, the portal utilizes an instantaneous, multi-layered search matrix:
- Global Search Input: A live-text filtering bar allowing applicants to type keywords, skill sets, or specific terms (e.g., searching "NetSuite" instantly isolates matching tiers).
- Segmented Filter Dropdowns:
- Department: Dynamically aggregates active departments (e.g., Service, Assembly, IT, Marketing).
- Location: Groups openings by their geographic physical office location (e.g., filtering for your Mississauga Office vs. New York).
- Country: Allows high-level global screening parameters (such as filtering exclusively for Canada positions).
- Reset Trigger ([Reset]): A single-click utility that instantly clears all search metrics, returning the applicant to the master vacancy list.
- Sort Layout Bar: Allows candidates to quickly rearrange postings by Job Title, Date, Department, or Location.
🎣 The Passive Sourcing Net ("Can't Find What You're Looking For?")
A critical feature embedded at the baseline of the external portal is the general intake channel. If a highly qualified professional visits your page but doesn't see an open vacancy matching their precise skill set, they can click "Share Your Resume" or use the general application link.
- The "Why": This ensures you never lose premium talent due to timing. It funnels their resume directly into your general talent bank for future sourcing.
2. Module 2.5: The Internal Career Portal
The internal portal looks and behaves identically to the external grid, but it is strictly sandboxed for your current employee network. A role only populates here if the Is Internal safety flag is checked during the creation process in Module 2.3
🎯 Key Strategic Variations:
- Privacy Controls: External search engines (like Google or Indeed) cannot index these listings.
- Tailored Application Paths: Internal applications bypass basic screening questions (like right-to-work verifications or language baselines) since the company already possesses this documentation, creating a friction-free internal transfer experience.
- Career Growth Opportunities: Gives current employees a dedicated internal portal to seamlessly browse and apply for upward or lateral roles within the organization.
3. Why & How to Manage the Portals
🎯 Branding and Candidate Experience
Candidates expect an instantaneous, bug-free application process. By using a portal that lives natively inside your NetSuite ecosystem, there are zero delays or sync errors between your database and your public site. If your recruiting team fills a vacancy and the headcount tracker rolls to zero, the job instantly vanishes from the public list, eliminating dead listings and protecting your employer brand reputation.
⚙️ Operational Best Practices
- Audit Location Mapping Regularly: Ensure your backend requisitions don't stay marked as "Default" locations. When candidates filter by specific locations like the Mississauga Office, roles labeled "Default" will be omitted from their search results, cutting off your local applicant pipeline.
- Promote Social Sharing Links: Utilize the social media integration vectors located at the footer of the portal layout. Recruiters can harvest clean, direct links from these buttons to push tracking-compliant vacancy links directly out to LinkedIn, Twitter, or Facebook.
- Leverage the Passive Pool First: Before spending corporate budget to boost a new listing on third-party job boards, have your recruiting team mine the entries submitted through the "Can't Find What You're Looking For?" general portal link. This acts as a completely free, warm talent network.
Module 2.6: Question Groups (Questions Manager)
The Question Groups module—managed via the Questions Manager workspace—acts as the automated gatekeeper for your recruitment funnel. Instead of manually reviewing every resume to find basic disqualifiers or compliance mismatches, this workspace allows you to build structured, reusable sets of screening questions.
These question sets are embedded directly into your External and Internal Career Portals and can be tied directly to a requisition during the Job Creation Phase: Post a new job.
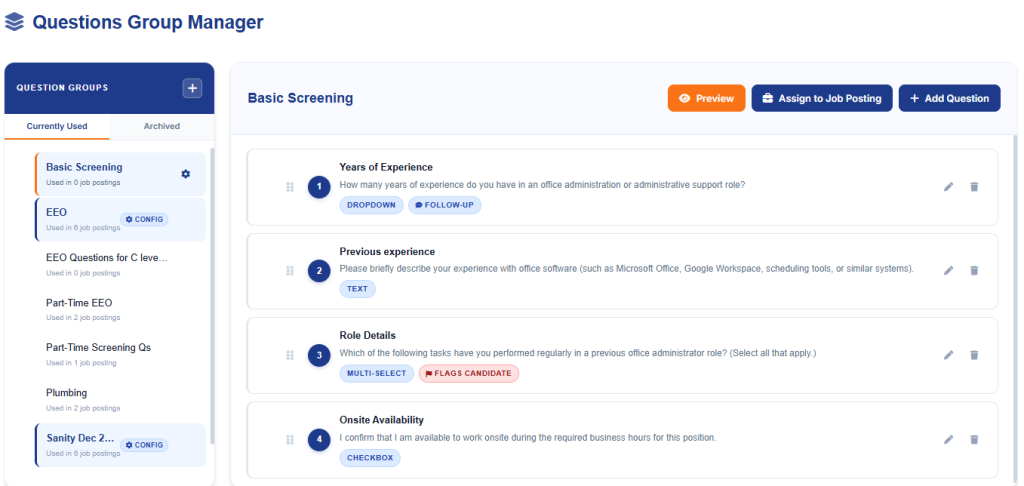
1. Workspace Anatomy & Inventory
The Questions Manager workspace is split into a dual-pane layout designed for quick administrative access:
📁 Left Pane: The Group Repository
This sidebar tracks your entire inventory of questionnaire assets, broken into two operational lifecycle tabs:
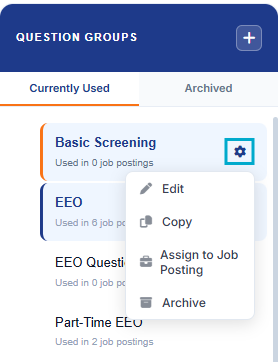
- Currently Used: Active question sets that are available to be attached to live requisitions. Each listing features an explicit utilization counter (e.g., Used in 2 job postings or Used in 0 job postings) alongside a **Settings Gear (**Milan ) to modify group properties.
- Archived: Legacy or seasonal question sets that are hidden from recruiters drafting new roles but preserved for historical applicant data compliance.
- Add Group Button (+): Located at the top right of the panel to spin up a blank questionnaire container.
📄 Right Pane: The Question Builder Grid
Selecting any group from the left pane loads its contents on the right.
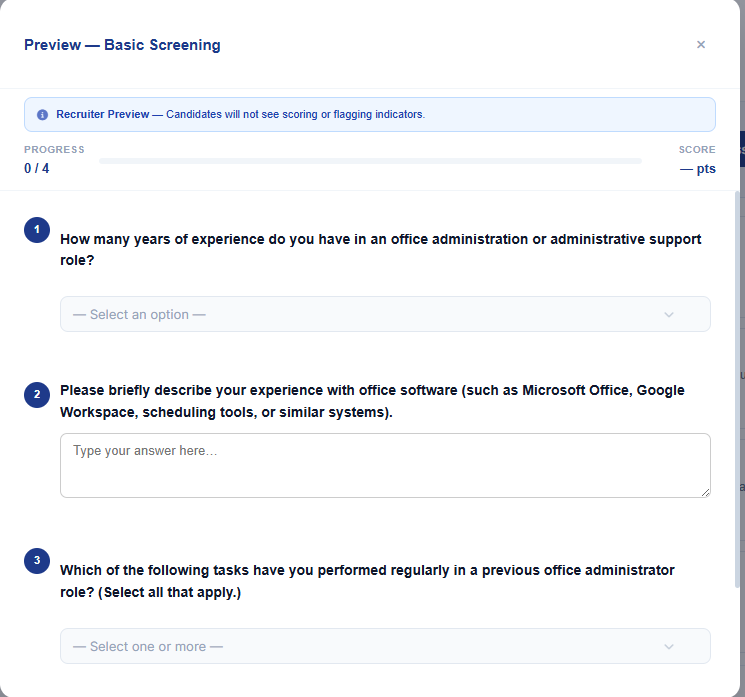
- Preview Button ( Preview): Displays the questionnaire exactly as a live applicant will see it on the career portal.
- Add Question Button (+ Add Question): Opens the configuration window to input a new screening prompt.
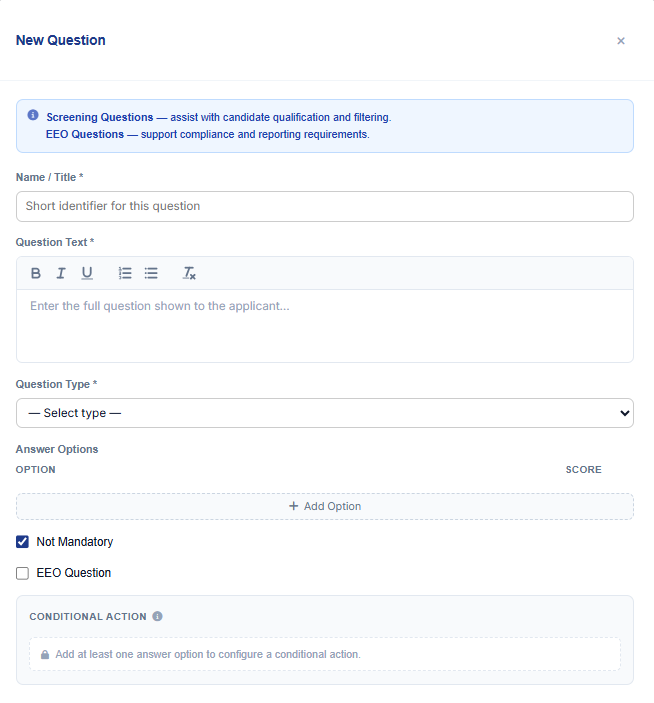
2. Core Question Types & Logic
When you click + Add Question, the ATS360™ engine allows you to build multi-dimensional screening forms using various input styles:
- Radio Buttons / Multiple Choice: Ideal for absolute, binary disqualifiers (e.g., "Are you legally authorized to work in Canada?" or "Do you possess a valid driver's license?").
- Checkbox Lists: Used for multi-skill inventories (e.g., "Select the NetSuite modules you have actively implemented").
- Text Paragraphs / Short Answer: Used for qualitative insights before committing to a phone screen (e.g., "Briefly describe your experience leading a data migration project").
3. Why & How to Use Question Groups
🎯 Protecting Recruiter Capacity
If a high-volume position receives hundreds of applications, manually screening each resume for core criteria wastes hours. By configuring mandatory Question Groups, the system filters out non-viable candidates at the exact moment of application. If a candidate answers "No" to a critical requirement (like mandatory hybrid availability at your Mississauga Office), the system can flag or auto-disposition the candidate, keeping your active screening queue clean.
⚙️ Operational Best Practices
- Check Utilization Counters Before Editing: Before clicking the settings wheel to modify an existing set like Basic Screening, verify its usage label. If it reads Used in 2 job postings, saving an edit will instantly alter the application form for those active live roles. If you need to make changes for a new role, click + to build a clean set instead.
- Isolate EEO Data Safely: Keep your Equal Employment Opportunity (EEO) questions inside a dedicated block like your EEO Question Set 1. This isolates sensitive compliance data from standard hiring manager review panels, ensuring fair and unbiased hiring practices.
- Keep Portals Lean: Avoid candidate fatigue. A questionnaire should take less than 3–5 minutes to complete. Use structured multiple-choice questions for the initial application stage, and save complex text essay prompts for the later Interviews phase.
Module 3: Job Applications
The Job Application module is the primary processing hub for your recruiting team. While previous modules focused on setting up the structural framework of a job, this workspace is where recruiters interact with live talent pipelines. It aggregates candidate resumes, system communication, test scores, and AI evaluation metrics into a single unified record within NetSuite.
Instead of managing applicants across separate email inboxes or external tracking sheets, this tab serves as an interactive pipeline matrix to screen, rank, and move candidates toward an offer.
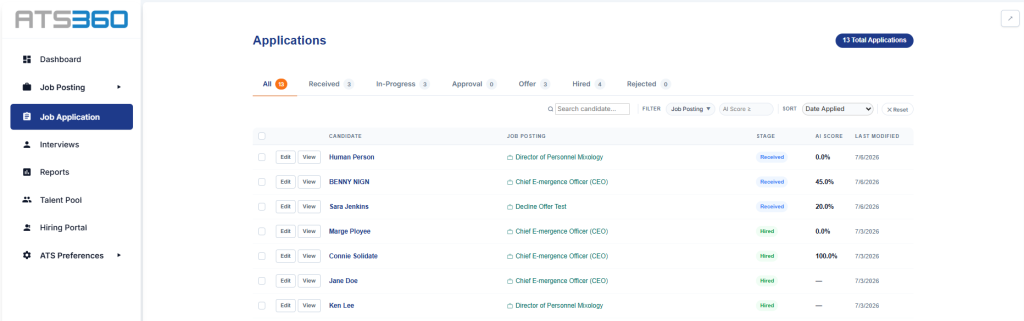
1. The Global Application Pipeline Matrix
When you open the Job Application menu, you are presented with a master processing grid that standardizes how candidate files are sorted and audited.
🔍 Advanced Searching & Target Filtering
To efficiently manage thousands of candidate records across various business units, the application grid features a top-tier filtering utility bar:
- Keyword Search Input: Instantly searches candidate names, email addresses, or previous company text fields.
- Job Posting & Subsidiary Dropdowns: Isolates applicants tied to specific open requisitions (such as your active Senior NetSuite Consultant role) or specific corporate entities.
- Hiring Manager & Recruiter Assignees: Allows individual recruiters to filter out external volume and display only the candidates assigned directly to their active portfolio.
- The Global Status Picker: Filters candidates by their precise stage in the hiring lifecycle (e.g., New, Screening, Interviewing, Offered, Rejected, Archived).
2. Applicant Record Card
Clicking on any individual candidate row opens their comprehensive file. The application file is divided into clear operational segments:
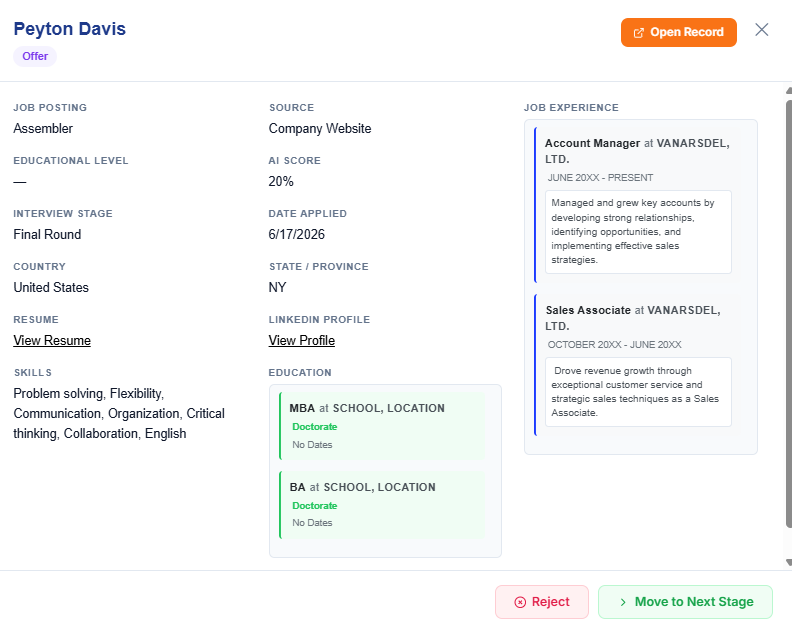
👤 Profile Summary & High-Level Metadata
- Candidate Contact & Sourcing Channels: Tracks the applicant’s core contact details alongside their origin point (e.g., Organic Career Portal, LinkedIn Campaign, Internal Transfer).
- AI Match Score: An advanced algorithmic ranking indicator. The ATS360™ engine cross-references the text within the candidate's resume against the core requirements set in [Module 2.3: Creating and Posting a New Job](Module 2.3: Creating and Posting a New Job), producing a percentage match score to help recruiters prioritize top-tier candidates instantly.
🗂️ Workflow Sub-Tabs (Lower Panel)
The lower panel organizes the candidate's historical interaction data into focused tabs:
- Resume & Files: Houses the original PDF or Word resume document, automatically rendering a viewable preview directly within NetSuite so recruiters don't have to download external files.
- Questionnaire Answers: Displays the candidate’s exact responses to the mandatory forms built in Module 2.6: Question Groups, such as their answers to your Multi screening or EEO sets.
- Internal Team Notes: A secure space for the hiring committee to tag teammates, leave feedback, and log screening impressions without sharing comments with the candidate.
3. Why & How to Manage Job Applications
🎯 Maintaining Velocity and Compliance
The longer a top-tier applicant sits in an unread state, the higher the likelihood they drop out of your pipeline. Managing applications natively within NetSuite ensures that your candidate information remains secure, compliant with local privacy standards, and instantly convertible into an official employee record without manual copy-pasting.
⚙️ Operational Best Practices
- Target "Inbox Zero" via Pending Reviews: Use the main dashboard's Pending Reviews card as a shortcut to this grid. Filter by the status New, and aim to advance or reject these candidates within 48 hours of submission to maintain momentum.
- Trust but Verify the AI Match Score: Use the AI Match Score to bubble high-potential talent to the top of your review list, but always cross-reference their Questionnaire Answers tab to verify critical, non-negotiable compliance items (like legal right-to-work authorizations).
- Log Status Transitions Cleanly: When moving a candidate from Screening to Interviewing, ensure you update the status drop-down immediately. This triggers real-time data updates across your main dashboard metrics and updates the hiring manager's private portal views.
Module 4: Interviews
The Interviews module serves as the logistical coordinator for your evaluation pipeline. Once candidates are successfully screened and advanced within theJob Applications Dashboard, this workspace centralizes calendar scheduling, interviewer assignments, and standardized evaluation scorecards directly inside NetSuite.
Instead of managing feedback across scattered emails or external calendar invites, this tab creates a single system of record for every hiring committee interaction.
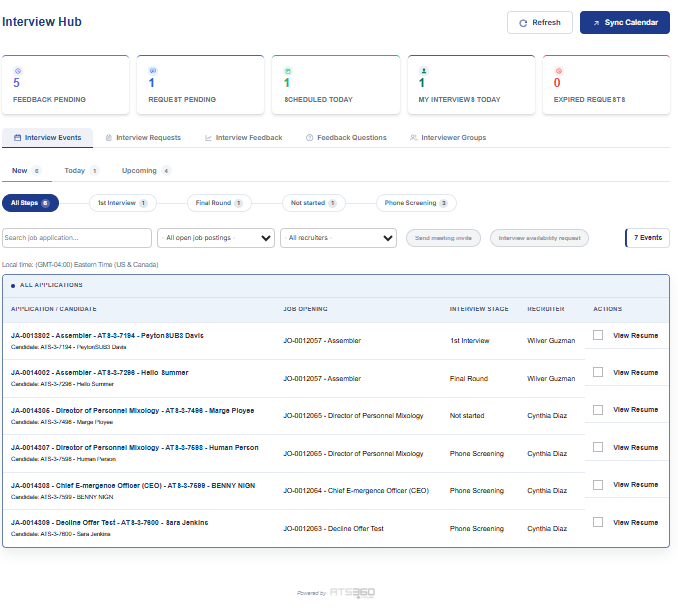
1. Core Functions of the Interview Workspace
When a recruiter transitions an applicant to the Interviewing stage, this module triggers three key actions:
📅 Calendar Coordination & Scheduling
- Panel Configuration: Allows recruiters to select specific dates, times, and time zones for candidate meetings.
- Hiring Staff Synchronization: Pulls directly from the Hiring Staff Allocation field configured during the Job Creation Phase. It maps invitations cleanly to assigned Recruiters, Hiring Managers, or cross-functional stakeholders.
📝 Evaluation Scorecards & Feedback Forms
- Standardized Matrices: Rather than allowing vague, unstructured feedback (e.g., "I liked their energy"), this panel lets you attach explicit scorecards matching the core competencies of the job description.
- Centralized Logging: Interviewers receive a direct submission link where they can rank candidate responses, submit technical evaluation notes, and log their final Hire / No Hire recommendation.
🔄 Real-Time Pipeline Integration
- Once feedback is submitted, the candidate's core profile is dynamically updated. Score summaries and interviewer notes pipe directly back to the main [Job Application](Module 3: job applications) workspace, allowing the primary recruiter to review collective team sentiment at a glance.
2. Why & How to Manage Interviews
🎯 Removing Bias and Accelerating Decisions
Interview bottlenecks frequently occur when hiring managers delay submitting feedback or use inconsistent evaluation criteria. Standardizing the interview process through this module ensures that every interviewer assesses talent against identical rubrics. Storing this information directly inside NetSuite protects the business from compliance risks by providing a clear, auditable trail of why hiring decisions were made.
⚙️ Operational Best Practices
- Pre-Assign Panelists Early: Don't wait until the candidate reaches the interview stage to pick your panel. Utilize the multi-select grids during requisition creation to pre-allocate your interviewers, ensuring they automatically inherit viewing rights to the candidate’s resume.
- Enforce a 24-Hour Feedback Rule: Instruct your hiring committee to log their evaluation scorecards within 24 hours of finishing the conversation. This keeps pipeline velocity high and prevents critical candidate details from being forgotten.
- Review Scorecards Collectively: Before scheduling a final round or routing an offer journey, use the aggregated score summaries to check for alignment across your panelists. If scores fluctuate wildly between technical and cultural interviewers, utilize the Internal Team Notes section to coordinate an alignment sync.
Learn more about the Interview Hub
Learn more about Booking Interviews
Module 5: Reports (Recruitment Analytics)
The Reports workspace serves as the business intelligence engine of the ATS360™ platform. While earlier modules focused on executing daily recruiting tasks, this dashboard aggregates systemic data points directly from your live NetSuite ledger to map team performance, identify pipeline bottlenecks, and analyze sourcing ROI.
Instead of exporting data to build manual spreadsheets, recruiters and executive leadership can utilize these real-time visual cards to drive data-backed hiring strategies.
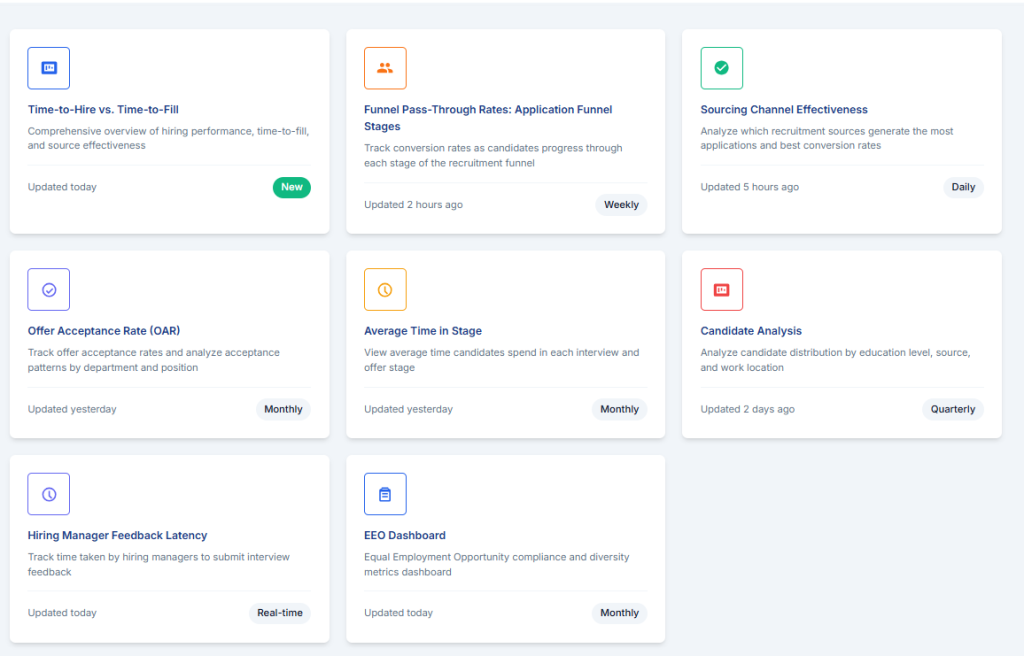
1. The Global Analytics Panel
The reporting interface uses a modern, card-based configuration where each block acts as an analytical application. Clicking any individual tile instantly populates visual charts and underlying data tables in the lower workspace panel.
🔍 Global Report Filters
To let you manipulate complex recruiting sets instantly, the top-right toolbar provides universal segmentation tools:

- Date Range Filter: Quickly shifts parameters across historical benchmarks (e.g., Last Month, Last Quarter, This Year, Last Year).
- Department Filter: Narrows the analytic metrics down to specific business units (e.g., IT, Assembly, Marketing, Service).
2. Core Report Catalog Broken Down
The dashboard surfaces eight core operational reports, categorized by their updating frequency and strategic intent:
⏱️ Operational Velocity Metrics
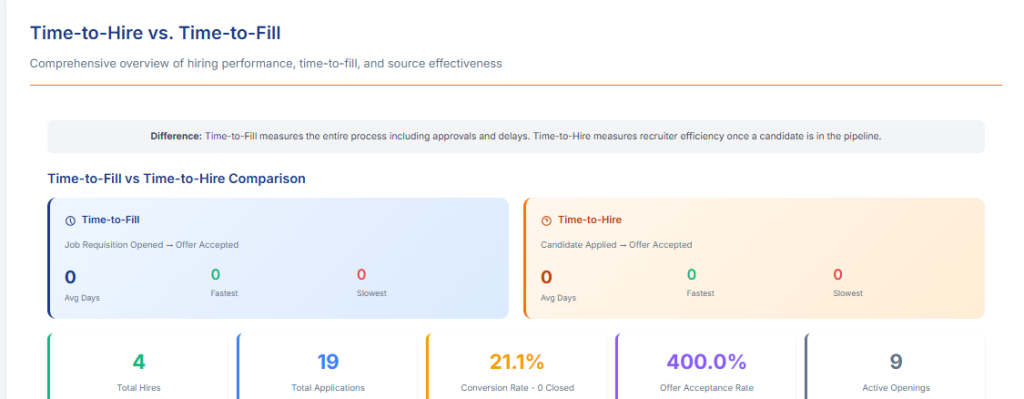
- Time-to-Hire vs. Time-to-Fill (Updated Today): * What it measures: The exact calendar days spanning from when a requisition is published to when a candidate officially signs an offer (Time-to-Fill) vs. the days from when an applicant enters the pipeline to when they accept (Time-to-Hire).
- Average Time in Stage (Updated Yesterday):
- What it measures: Tracks the chronological friction of your pipeline by measuring the average duration an applicant sits in a specific status (e.g., Screening vs. Interviewing).
- Why it matters: This exposes process stagnation points, pointing out exactly where candidate velocity drops.
- Hiring Manager Feedback Latency (Real-time):
- What it measures: Tracks the precise hours or days it takes for interviewers to log their evaluation scorecards after a meeting concludes.
- Why it matters: This is your primary tool for internal accountability. It provides objective data to show which department heads are causing candidate drop-off due to slow follow-ups.
📈 Funnel & Conversion Analytics
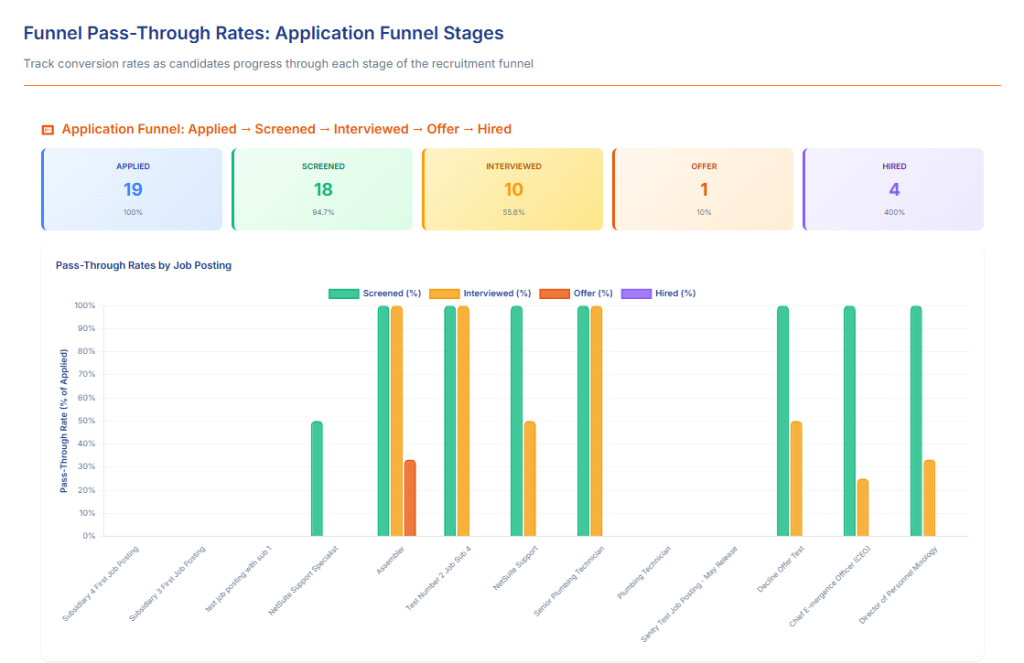
- Funnel Pass-Through Rates: Application Funnel Stages (Updated Weekly):
- What it measures: The percentage of candidates that successfully advance from step to step (e.g., New $\rightarrow$ Screening $\rightarrow$ Interviewing $\rightarrow$ Offer).
- Why it matters: Identifies structural issues in your selection process. For example, if 95% of candidates fail the phone screen, your job description requirements may be misaligned with market realities.
- Offer Acceptance Rate - OAR (Updated Yesterday):
- What it measures: The percentage of formal offers extended that are successfully accepted by candidates.
- Why it matters: Measures the competitiveness of your compensation, benefit tiers, and overall corporate reputation.
💰 Sourcing & Diversity Auditing
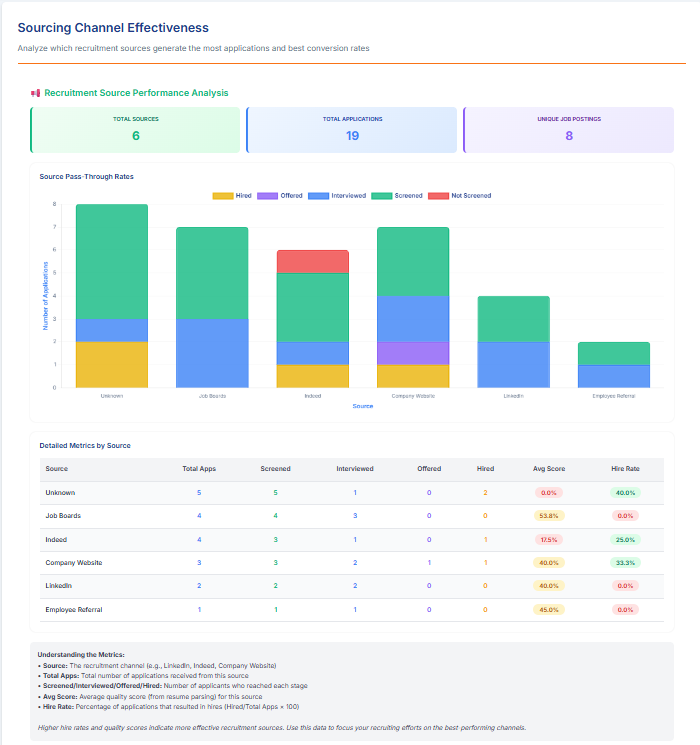
- Sourcing Channel Effectiveness (Updated 5 hours ago):
- What it measures: Calculates which talent platforms (e.g., Organic Portal, LinkedIn Campaigns, Indeed) yield the highest volume of qualified hires, rather than just raw application volume.
- Why it matters: Dictates where your corporate advertising budget should be spent to maximize sourcing ROI.
- Candidate Analysis (Updated 2 days ago):
- What it measures: Breaks down applicant demographics, education levels, and geographic locations.
- EEO Dashboard (Updated Today):
- What it measures: Aggregates Equal Employment Opportunity data securely to ensure organizational compliance and track diversity metrics across departments.
3. Why & How to Leverage Recruitment Analytics
🎯 Proactive Hiring vs. Reactive Firefighting
Without unified reporting, recruiting teams operate blindly—focusing solely on current open seats. Accessing analytics natively inside NetSuite transforms recruitment into a predictable, strategic asset. Leadership can utilize historical time-to-fill averages to accurately forecast exactly when a requisition must be opened to meet next quarter's headcount targets.
⚙️ Operational Best Practices
- Address Feedback Latency Directly: Check the Hiring Manager Feedback Latency report weekly. If a specific department's time-to-hire is climbing, use this data to show their leadership team how delayed interview scorecards directly impact their ability to secure top-tier candidates.
- Optimize Ad Budgets with Sourcing Data: Before automatically renewing expensive global job board subscriptions, run the Sourcing Channel Effectiveness report. If a specific channel produces 80% of your raw applications but 0% of your actual hires, reallocate that budget to your top-performing conversion sources.
- Set Scheduled Review Cadences: Align your reporting reviews with the update frequencies built into the dashboard cards:
- Daily/Real-time: Check Feedback Latency to clear out immediate process bottlenecks.
- Weekly: Check Pass-Through Rates to monitor active campaign pipelines.
- Monthly/Quarterly: Analyze Time-to-Fill and OAR patterns for executive board reporting.
Module 6: Talent Pool & AI Search
The Talent Pool workspace serves as your internal human capital database and passive candidate CRM. While the Job Applications module focuses on managing candidates actively moving through a single live requisition's interview sequence, the Talent Pool looks at your entire historical database. It houses all past applicants, "silver medalists" (high-quality runners-up), active contractors, and prospective talent profiles across the organization.
Instead of paying to post a new job campaign every time a position opens, recruiters use this module to instantly mine existing, warm profiles already familiar with your employer brand.
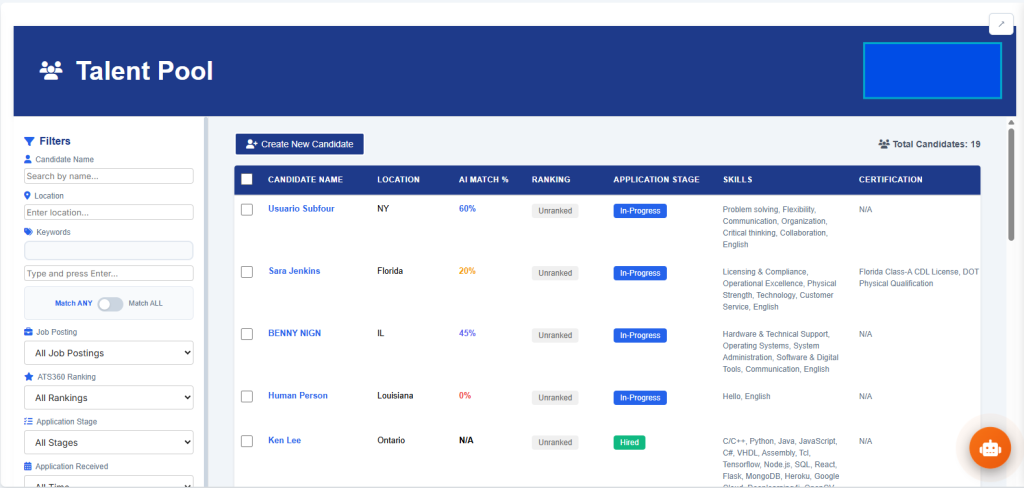
1. Advanced Search Matrix & Filters
To help you navigate your entire database of 145 Total Candidates, the workspace features a granular filtering panel designed to isolate premium profiles without manual scrolling:
-
Candidate Name & Location Search: Quick text input bars to instantly find individuals or geographically isolate talent (e.g., searching for candidates specifically located in Ontario, New York, or Florida).
-
Keyword Matching Logic Toggle: * Match ANY: Expands results to surface profiles containing any entered skill terms (ideal for broad sourcing sweeps).
- Match ALL: Narrows results strictly to profiles that possess every single specified keyword (ideal for highly technical niche roles).
-
Job Posting Filter: Filters candidates based on the historical requisition they originally applied to (e.g., filtering exclusively for past applicants of your NetSuite Consultant or QA Support Intern roles).
-
Application Stage & Received Filters: Filters talent by their current macro-status (e.g., In-Progress, Received, Rejected, Hired) or by when they entered your ecosystem (ranging from Today to All Time).
-
Reset Filters Button ([ Reset Filters]): Instantly wipes all active parameters to restore the master talent list.
Learn more about the Talent Pool
2. The Interactive Candidate Sourcing Ledger
The center face of the workspace displays candidates in an active data matrix, exposing critical screening data points at a glance:
| Field | Purpose & Operational Value |
|---|---|
| Candidate Name | Hyperlinked directly to their master file profile to review historical notes, phone logs, and application history. |
| AI Match % | A real-time algorithmic suitability score matching their background text against your requirements (e.g., profiles ranging from a strong 85% match down to a lower 20% match). |
| Skills & Certifications | Automatically parses and surfaces specific structural competencies directly on the dashboard row (e.g., listing tech stacks like React, Node.js, Docker or professional credentials like AWS Certified Developer or Google Ads Certified). |
| Resume Quick-Viewer | Clicking " View Resume" opens an inline document visualizer directly inside NetSuite, completely removing the need to download tracking files locally onto your machine. |
3. 🤖 AI Search & Match Engine
Positioned as a persistent sidebar panel, the AI Search & Match engine introduces natural language conversational searching to your database. Instead of manually turning configuration filters on and off, recruiters can speak directly to the database.
💡 Core Capabilities:
- Natural Language Parsing: Type conversational strings like "Find candidates with Python experience in Ontario" and the engine will automatically map the backend filters for you.
- Algorithmic Ranking: Prompting the engine with phrases like "Rank these by leadership skills and 5+ years experience" will instantly trigger a re-scoring matrix, reorganizing your view with the most qualified talent positioned at the absolute top of the page.
4. Why & How to Leverage the Talent Pool
🎯 Minimizing Sourcing Spend
Sourcing entirely new candidate pools for every opening is expensive and inefficient. The Talent Pool treats your historical recruiting data as an active asset. If a candidate was a stellar In-Progress or Approval stage applicant for a past position but lost out to a marginally faster hire, they remain indexed here. Re-engaging an active "silver medalist" profile cuts your time-to-hire down from weeks to days.
⚙️ Operational Best Practices
- Mine the Pool Before Advertising: Make it a mandatory team rule that before a recruiter switches a newly created job from Draft to Open in Module 2.3, they must execute at least two keyword sweeps inside the Talent Pool to see if the ideal candidate already exists in your ecosystem.
- Keep an Eye on "Hired" Status Profiles: The talent pool will still display profiles currently marked as Hired (such as Peytontestesdos Davisesdos). This is intentional; it allows HR teams to easily locate internal employee skills and certifications when exploring internal mobility options or structural team transfers.
- Utilize the "Create New Candidate" Asset Manually: If a recruiter encounters a premium passive profile on LinkedIn or receives a direct referral, they can use the [ Create New Candidate] button to manually inject them into the talent pool database before an active position is even carved out for them.
Module 7: Hiring Portal (Manager Access Control)
The Hiring Portal workspace is your administrative bridge between the core recruiting team and your organization's line managers. While recruiters spend their day inside the main NetSuite ATS interface managing global pipelines, busy department heads require a streamlined, distraction-free environment to review only the candidates applying to their specific open requisitions.
This module allows recruiters to manage access permissions, audit active manager accounts, and instantly dispatch secure portal access credentials directly from NetSuite.
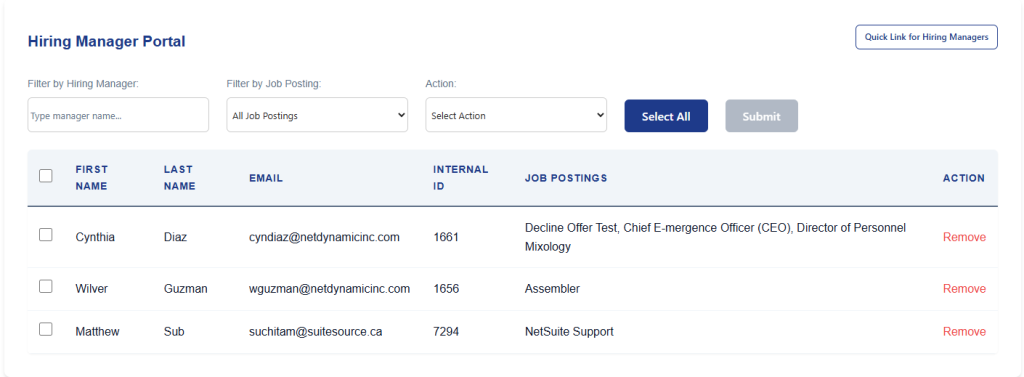
1. Portal Management Interface & Filters
The control board displays a comprehensive ledger of all designated internal hiring authorities. To manage large numbers of managers, use the top-tier filtering tools:
- Filter by Hiring Manager: A predictive live-text box where you can type an internal stakeholder's name to isolate their record immediately.
- Filter by Job Posting: A dropdown menu that filters your view down to managers assigned to specific active requisitions (such as your Senior NetSuite Consultant, Technical Solutions Specialist, or QA Support Intern roles).
2. The Hiring Manager Directory Matrix
The center of the workspace houses a secure directory mapping managers to their live requisitions:
- Manager Profile (First Name / Last Name / Email): Tracks the manager's core company identity. This links directly to their internal NetSuite employee file.
- Internal ID: The unique numerical system identifier automatically assigned to each corporate user.
- Job Postings Array: A dynamic look-up column that explicitly lists every live requisition currently assigned to that manager (e.g., showing that Adam Durrani is tracking NetSuite Dev II, Maitre D, and Technical Solutions Specialist).
- The Remove Action Link ([Remove]): Instantly revokes a manager’s viewing access to a specific role if shifting team structures or reassigning requisition ownership occurs.
3. Why & How to Use the Hiring Portal Control Board
🎯 Delegating Safely and Protecting Privacy (The "Why")
Hiring managers shouldn't have access to your entire company talent bank due to privacy and compliance regulations. Utilizing this control board ensures they are strictly sandboxed. When a manager clicks their unique portal link, they only see the candidate resumes, interview scorecards, and custom questionnaire groups tied to their active openings.
⚙️ Operational Best Practices (The "How")
- Dispatching Access via Quick Actions: To grant or restore access to an internal manager, select the checkbox next to their name, navigate to the Action dropdown menu, select "Send Hiring Portal Link," and click the blue [Submit] button. This automatically emails them a secure tokenized entry link.
- Audit Assignments Pre-Interview: Before kicking off a live candidate panel in [Module 4: Interviews](Module 4: Interviews), cross-reference this grid to ensure your target hiring manager (such as Matthew Gardiner or Scott Lee) is properly mapped to the target job title. If they aren't mapped here, they won't be able to log in to read the incoming applicant's resume files.
- Clean Up Legacy Assignments: When an opening is successfully closed or filled, use the [Remove] action tool to clean up your managers' active portals. Keeping their workspace limited to strictly active roles prevents administrative confusion.
Module 8: ATS Preferences & Email Templates (System Configuration)
The ATS Preferences and Email Templates modules serve as the underlying control panel for the entire ATS360™ ecosystem. While other workspaces handle the execution of recruitment campaigns and candidate processing, this configuration engine determines how your ATS automates workflows, routes internal approvals, drafts communication templates, and feeds matching data to the platform’s AI engine.
Configuring these global settings correctly guarantees cross-department compliance, reduces manual data duplication, and aligns the recruitment platform with your organizational identity.
1. ATS Preferences Manager
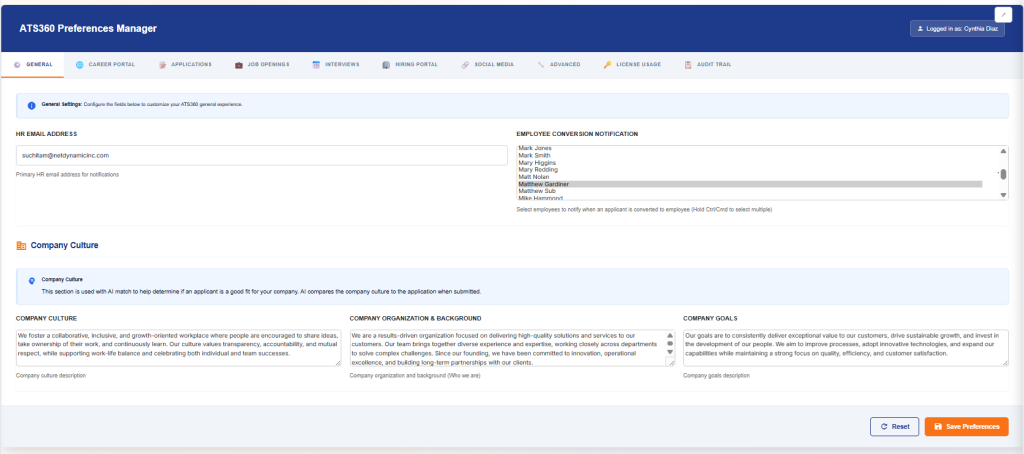
The Preferences Manager organizes system parameters into eleven dedicated administration sub-tabs:
- ⚙️ GENERAL: Houses primary core communications data, routing configurations, and baseline notifications.
- 🌐 CAREER PORTAL & 📱 HIRING PORTAL: Manages user access, interface branding, domain settings, and look-and-feel restrictions across public job boards and manager portals.
- 📝 APPLICATIONS & 💼 JOB OPENINGS: Outlines default hiring stage tracks, compliance triggers, and multi-currency or subsidiary defaults for new job creation.
- 📧 EMAIL TEMPLATES & 📅 INTERVIEWS: Pairs system actions (like a candidate applying) with standard email dispatches and configures calendar availability structures.
- 🔗 SOCIAL MEDIA & 🔧 ADVANCED: Handles external API keys for job board multi-posting aggregators (like Indeed or LinkedIn) and underlying software configurations.
- 🔑 LICENSE USAGE & 📋 AUDIT TRAIL: Monitors seat allocation across recruiters and tracks historical changes to settings for internal accountability.
🔧 Key Field Configurations:
- HR Email Address: The foundational fallback address (e.g., bariola+3@netdynamicinc.com) that receives all automated alerts, candidate inquiries, and system notifications.
- Employee Conversion Notification: A multi-select roster mapping internal personnel (e.g., Adam Durrani, Aiden Somerhalder, etc.). Any user highlighted here will receive an automated alert the exact moment a recruiter converts a candidate's status to a hired employee inside NetSuite, prompting payroll and IT provisioning workflows.
Learn more about ATS360 Preferences Manager
2. 🧠 Training the AI Match Engine (Company Profile Block)
Located directly beneath general preferences is the Company Culture Evaluation Block. This section is critical because it serves as the contextual text benchmark for the platform’s background match algorithm.
When a candidate applies through your career portals, the AI doesn't just read their technical skill words—it cross-references their resume phrasing against the structural text saved in these three fields:
- Company Culture: A comprehensive summary of your organization's core values, work environment styles, and behavioral expectations.
- Company Organization & Background (Who We Are): A clean summary outlining the company's operational industry footprint and organizational history.
- Company Goals: Your core long-term business objectives or strategic mission statements.
🎯 Why & How to Use It:
If your AI Match Scores in [Module 3: Job Applications](Module 3: job applications) feel misaligned with your actual talent standards, it typically means these fields are blank or contain generic placeholder text. Populate these boxes with detailed descriptions of how your teams function. If your company highly values collaborative engineering, explicitly state that in the Culture field so the backend matching algorithms look for matching soft skills within submitted resumes.
3. Email Templates Module
The Email Templates workspace is your library for pre-written candidate communications. It completely replaces the need for recruiters to draft individual, repetitive status updates.
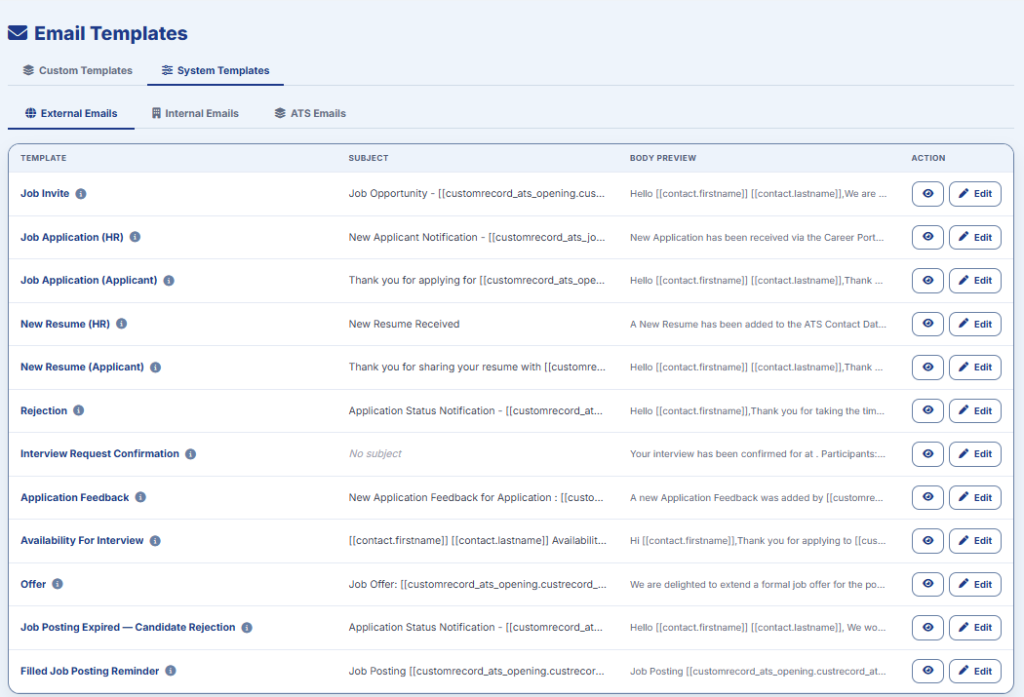
- Triggered Templates: Map specific message templates to automated system changes (e.g., saving an applicant to Application Received instantly dispatches the assigned "Thank You for Applying" layout).
- Tokenized Merge Fields: Incorporate dynamic NetSuite merge codes (such as {bnd_first_name} or {job_title}) inside the email body text. This guarantees that even though an email is automated, it dynamically renders personalized details like the candidate's name and target job title without manual typing.
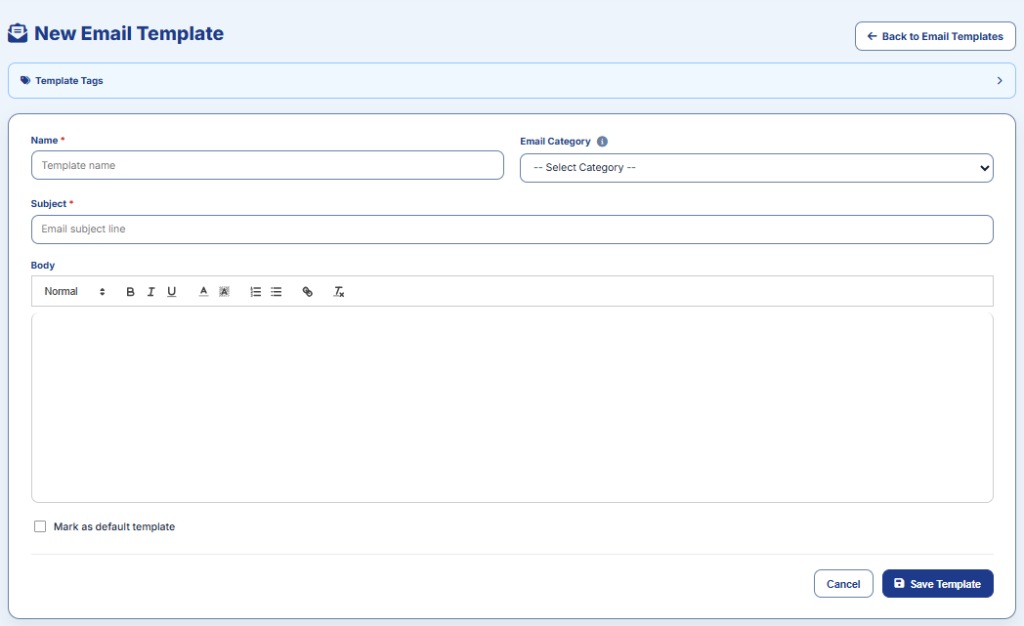
4. Operational Best Practices & Maintenance
- Utilize [Save Preferences] Judiciously: Any structural modifications made across these sub-tabs will alter global recruitment workflows for all active users. Always verify changes with your internal recruiting leads before clicking the blue Save Preferences action bar.
- Test Email Triggers in a Sandbox Account: Before making sweeping updates to client-facing message templates, execute a test run using a fake applicant profile to confirm merge tags map text data accurately without clipping code.
- Maintain the Audit Trail: Review the Audit Trail sub-tab quarterly to track any modifications made to workflow rules, ensuring system configurations remain clean and authorized.