
Hiring Manager Portal User Guide (June 2026 Release)
Last updated
1. Hiring Portal Dashboard Overview
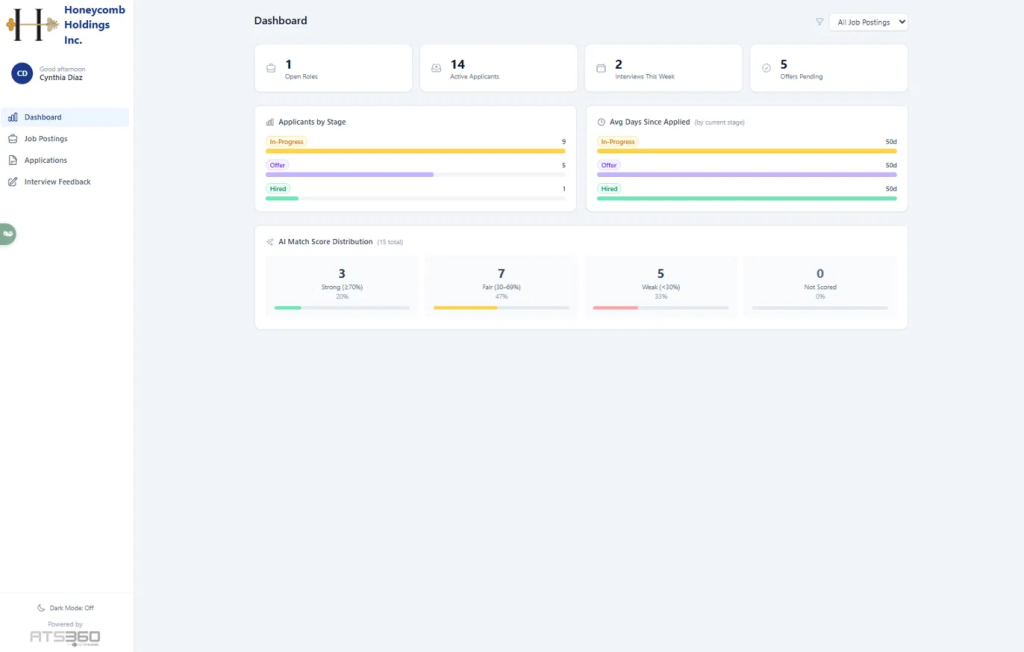
The Dashboard serves as the central command center for managing your organization's recruitment activity from a Hiring Manager perspective. It provides a real-time, high-level overview of active job postings, applicant progression, upcoming schedules, and AI-driven candidate quality insights. This portal enables hiring managers to quickly assess health metrics, track candidate throughput, and prioritize outstanding hiring tasks.
2. Key UI Elements & Fields
| UI Element/Field Name | Type | Description & Purpose for the User |
|---|---|---|
| Job Filter Dropdown | Dropdown Menu | Located in the top-right corner. Allows you to filter all dashboard metrics by a specific role (e.g., Business Analyst) or view data across all listings by selecting All Job Postings. |
| Open Roles | Metric Summary Card | Displays the total number of currently active, unfilled job openings published in the system. |
| Active Applicants | Metric Summary Card | Shows the total number of candidates currently being evaluated across all open positions. |
| Interviews This Week | Metric Summary Card | Highlights the total number of candidate interviews scheduled during the current calendar week. |
| Offers Pending | Metric Summary Card | Displays the number of formal job offers that have been extended to candidates but are awaiting a final decision. |
| Applicants by Stage | Progress Bar/Chart | Visually maps out where active applicants sit in your pipeline across three core hiring milestones: In-Progress, Offer, or Hired. |
| Avg Days Since Applied | Data Metrics Bar | Tracks candidate velocity by displaying the average number of days applicants have spent in their current hiring stage. |
| AI Match Score Distribution | Analytical Distribution Card | Categorizes your applicant pool into tier rankings (Strong, Fair, or Weak) based on an automated resume-to-job-description compatibility match. |
| Navigation Menu | Left Sidebar Menu | Provides quick-click links to jump between the Dashboard, Job Postings, Applications, and Interview Feedback modules. |
| Dark Mode Toggle | Action Link | Located at the bottom of the left sidebar. Switches the portal interface between standard light mode and high-contrast dark mode for optimal viewing comfort. |
3. Step-by-Step Instructions
- Filter Your Workspace View: Upon logging in, look at the top-right corner of the dashboard. Click the All Job Postings dropdown menu to filter your metrics. Select a single job role to view specialized metrics for that specific position, or leave it as default to see cross-company totals.
- Review Core Pipeline Volumes: Check the top row of metric summary cards (Open Roles, Active Applicants, Interviews This Week, and Offers Pending) to gauge your daily actionable priorities.
- Assess Candidate Velocity: Scan the Avg Days Since Applied metric bars. If the day count is climbing high (e.g., sitting at 50 days), review the corresponding candidates to ensure applicants aren't stagnating in the pipeline.
- Evaluate Applicant Quality: Review the AI Match Score Distribution panel to see the overall strength of your talent pool. Click into your Applications tab on the left panel if you need to prioritize screening candidates flagged in the Strong (≥70%) tier.
- Navigate to Core Workflows: Use the left navigation panel to act on your findings—click Job Postings to edit or create roles, Applications to advance specific candidates, or Interview Feedback to log assessment notes.
4. Pro-Tips / Important Notes
💡 Important Notes & Best Practices
- Metric Synchronization: The metrics displayed on the Dashboard automatically sync with your NetSuite backend database. Any status updates made inside candidate files will reflect here instantly.
- Monitoring Pipeline Bottlenecks: The Avg Days Since Applied chart calculates the mean duration specifically for the current stage. A high day count under the In-Progress bar indicates it is time to prompt your internal team for resume reviews or scheduling next steps to keep candidates engaged.
- Understanding AI Match Scores: The AI scores are calculated upon submission. If a candidate is marked as Not Scored (0%), it typically indicates that their resume file format was unreadable or their application data is still being processed by the parser system.
Hiring Portal User Guide: Job Postings
1. Job Postings Overview
The Job Postings page provides hiring managers with a simplified view of active employment listings within the ATS360 SuiteApp ecosystem. This page allows users to see the current status of specific roles, review key publication details, and navigate directly to the applicant pipelines associated with individual job requisitions.
2. Key UI Elements & Fields
| UI Element/Field Name | Type | Description & Purpose for the User |
|---|---|---|
| Job Card Title | Header Field | Displays the official internal/external title of the job opening. |
| Subsidiary/Department Info | Text Label | Displays the corporate structure tags associated with the position (e.g., Honeycomb Holdings Inc. / Default). |
| Job Posting Target | Text Label | Indicates whether the listing is internal, external, or both (e.g., Default • External). |
| Status Tag | Status Indicator | A color-coded badge reflecting the live workflow state of the requisition (e.g., Open, Closed, Draft). |
| Job Description Snippet | Text Field | Shows a brief introductory preview of the job description requirements. |
| Show more | ||
| Action Link | ||
| Expands the job card downward to reveal the full text of the job description without navigating away from the page. | ||
| View Applications (X) | Button / Link | Shows the total volume of candidates who have applied to this role. Clicking it directs you straight to the filtered candidate list. |
3. Step-by-Step Instructions
- Locate Your Requisition: Scan down the central feed of the Job Postings page to locate the specific role card you want to review.
- Expand the Description Details: If you need to verify the posted roles or expectations, click the Show more link on the card to reveal the full text summary.
- Verify Public Presentation: Click the External Link Icon next to the job title header if you need to double-check how the listing appears on your live public career site.
- Access the Applicant Pipeline: Look at the bottom of the card for the View Applications (X) action link. Click this button to transition immediately into the Applications workflow tab, filtered specifically for that position's candidates.
4. Pro-Tips / Important Notes
💡 Important Notes & Best Practices
- Real-Time Counters: The applicant volume indicator—for example, View Applications (15)—updates live. Every time a candidate submits an application on your external portal, this counter increments instantly.
Hiring Portal User Guide: Job Posting Details Workspace
1. Job Posting Details tab Overview
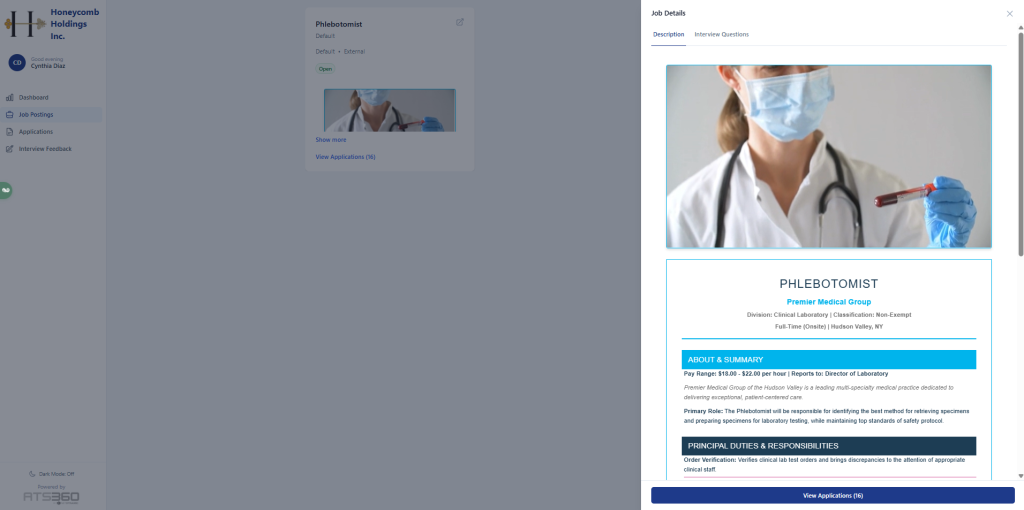
The Job Posting Details right side bar workspace is an interactive slide-out drawer that allows hiring managers to review and audit specific requisition configurations directly within the Job Postings module. This centralized view ensures that job attributes, targeting parameters, external listing links, and the full job description text can be verified quickly without navigating away from the core list view.
2. Key UI Elements & Fields
| UI Element/Field Name | Type | Description & Purpose for the User |
|---|---|---|
| Close Panel (✕) | Navigation Button | Located in the upper corner of the slide-out view. Closes the slide-out drawer and returns you immediately to the main Job Postings list. |
| Job Title Header | Text Header | Displays the official nomenclature assigned to the job requisition. |
| Full Job Description Block | Text Container | Renders the complete text layout, including performance expectations, role responsibilities, required skills, and benefit descriptions. |
3. Step-by-Step Instructions
- Trigger the slide-out drawer: Scroll through your master list in the Job Postings module and click directly on the title or body card of the requisition you wish to audit.
- Verify Corporate Mapping: Look over the meta-tags underneath the main title header to verify that the Subsidiary, Department, and Posting Target statuses match your tracking requirements.
- Audit Public Accessibility: Click the External Post URL Link icon next to the title header if you need to preview formatting, check broken links, or manually share the application path with an external candidate source.
- Read Full Requirements: Scroll vertically through the Full Job Description Block to read or verify the detailed text parameters of the posting.
- Close the View Panel: Once your review is complete, click the Close panel (✕) button at the top of the drawer to collapse the view and return to your master dashboard ledger.
4. Pro-Tips / Important Notes
💡 Important Notes & Best Practices
- Direct Source Mapping: All configurations displayed in this slide-out drawer are hardcoded mirrors of your core ATS360 Job Posting records. To modify any of these text items or field values, an authorized user must edit the source record inside ATS360/NetSuite.
- Preserving Scroll Positioning: Closing this panel returns you to the exact vertical scroll location you were previously browsing on the primary Job Postings page, preventing you from losing your place when auditing multiple open listings in sequence.
Hiring Portal User Guide: Job Posting Details: Interview Questions Tab
1. Interview Questions Tab Overview
The Interview Questions tab within the Job Details side bar workspace allows hiring managers to manage structured assessment questionnaires for specific job listings. This interactive module enables users to create target questions, link them to specific interview stages, assign them to one or multiple job postings simultaneously, and maintain a standardized evaluation template.
2. Key UI Elements & Fields
| UI Element/Field Name | Type | Description & Purpose for the User |
|---|---|---|
| Description / Interview Questions | Sub-Tab Menu | Standardized horizontal navigation. Clicking Interview Questions opens the custom iframe workspace to manage assessment criteria. |
| Enter new question | Text Input Field | An open text entry field used to type out the specific interview question or prompt you wish to ask candidates. |
| Interview Stage | Text Input Field | An open text entry field used to type out the specific interview question or prompt you wish to ask candidates. |
| Job Postings | Multi-Select List | Displays available job listings. Allows you to attach the question to a single position (e.g., Business Analyst) or select multiple requisitions simultaneously using keyboard shortcuts. |
| Add Question | Action Button | Validates the fields above and dynamically appends the new entry to the active questions database table below. |
| Questions Table | Data Ledger | A structured grid displaying all currently saved questions, their designated evaluation stage, and their mapped requisitions. |
| Remove Job Tag (✕) | Inline Action Button | Located next to the job title inside the table row. Clicking the red ✕ unlinks that specific question from the individual job posting without deleting the text entirely. |
| Delete | Action Button | Positioned in the table row's action column. Completely purges the question from the entire system across all associated listings. |
| Save | Primary Action Button | Located at the bottom right of the container panel. Commits all newly added questions, alterations, or deletions permanently to the database. |
3. Step-by-Step Instructions
- Access the Tool Area: Open a job card from your primary workspace and select the Interview Questions sub-tab in the upper horizontal row.
- Draft a New Assessment Prompt: Click inside the Enter new question input field and type your target question text.
- Map the Selection Pipeline: Click the Interview Stage dropdown to designate when this question should be introduced (e.g., select Initial Screening).
- Target Specific Requisitions: Scroll through the Job Postings selection block and click the desired job title.
- Stage and Review the Entry: Click the blue Add Question button. The new item will pop up instantly inside the lower Questions ledger table for verification.
- Commit the Configuration Changes: Once you are satisfied with your question mapping table, click the blue Save button in the lower-right corner to finalize your updates.
4. Pro-Tips / Important Notes
💡 Important Notes & Best Practices
- Multi-Selection Controls: To map a single interview question to multiple hiring paths at the same time, hold down the Ctrl key (on Windows) or Cmd key (on Mac) while clicking distinct items inside the Job Postings scroll menu.
- Staged vs. Committed Saves: Clicking Add Question or the red ✕ marks changes locally within the interface. No updates are finalized in the system database until you explicitly click the master Save button at the bottom of the widget frame.
- Iframe Scroll Safety: This specialized control environment functions inside an isolated panel frame. If fields or table rows appear cut off, use the localized scrollbar positioned on the far right edge of the pop-up panel container to view lower options.
Hiring Portal User Guide: Applications
1. Applications Overview
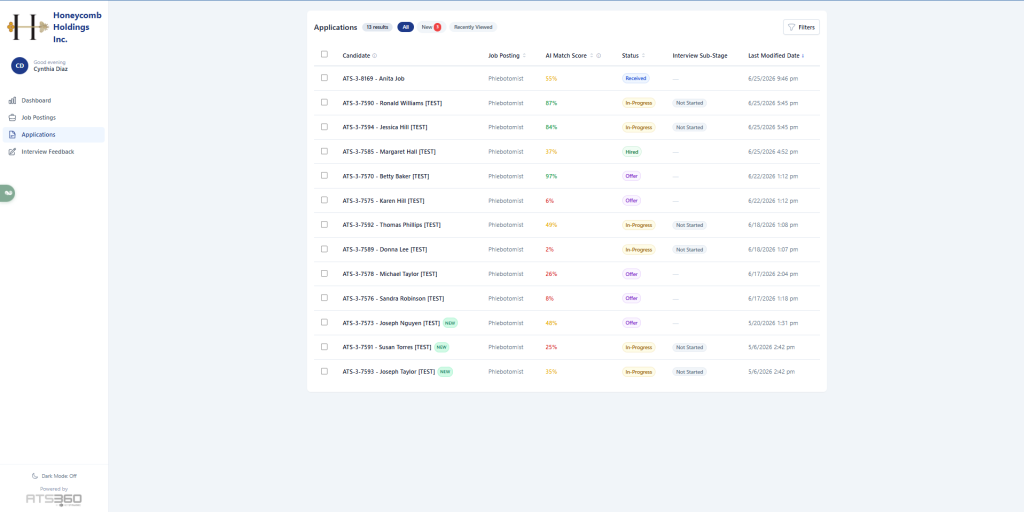
The Applications page provides a centralized database for reviewing and managing all incoming candidate submissions within the ATS360 SuiteApp environment. It allows hiring managers to quickly monitor candidate progression, assess automated resume compatibility metrics, and sort applicants using specialized tracking filters.
2. Key UI Elements & Fields
| UI Element/Field Name | Type | Description & Purpose for the User |
|---|---|---|
| Applications Tab Menu Filters | Tab Buttons | Quickly isolates records based on status presets: All (total pool), New (unread/unprocessed entries), or Recently Viewed. |
| Filters Button | Toggle Button | Located in the top right. Expands search fields to narrow down the candidate table by specific parameters like job titles or timeline dates. |
| Selection Checkbox ([ ]) | Checkbox | Placed next to each row. Allows users to select single or multiple candidates to perform bulk operations or trigger details panels. |
| Candidate ID & Name | Interactive Link | Displays the internal NetSuite applicant record tracking ID alongside the candidate's full name (e.g., ATS-3-7585 - Margaret Hall). Clicking this launches the candidate details workspace. |
| Job Posting | Text Label | Shows the exact requisition title the candidate submitted their application under (e.g., Business Analyst). |
| AI Match Score | Analytical Badge | A percentage indicator estimating resume match alignment with the job description. Color-coded to quickly flag strong matches (green) versus weak matches (red). |
| Status | Stage Badge | Indicates the high-level macro hiring pipeline stage the applicant resides in (e.g., Hired, Offer, In-Progress). |
| Interview Sub-Stage | Progress Tag | Tracks granular progression steps inside the broader evaluation workflow (e.g., Not Started). |
| Last Modified Date | Sortable Column | Displays the timestamp of the latest profile or status update. The down arrow icon (↓) sorts the entire table chronologically. |
| NEW Badge | Status Tag | A bright green indicator marking fresh application submissions that haven't been opened yet. |
3. Step-by-Step Instructions
- Isolate Your Working Pool: Use the filter tags at the top of the table to sort your workspace view. Click New to focus exclusively on unread applicants or All to see the full talent list.
- Review Candidate Layouts: Scan the list visually using the AI Match Score and Status columns to identify top-tier talent or check on processing bottlenecks.
- Trigger the Candidate Drawer: Click directly on a candidate's row selection box or interactive Candidate ID & Name string. This will dynamically launch a context slide-out panel on your screen without navigating away from the core menu ledger.
- Sort Content Chronologically: Click the Last Modified Date column header to toggle between seeing your most recently active candidate applications first or last.
4. Pro-Tips / Important Notes
💡 Important Notes & Best Practices
- Interactive Slide-out Drawers: Clicking a candidate's name brings up a dynamic slide-out profile context view. This pop-up allows you to preview resumes, read communication histories, and change interview sub-stages directly without ever losing your place on the master list.
- The "New" Counter Logic: The New counter bubble (e.g., New 6) ticks down automatically once a team member selects or opens the candidate profile drawer for the first time.
- Bulk Actions Availability: Checking the topmost master header checkbox selects all visible candidate lines on the screen, turning on hidden bulk update tools to change multi-candidate stages simultaneously.
Hiring Portal User Guide: Application Details slide-out drawer Workspace
1. Application Details Overview
The Application Details pop-up workspace is a dynamic slide-out drawer that displays comprehensive, centralized candidate profile information directly within the Applications dashboard. It eliminates the need to navigate away from the primary applicant list, allowing hiring managers to quickly evaluate background data, review resume analysis metrics, log internal feedback, and advance candidates through the selection pipeline.
2. Key UI Elements & Fields
| UI Element/Field Name | Type | Description & Purpose for the User |
|---|---|---|
| Applications Tab Menu Filters | Tab Buttons | Quickly isolates records based on status presets: All (total pool), New (unread/unprocessed entries), or Recently Viewed. |
| Filters Button | Toggle Button | Located in the top right. Expands search fields to narrow down the candidate table by specific parameters like job titles or timeline dates. |
| Selection Checkbox ([ ]) | Checkbox | Placed next to each row. Allows users to select single or multiple candidates to perform bulk operations or trigger details panels. |
| Candidate ID & Name | Interactive Link | Displays the internal NetSuite applicant record tracking ID alongside the candidate's full name (e.g., ATS-3-7585 - Margaret Hall). Clicking this launches the candidate details workspace. |
| Job Posting | Text Label | Shows the exact requisition title the candidate submitted their application under (e.g., Business Analyst). |
| AI Match Score | Analytical Badge | A percentage indicator estimating resume match alignment with the job description. Color-coded to quickly flag strong matches (green) versus weak matches (red). |
| Status | Stage Badge | Indicates the high-level macro hiring pipeline stage the applicant resides in (e.g., Hired, Offer, In-Progress). |
| Interview Sub-Stage | Progress Tag | Tracks granular progression steps inside the broader evaluation workflow (e.g., Not Started). |
| Last Modified Date | Sortable Column | Displays the timestamp of the latest profile or status update. The down arrow icon (↓) sorts the entire table chronologically. |
| NEW Badge | Status Tag | A bright green indicator marking fresh application submissions that haven't been opened yet. |
| Close panel (✕) / Previous & Next Arrows | Navigation Controls | Located along the top border. The ✕ closes the drawer, while the arrow buttons allow you to cycle to the Previous or Next application records sequentially. |
| Move to Next Stage | Navigation Controls | A prominent blue button that promotes the candidate to the subsequent phase of your company's evaluation workflow. |
| Reject Application | Action Button | A prominent red button that terminates the candidate's active application process and triggers rejection workflows. |
| Sub-Tab Navigation (Candidate Details, Documents, etc.) | Category Tabs | |
| Standardized horizontal text links that switch the focus of the lower container view: | ||
| • Candidate Details: Main profile metadata, contact details, and automated scores. | ||
| • Documents: Attached resumes, cover letters, and transcripts. | ||
| • Interviews: Logged schedules and interviewer assessments. | ||
| • Emails: Interaction and message histories. | ||
| Candidate Metadata Summary Header | Info Cards | Displays standard contact record values such as applicant name, stage, associated job posting, phone, email, and geographic location. |
| Applicant Info Panel | Data Summary Grid | Synthesizes parsed resume parameters, including LinkedIn Profile links, Skills keyword extractions, Certifications, and the calculated AI Match Score. |
| Pre-Screening Questions | Data Fields | Displays candidate responses to questions answered during the initial job submission process. |
| Comments Panel | Interactive Text Box | An open text area at the bottom where recruiters can type internal evaluation notes and select Save Comment to log feedback chronologically. |
3. Step-by-Step Instructions
- Review Core Candidate Bio Data: Once the panel slides open from the main table, skim the topmost metadata rows to confirm identity, primary application contact information, and current workflow status.
- Examine Skills & Credentials: Scroll down to the Applicant Info section to review extracted keywords (e.g., Mobile Development, iOS, Swift) and cross-reference them against your role requirements.
- Log Internal Evaluation Notes: To document your assessment, locate the Comments text field at the base of the drawer. Click Write a comment..., input your team feedback, and click the Save Comment button.
- Advance or Conclude the Workflow:
- If the candidate satisfies requirements, click the blue Move to Next Stage button to progress them further.
- If the candidate is unqualified, click the red Reject Application button.
- Cycle to the Next Applicant: Instead of closing out your workspace view, click the Next application right-arrow button at the top to load the next file from your application ledger automatically.
4. Pro-Tips / Important Notes
💡 Important Notes & Best Practices
- Preserving Tab Focus: When cycling between files using the Next application arrows, the slide-out drawer retains your currently active sub-tab view (e.g., if you are looking at the Documents sub-tab, clicking next will instantly load the next candidate's documents tab).
- Hyperlinked References: Social fields like the LinkedIn Profile field render as active external hyperlinks. Clicking them will safely open a new tab outside NetSuite so you don't lose your working application drawer state.
- Unsaved Comments Safeguard: Be sure to click Save Comment before using the navigation arrows or hitting the close icon, as closing the panel or changing profiles with an empty scratchpad will discard unsaved text entry edits.
Hiring Portal User Guide: Candidate Details — Received Stage
1. Received Stage Overview
The Candidate Details (Received Stage) panel is an interactive slide-out drawer that displays immediate background data for newly arrived applicants. This initial workspace view allows recruiters to conduct preliminary profile evaluations, verify automated screening indicators, and quickly determine whether to reject the submission or progress the candidate further into the active recruitment pipeline.
2. Step-by-Step Instructions
- Verify the Processing Stage: Confirm the candidate is in the initial entry phase by checking that the Received badge is highlighted on the tracker bar.
- Assess Initial Alignment: Check the AI Match Score Badge to gauge immediate technical keyword compatibility.
- Audit Submission Details: Scroll through the profile grid to verify required information, target position fields, and contact information.
- Advance or Conclude the Application:
- To initiate the interview or testing sequence, click the blue Move to Next Stage button to shift the candidate to In-Progress status.
- If the candidate fails baseline requirements, click the red Reject Application button.
- Document Initial Findings: Type any initial screening notes in the comment box and click Save Comment to record your feedback before closing the drawer.
3. Pro-Tips / Important Notes
💡 Important Notes & Best Practices
- The "New" Flag Behavior: Opening this panel for a candidate marked with a green NEW tag automatically changes their status to "read". This updates your team's application inbox counters in real time.
- Advancing Workflow Logic: Clicking Move to Next Stage on a Received record automatically prompts the system to initialize the Interview Sub-Stage tracking options (defaulting them to Not Started), making the profile ready for active panel routing.
Hiring Portal User Guide: Application Details — In-Progress Stage
1. In-Progress Stage Overview
The Application Details (In-Progress / Documents Tab) workspace is a specialized slide-out drawer utilized when an applicant has been advanced to the active screening phase. This view centers primarily on the Documents sub-tab, providing hiring teams with an integrated, high-resolution PDF document viewer to read, zoom, and evaluate the candidate’s submitted resume directly alongside their baseline tracking record.
2. Step-by-Step Instructions
- Verify active status: Open the candidate record and confirm that the In-Progress status badge is active next to the applicant's name.
- Access the resume text: Click the Documents sub-tab in the drawer navigation menu to bring the file rendering workspace forward.
- Adjust document legibility: Use the Zoom in (🔍) button to enlarge small text details, or click the Maximize (⛶) button to push the text layout into full screen. Use the scrollbar on the right side of the viewer frame to advance down through the career history text.
- Save a local copy: If you need to attach this file to an internal chat or print it for an interview panel, click the Download button to instantly save the file to your local drive.
- Decide candidate status: After reviewing their professional experience, click Reject Application if they do not meet the minimum job qualifications. To review other aspects of their profile, toggle to the Candidate Details, Interviews, or Emails sub-tabs.
3. Pro-Tips / Important Notes
💡 Important Notes & Best Practices
- Persisted Viewer Settings: The zoom percentage level (e.g., 75%) and page orientations you configure will persist as you click the Previous application or Next application arrows. This layout stability makes high-volume resume parsing much faster.
- Supported Formatting: The interactive document viewer seamlessly renders standardized formats like .pdf and .docx. If a candidate uploads an unsupported file type, the inline preview will display an error placeholder, but the files can still be accessed cleanly using the master Download button.
Hiring Portal User Guide: Application Details — Interviews Tab
1. Interviews Tab
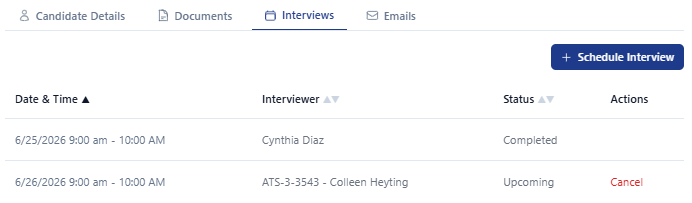
The Interviews tab within the Application Details slide-out drawer provides recruiters and hiring managers with a specialized environment to coordinate, track, and review assessment schedules for an active applicant. This panel gives a clear overview of upcoming or historical assessment events, confirmation statuses, and dedicated scheduling operations without disrupting your workspace workflow.
2. Key UI Elements & Fields
| UI Element/Field Name | Type | Description & Purpose for the User |
|---|---|---|
| Interviews Tab | Sub-Tab Menu Item | The currently selected menu view (underlined) which swaps profile metadata or documents out for the scheduling log. |
| Schedule Interview | Primary Action Button | A prominent blue button that opens the interview configuration calendar widget to set up a new meeting slot. |
| Success Banner | Alert Notification | |
| A green confirmation ribbon that appears at the top of the tab area when automated invite notifications are successfully dispatched to the candidate and panel members. | ||
| Date & Time | Sortable Column | Displays the structured calendar window (date and duration) for the interview slot. The up arrow icon (▲) sorts events chronologically. |
| Interviewer | Sortable Column | Displays the unique corporate ID and name of the internal employee assigned to conduct the evaluation panel. |
| Status | Sortable Column | Tracks the real-time condition of the interview appointment (e.g., Upcoming, Completed, No Show). |
| Actions / Cancel | Context Link Button | An inline action trigger that allows users to cancel an upcoming schedule and automatically remove it from the system calendar. |
3. Step-by-Step Instructions
- Access the Evaluation Panel Log: From the main applicant table, open the candidate profile slide-out drawer and click the Interviews sub-tab option.
- Review Scheduled Events: Scan the primary ledger table to check on the configuration, designated panel owner, and the operational condition listed under the Status column.
- Initialize a New Meeting Request: Click the dark blue Schedule Interview button to prompt the coordination tool to open. Follow the prompts to configure dates, invite relevant team members, and select confirm.
- Verify Dispatched Invitations: Look for the green banner text stating "Interview scheduled successfully. Invites have been sent." to confirm that automated internal and external notification emails have been dispatched correctly.
- Revoke or Cancel a Schedule: If an emergency conflict arises, locate the target entry row in the ledger and click the red Cancel link button under the Actions column to free up the calendar availability slot.
4. Pro-Tips / Important Notes
💡 Important Notes & Best Practices
- Automated NetSuite Backend Sync: Clicking Schedule Interview triggers automated communication workflows behind the scenes. Meeting invites are instantly sent out to both the candidate's personal email inbox and the assigned interviewer's standard NetSuite calendar.
- Sorting Timeline Paths: Clicking the column header arrows (such as Date & Time ▲) lets you quickly toggle between prioritizing your immediate upcoming assessments or looking back at previous, historical interview logs.
Hiring Portal User Guide: Application Details — Schedule Interview Interface
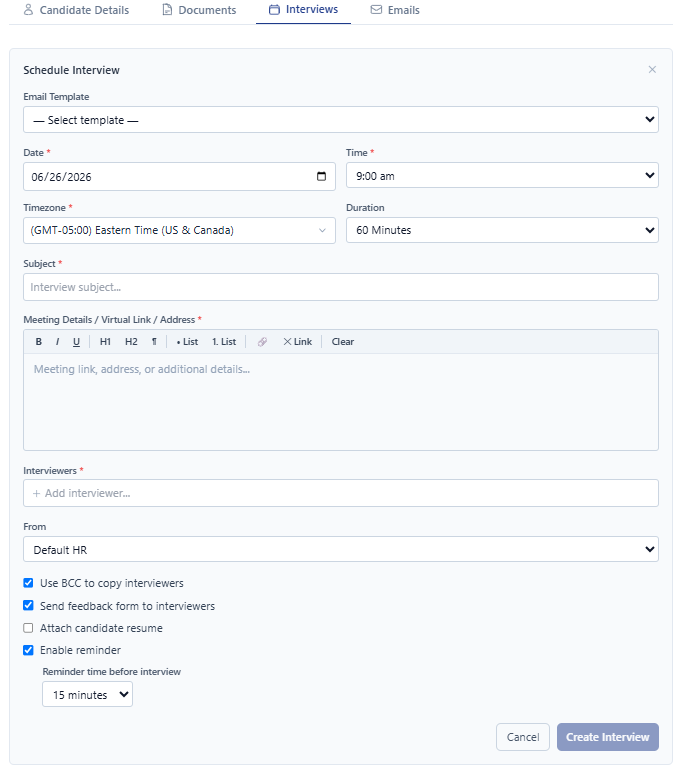
1. Schedule Interview Overview
The Schedule Interview workspace is a focused modal or view state embedded directly within the Interviews sub-tab of the Application Details panel. It provides recruiters and hiring managers with a simplified scheduler to establish new assessment slots, assign localized internal panel owners, and dispatch automated notification alerts across both internal calendar structures and candidate networks.
2. Key UI Elements & Fields
| UI Element/Field Name | Type | Description & Purpose for the User |
|---|---|---|
| Schedule Interview | Primary Action Button | Located prominently above the schedule tracking ledger. Clicking this initiates the meeting configuration setup sequence. |
| Date & Time Column | Sortable Data Field | Logs the chronological anchor and specific duration windows for upcoming or previous interview engagements (e.g., 6/26/2026 9:00 am - 10:00 AM). |
| Interviewer Column | Sortable Data Field | Displays the unique NetSuite system tracking ID and name of the internal employee designated to execute the candidate evaluation. |
| Status Column | Sortable Data Badge | Visually tracks the life-cycle condition of the specific meeting slot (e.g., Upcoming, Completed, Canceled). |
| Cancel | Action Link Button | Positioned inline under the Actions column. Instantly removes an upcoming entry from the active queue and triggers cancellation notifications. |
3. Step-by-Step Instructions
- Launch the Configuration Space: Navigate to the active candidate drawer, select the Interviews sub-tab, and click the blue Schedule Interview button to display the coordination widget.
- Designate Date & Sizing Parameters: Set the specific calendar date and adjust the start/end time sliders to define the interview's overall duration.
- Assign the Internal Interviewer: Select from the drop-down menu or type in the corporate name field to map an authorized team member (such as Colleen Heyting) to lead the panel.
- Confirm and Dispatch: Review your variables for structural conflicts, then select the final submission prompt.
- Verify the Dispatch State: Confirm that the scheduling registry pushes the entry live with an Upcoming status badge and that a green automation confirmation banner displays at the top of the interface.
4. Pro-Tips / Important Notes
💡 Important Notes & Best Practices
- Automatic Invites: Pressing the confirm button within the scheduling view prompts NetSuite to automatically dispatch an .ics calendar invitation file and email copy directly to the candidate's personal inbox and the internal staff member's core agenda.
- Status Progress Tracking: The Status value automatically transitions from Upcoming to Completed once the scheduled time block expires, signaling to other team members that interview assessment logs can now be submitted under the main navigation's Interview Feedback panel.
Hiring Portal User Guide: Application Details — Emails Tab
1. Page Overview
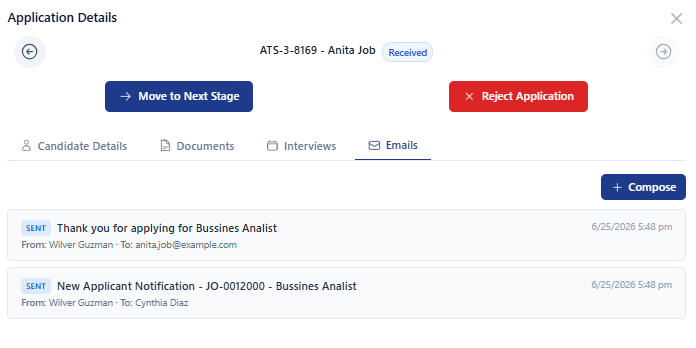
The Emails tab within the Application Details slide-out drawer serves as a dedicated communication ledger for the selected candidate. This tab displays an automated, chronological history of all email correspondences, auto-generated platform updates, and calendar confirmations dispatched to the applicant or internal interviewers. It allows recruiters to verify that critical outreach—such as interview invitations—has been successfully transmitted.
2. Key UI Elements & Fields
| UI Element/Field Name | Type | Description & Purpose for the User |
|---|---|---|
| Emails Tab | Sub-Tab Menu Item | The active communication sub-view (underlined in blue) within the larger candidate profile drawer. |
| Compose Button (+ Compose) | Action Button | Positioned at the top right of the email workspace container. Launches an interactive message builder to draft and send a custom manual email directly to the applicant. |
| Sent Status Tag (SENT) | Status Indicator | A blue label tracking the delivery state of the message entry, confirming that the communication was successfully processed and sent by the system backend. |
| Message Header Log | Interactive Row | Displays the subject line, timestamp, author, and target recipient of the email communication string. |
3. Step-by-Step Instructions
- Access Communication Records: From the master candidate grid, open the profile view for an applicant (such as Elizabeth Martin) and select the Emails sub-tab.
- Audit System Dispatches: Review the message log rows to confirm that required automated notifications—such as the applicant's schedule confirmation or internal panel invites—have been systematically dispatched.
- Check Correspondence Metadata: Read the inline summary text to verify exactly who sent the email, the precise date and time it left the system, and who was designated on the "To" line (e.g., confirming an invite went to interviewer Colleen Heyting).
- Initiate New Candidate Outreach: Click the blue Compose button to open the message editor panel whenever you need to manually follow up, request updated paperwork, or send personalized updates to the candidate.
4. Pro-Tips / Important Notes
💡 Important Notes & Best Practices
- Automatic Scheduling Logs: When you use the built-in Schedule Interview workflow, the system automatically generates and tracks those notification confirmations here instantly, complete with timestamped receipts.
- Unified Communication History: This log aggregates both automated platform emails and manual messages sent via the Compose button, ensuring your recruiting team maintains a single, reliable audit trail of all candidate touches.
Hiring Portal User Guide: Application Details — Compose Email Interface
1. Compose EmailOverview
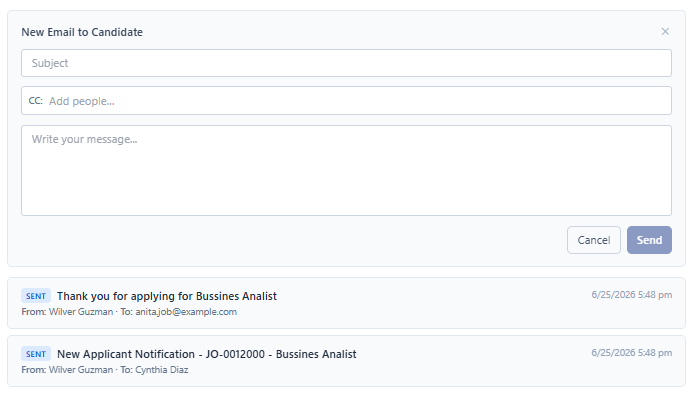
The Compose Email interface is an interactive messaging panel that expands within the Emails tab of the Application Details drawer. It enables recruiters and hiring managers to draft and send direct, custom email correspondence to an applicant without leaving the centralized workspace.
2. Key UI Elements & Fields
| UI Element/Field Name | Type | Description & Purpose for the User |
|---|---|---|
| New Email to Candidate | Panel Header | Confirms that you are drafting an active outbound message to the currently selected applicant. |
| Subject | Text Input Field | Where you enter the main title or headline of your email as it will appear in the candidate's inbox. |
| CC: Add people… | Lookup Input Field | Allows you to type and add email addresses of internal team members or stakeholders who need to be carbon-copied on the correspondence. |
| Write your message... | Rich Text Area | The primary body input area where you compose the main text, updates, or custom follow-up notes for the candidate. |
| Cancel | Button | Discards the current draft text and collapses the email composition interface. |
| Send | Button | Validates all input fields and immediately dispatches the email to the recipient's personal inbox. |
| Close Draft (✕) | Toggle Button | Located in the upper right-hand corner of the compose card. Instantly minimizes the draft template window. |
3. Step-by-Step Instructions
- Launch the Composer: From the candidate's slide-out details panel, toggle to the Emails tab and click the + Compose button to reveal the messaging form.
- Define Your Topic: Click inside the Subject line field and enter a clear title for your email (e.g., Interview Follow-up - Next Steps).
- Include Internal Stakeholders (Optional): If you need to keep a hiring manager or department lead in the loop, click the CC: bar, type their corporate email address, and select them.
- Draft the Message Body: Click inside the large Write your message... text box and type out your customized candidate update or instruction set.
- Dispatch the Email: Review your text for accuracy, then click the blue Send button to transmit the message. Once sent, the conversation row will dynamically appear in the log below with a blue SENT status badge.
4. Pro-Tips / Important Notes
💡 Important Notes & Best Practices
- Automatic History Tracking: Any message sent using this button is instantly recorded in chronological order at the bottom of the Emails ledger, ensuring that your entire recruiting department has visibility into the exact messaging timeline.
- No Auto-Save for Drafts: Unlike some external mail clients, closing this interface with the ✕ icon or clicking Cancel will wipe out your current text input. Be sure you are ready to send before toggling to other tabs or applications.
Hiring Portal User Guide: Interview Feedback Module
1. Interview Feedback Module Overview
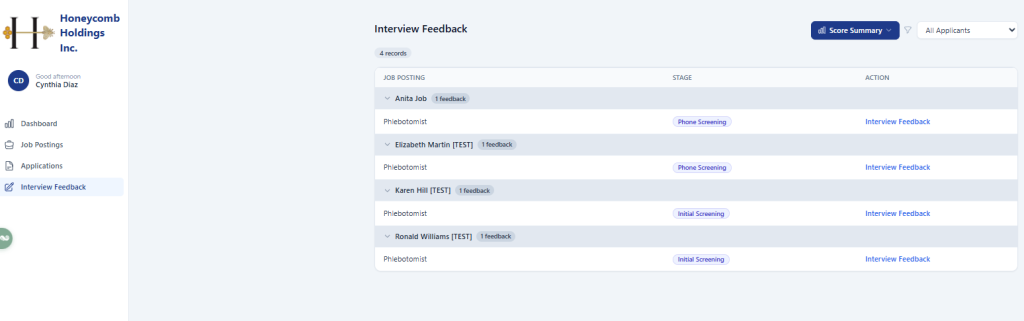
The Interview Feedback page is a centralized workspace that allows recruiters and hiring managers to review and manage candidate interview performance assessments. This page compiles multi-stage interview results, displays score summaries, and serves as the gateway for logging detailed feedback evaluations for candidates currently navigating active selection pipelines.
2. Key UI Elements & Fields
| UI Element/Field Name | Type | Description & Purpose for the User |
|---|---|---|
| Score Summary | Dropdown Menu Button | Provides quick-click paths between the core portal components; Interview Feedback is the currently highlighted active tab. |
| Applicant Filter Dropdown | Dropdown Menu | Positioned in the top right corner. Defaults to All Applicants but can be filtered to isolate a specific candidate's tracking rows (e.g., Elizabeth Martin). |
| Record Count Badge | Data Indicator | Shows the total number of filtered candidate records populated in the list view below |
| Candidate Header Row | Interactive Grid Header | Displays the applicant's name and notes the total number of evaluation submissions collected so far (e.g., Elizabeth Martin 1 feedback). |
| Job Posting | Table Column | Identifies the specific requisition the candidate's interview panel was conducted under (e.g., Business Analyst). |
| Stage | Table Column Badge | Reflects the specific interview milestone under review (e.g., a color-coded Phone Screening badge). |
| Action / Interview Feedback | Action Link Button | Positioned on the right side of the row entry. Clicking this launches the structured assessment form to log or read detailed interviewer notes. |
3. Step-by-Step Instructions
- Navigate to Feedback Hub: Click Interview Feedback in the left-hand navigation column to populate the open evaluations roster.
- Isolate a Candidate (Optional): If managing a busy queue, click the top-right filter dropdown menu (currently set to All Applicants) and select a specific name to narrow down your table rows.
- Locate Target Hiring Milestone: Find the row for your target candidate, and expand the row header if needed to see the relevant Job Posting and Stage column fields.
- Launch the Evaluation Form: Move to the right side of the row layout and click the blue Interview Feedback link button under the Action column.
- Review Historical Metrics: Click the Score Summary button next to the filters at the top of the interface whenever you need to check aggregate performance metrics across recent evaluations.
4. Pro-Tips / Important Notes
💡 Important Notes & Best Practices
- Typo Alignment: Just like the core modules, the job posting titles (such as Bussines Analist) pull their text directly from your primary NetSuite Requisition Records.
- The Feedback Counter: The counter badge attached to the candidate header row (e.g., 1 feedback) reflects the total number of completed score sheets submitted by all interview panel members for that candidate. Use this to track if all assigned interviewers have logged their notes.
- Stage-Bound Forms: Clicking the Interview Feedback link dynamically generates an assessment scorecard tailored specifically to the stage listed in that row (e.g., a Phone Screening form focuses on baseline skills, while a Technical Interview form focuses on system questions).
Hiring Portal User Guide: Interview Feedback — Score Summary slide-out drawer Workspace
1. Score Summary Overview
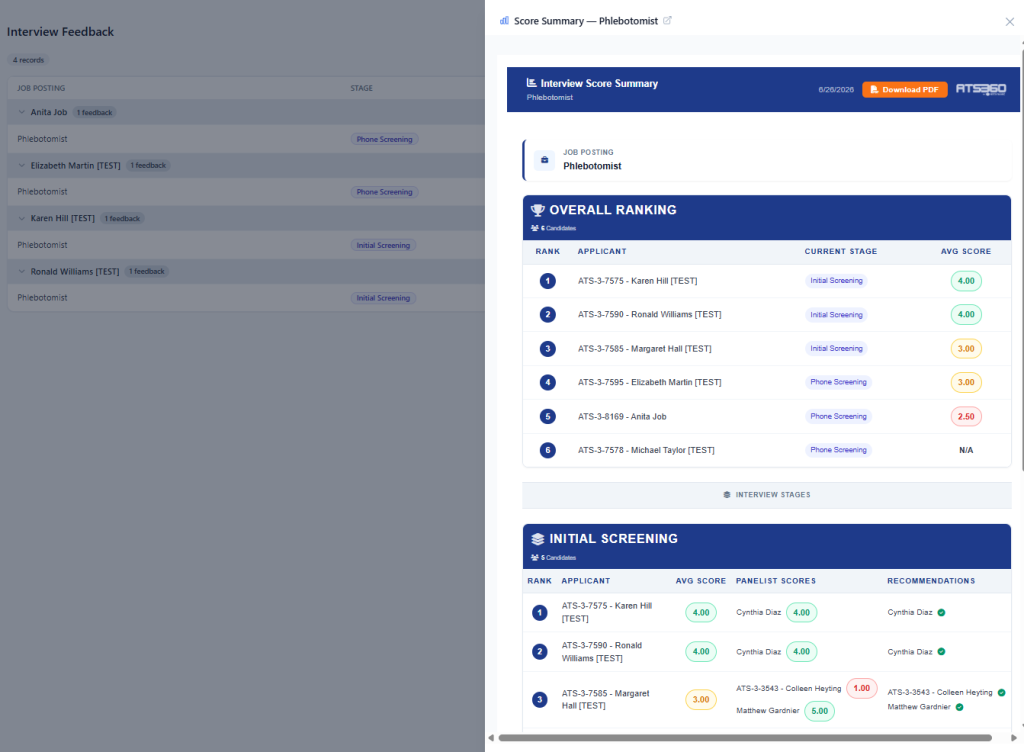
The Score Summary pop-up workspace is a dynamic slide-out analytics panel triggered from the Interview Feedback module. It aggregates and scales multi-candidate assessment evaluations for a specific position (e.g., Business Analyst), displaying stack-ranked leaderboards and granular, panelist-by-panelist recommendation breakdowns across distinct interview milestones. This view helps hiring teams eliminate ambiguity and make data-driven decisions when comparing candidate performance.
2. Key UI Elements & Fields
| UI Element/Field Name | Type | Description & Purpose for the User |
|---|---|---|
| Close panel | Action Button | Positioned at the top right of the drawer wrapper. Collapses the analytical dashboard and restores the primary Interview Feedback list view. |
| Download PDF | Action Button | Located in the blue header block. Generates and downloads a clean, printable executive PDF report containing the score summaries. |
| Overall Ranking Table | Data Ledger | High-level master leaderboard sorting all active candidates chronologically by their calculated cross-stage metric score. Includes columns for Rank, Applicant ID/Name, Current Stage, and Avg Score. |
| Interview Stages Panel | Section Divider | Segregates subsequent evaluation deep-dives into their respective milestone segments (e.g., Phone Screening, Initial Screening). |
| Avg Score | Numerical Metric | Displays the mathematical mean of scores submitted by all assigned interviewers (rendered as N/A if metrics haven't been finalized). |
| Panelist Scores | Status Label Row | Lists individual internal panel interviewers side-by-side with the specific numerical rating they assigned to that candidate. |
| Recommendations | Visual Status Badges | Displays rapid-glance checklist symbols representing each interviewer's ultimate hiring decision regarding the applicant:Checked Circle ( ): Recommended to advance.Question Circle ( ): Neutral / Undecided response.Crossed Circle ( ): Not Recommended. |
3. Step-by-Step Instructions
- Launch the Analytical Summary: From the primary Interview Feedback screen, click the Score Summary button located at the top right to expand the metrics drawer.
- Review Master Leaderboard Standings: Scan the Overall Ranking table to see who currently holds the top spots based on cumulative performance averages.
- Analyze Specific Milestone Breakdowns: Scroll down to the Interview Stages section to evaluate candidate performance during isolated evaluation phases, such as Phone Screening or Initial Screening.
- Audit Panelist Discrepancies: Cross-reference individual ratings under the Panelist Scores column to check for score variances between different team members (e.g., verifying why one interviewer scored a candidate a 1.00 while another scored them a 5.00).
- Inspect Definitive Recommendations: Look at the Recommendations column to evaluate individual panelist votes (Advance, Hold, or Stop) to find general team alignment.
- Export Findings: Click the orange Download PDF button to export a hard copy layout of the report for offline review or hiring committee alignment meetings.
4. Pro-Tips / Important Notes
💡 Important Notes & Best Practices
- Understanding "N/A" Score Marks: An Avg Score of N/A indicates that while an interview event was formally scheduled or completed, numerical scorecards haven't been submitted or saved by the panel owners yet.
- Managing Discrepancies: When an applicant shows a Question Mark indicator ( ) or conflicting recommendation badges (a mixture of Checkmarks and X marks), it flags a pipeline bottleneck where team consensus hasn't been reached, signaling that a calibration meeting is needed.
- Isolated Workspace Display: This analytics summary interface functions within an isolated iframe container window. If data points or table rows appear truncated on smaller monitors, use the internal scrollbars built directly onto the right edge of the slide-out panel to move up and down seamlessly.
Hiring Portal User Guide: Interview Feedback Form
1. Interview Feedback Form Overview
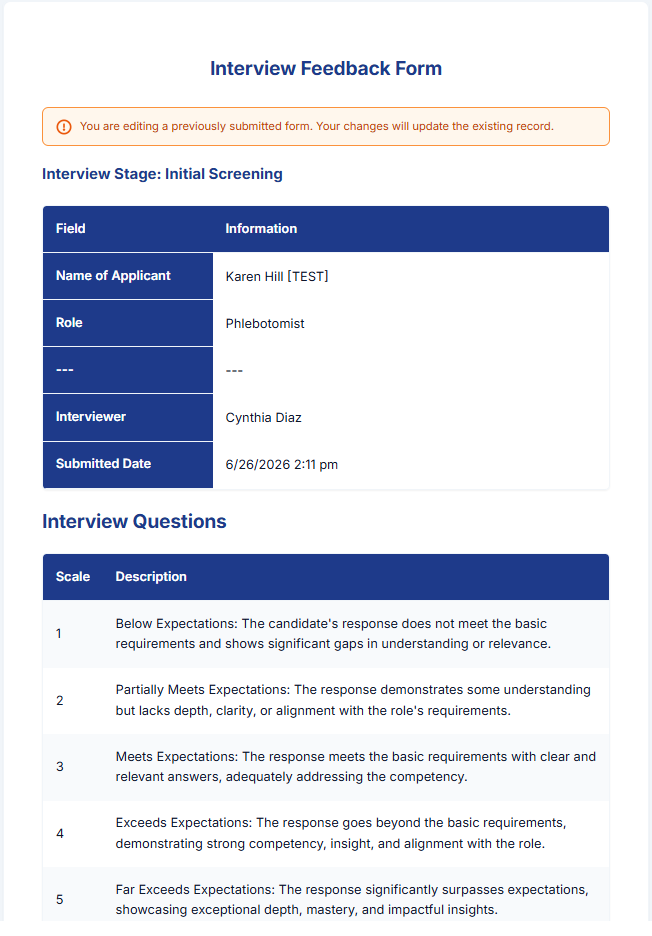
The Interview Feedback Form is an interactive workspace that opens within a slide-out drawer or focused frame when evaluating a candidate’s performance for a specific hiring stage. It provides interviewers with a standardized grading rubric and specialized text areas to record structured question ratings, scenario notes, and final hiring recommendations. This ensures consistent candidate assessments that sync directly with the core recruitment database.
2. Key UI Elements & Fields
| UI Element/Field Name | Type | Description & Purpose for the User |
|---|---|---|
| Close Panel (✕) | Navigation Control | |
| Located at the top right of the drawer. Closes the evaluation form and returns you directly to the primary Interview Feedback list view. | ||
| System Modification Alert | Banner Notification | |
| An orange informational ribbon highlighting that you are modifying a previously submitted evaluation, noting that new changes will overwrite the active record. | ||
| Interview Stage Metadata Header | Information Grid | |
| Automatically populates uneditable background tracking details, including the Name of Applicant, target Role, assigned Interviewer, and the initial Submitted Date and time. | ||
| Scoring Scale Rubric | ||
| Reference Guide | ||
| Displays a standardized 1-5 scoring framework to eliminate grading ambiguity among the panel:Below ExpectationsPartially Meets ExpectationsMeets ExpectationsExceeds ExpectationsFar Exceeds Expectations | ||
| Recommendation | Radio Buttons | Explicit selection metrics defining the interviewer's final choice for the applicant's pipeline routing: Proceed, Do Not Proceed, or Undetermined. |
| Additional Questions Prompt | Information Card | Highlights the core structural focus and evaluation objectives designed for that specific hiring phase (e.g., using scenario-based questions to measure role-specific knowledge). |
| Interviewer Notes | ||
| Rich Text Box | ||
| A spacious open text canvas used to type detailed technical observations, structural thinking notes, or candidate responses from the live interview. | ||
| Score (1 - 5) | ||
| Text/Selection Input | ||
| A numerical text entry or dropdown box positioned next to the prompt row where you assign the candidate's core competency rating based on the rubric. | ||
| Add Question | Button | Allows the interviewer to dynamically append a new custom evaluation row to the score sheet if unexpected competencies need to be reviewed. |
| Additional Comments and Remarks | ||
| Rich Text Box | ||
| A broad summary input field at the bottom of the form used to synthesize final observations and detail the core rationale behind your hiring recommendation. | ||
| Submit | Primary Action Button | Located at the bottom left of the workspace. Validates all text inputs, calculates averages, and saves the scorecard parameters permanently to NetSuite. |
3. Step-by-Step Instructions
- Verify Your Context Info: Review the Interview Stage block at the top of the form to double-check that the applicant name, role title, and your interviewer profile name are correctly mapped.
- Review the Grading Guidelines: Skim the Scoring Scale table block to anchor your assessment answers to your organization's baseline criteria definitions (ranging from 1 for Below Expectations up to 5 for Far Exceeds Expectations).
- Log Core Assessment Content: Locate the active evaluation rows. Read the structured prompt context, type your detailed qualitative assessment points in the Interviewer Notes box, and input the appropriate value in the Score (1 - 5) column.
- Choose Your Hiring Recommendation: Navigate to the Recommendation row and click the appropriate radio bubble—mark Proceed to request advancing the candidate, or select Do Not Proceed if they fail core requirements.
- Formulate Your Executive Summary: Scroll down to the Additional Comments and Remarks canvas. Type a comprehensive synthesis of the candidate's unique advantages, communication abilities, and technical alignment.
- Commit the Scorecard: Click the blue Submit button at the base of the frame to lock in your notes and instantly update the master candidate tracker database.
4. Pro-Tips / Important Notes
💡 Important Notes & Best Practices
- Overwriting Existing Records: If you launch a scorecard that has already been filled out, the orange alert ribbon reminds you that edits are live. Saving edits will replace previously stored notes rather than creating a duplicate entry.
- Draft Protection: Closing the panel using the ✕ button at the top right before hitting Submit will discard all unsubmitted text inputs. Always make sure to click Submit at the bottom of the card to securely log your feedback.
- Scrollable Frame Alignment: This form operates inside an isolated workspace iframe container. If lower sections like the Additional Comments field or Submit button appear cut off from your standard viewport window, utilize the frame's internal scrollbar on the far right edge of the screen to scroll down cleanly.
ATS360 Preferences Manager — Hiring Portal Configuration
1.Hiring Portal Configuration Overview
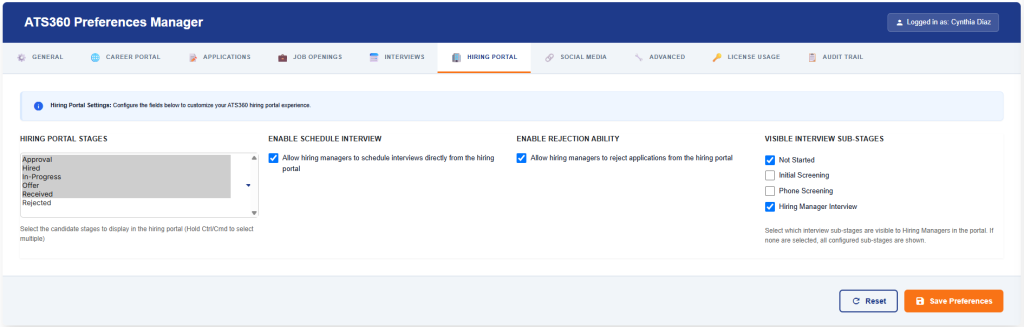
The ATS360 Preferences Manager (Hiring Portal Tab) is an administrative control screen located within the main NetSuite environment. This screen gives recruiters and system administrators the power to customize the exact workflow permissions, visible data checkpoints, and sub-stages that hiring managers can see or interact with when using their client-facing portal.
2. Key UI Elements & Fields
| UI Element/Field Name | Type | Description & Purpose for the User |
|---|---|---|
| HIRING PORTAL STAGES | Multi-Select List | Selects which primary candidate pipeline milestones (e.g., Approval, Hired, In-Progress, Offer, Received, Rejected) are visible to hiring managers in their dashboard charts. |
| ENABLE SCHEDULE INTERVIEW | Checkbox | When checked, grants hiring managers permission to schedule interviews independently directly from their portal view. |
| ENABLE REJECTION ABILITY | Checkbox | When checked, allows hiring managers to reject applicants directly from their portal window. |
| VISIBLE INTERVIEW SUB-STAGES | Checklist | A granular series of options (e.g., Not Started, Initial Screening, Phone Screening, Hiring Manager Interview) that controls which sub-stages show up for team review. |
| Reset | Button | A granular series of options (e.g., Not Started, Initial Screening, Phone Screening, Hiring Manager Interview) that controls which sub-stages show up for team review. |
| Save Preferences | Primary Action Button | Commits all active checkboxes, menu configurations, and stage visibility mappings directly to the database. |
Step-by-Step Instructions
- Open Preferences Menu: Inside the primary NetSuite navigation sidebar, select ATS Preferences and click into the configuration dashboard.
- Navigate to the Target View: Click on the HIRING PORTAL tab link along the horizontal sub-menu to load the portal configuration fields.
- Filter Pipeline Stages: Go to the HIRING PORTAL STAGES menu block. Hold down the Ctrl key (Windows) or Cmd key (Mac) and click on the specific stages you want shared with your management teams.
- Grant Action Permissions: Check the box for ENABLE SCHEDULE INTERVIEW and ENABLE REJECTION ABILITY depending on whether you want managers to execute those recruiting tasks directly or if those actions should remain restricted to human resources.
- Set Sub-Stage Tracking Visibility: Look under the VISIBLE INTERVIEW SUB-STAGES block and check the exact boxes for the interview phases that managers should track.
- Commit Preferences: Review your settings change layout, then click the green Save Preferences button in the lower action bar to push updates live to your users.
Pro-Tips / Important Notes
💡 Important Notes & Best Practices
- The Blank Sub-Stage Rule: Under the VISIBLE INTERVIEW SUB-STAGES layout block, if none of the explicit check boxes are selected, the platform defaults to showing all configured interview sub-stages automatically to your portal users.
- Instant Portal Synchronization: Adjustments made on this administration preferences frame populate instantly. When you click Save Preferences, any logged-in hiring manager will see their portal permissions update upon their next page load or dashboard refresh.
- If something goes wrong: If hiring managers report missing menu options or notice that they are unable to view specific candidates, come back to this panel to confirm that their current candidate stage is highlighted inside the master HIRING PORTAL STAGES selection block.