
ATS360™ Preferences Manager User Guide (July 2026)
Last updated
Page Overview
The ATS360 Preferences Manager serves as the central control hub for customizing your ATS360 general application experience within NetSuite. In this General settings subtab, system administrators and HR managers can define core communication routing, select key personnel for automated employee conversion alerts, and establish foundational company profile details used for AI-driven candidate matching.
Key UI Elements & Fields
| UI Element/Field Name | Type | Description & Purpose for the User |
|---|---|---|
| HR Email Address | Text Field | Enter the primary human resources email address where system-wide recruitment notifications and alerts will be sent. |
| Employee Conversion Notification | Multi-Select List | Select one or multiple employees who should receive an automated notification whenever an applicant is officially converted into a hired employee. |
| Company Culture | Text Area | Provide a description of your workplace environment and values. This text is utilized by the built-in AI Match feature to evaluate how well a candidate's application aligns with your company's core values. |
| Company Organization & Background | Text Area | Enter a high-level summary of who your company is, its history, and your operational structure to feed context into the AI matching system. |
| Company Goals | Text Area | Describe your organization's short-term and long-term objectives to help the AI gauge applicant alignment with company targets. |
| Reset (Refresh icon) | Button | Reverts any unsaved modifications back to the last saved configuration. |
| Save Preferences | Button | Permanently saves all changes made across the Preferences Manager tabs. |
| Career Portal | Button | Directs you to the public-facing Career Portal configuration or view. |
| Easy Apply | Button | Opens the setup or management screen for the streamlined application process. |
Step-by-Step Instructions
- Navigate to the ATS Preferences menu on the left sidebar and select ATS Preferences.
- Ensure you are on the first subtab labeled GENERAL (this is active by default).
- In the HR Email Address field, type or update the main inbox address designated for automated recruitment notifications.
- Go to the Employee Conversion Notification list. Scroll through the employee directory and click on a name to select them.
- In the Company Culture section, fill out the three descriptive blocks (Company Culture, Company Organization & Background, and Company Goals). Ensure these fields accurately reflect your company's identity, as the AI engine reads this text directly to score new applicants.
- Review your entries for accuracy, then click the Save Preferences button at the bottom of the page to commit your changes.
Pro-Tips / Important Notes
💡 Important Multi-Select Behavior: When selecting multiple employees in the Employee Conversion Notification box, hold down the Ctrl key (Windows) or Cmd key (Mac) while clicking the names. If you click a name without holding this key, it will deselect your previous choices.
🤖 AI Match Optimization: The quality of your AI Match applicant scoring depends directly on the descriptions you provide in the Company Culture section. Be specific about your core values and operational style to ensure the AI yields the most accurate candidate compatibility results.
Subtab 2: Career Portal Settings
Page Overview
The Career Portal subtab allows administrators to customize the public-facing job board where applicants view and apply for open positions. This page controls the portal's branding layouts, custom field labels, embed codes, and rich text header/footer content to ensure the portal aligns with your corporate identity.
Key UI Elements & Fields
| UI Element/Field Name | Type | Description & Purpose for the User |
|---|---|---|
| Career Portal Logo | File Upload (Choose File) | Upload your company logo (Recommended: 800x600, JPEG, ~50kb) to display on the public career portal. |
| Open Jobs in New Tab | Checkbox | When checked, clicking a job posting opens it in a new browser tab instead of the current window. |
| Job Openings Per Page | Text Field (Number) | Defines how many job listings appear on a single page before pagination links appear. |
| Career Portal Website IFrame | Read-Only Text Field | Generates the HTML IFrame snippet used to seamlessly embed the career portal into your corporate website. Click to copy. |
| Repository Email Address | Text Field | The designated email address for processing automated resume repository submissions. |
| Mandatory Resume | Checkbox | When enabled, applicants are strictly required to upload or paste a resume before they can proceed with their application. |
| Relabel and Hide Fields | Checkboxes & Text Fields | Allows you to override default terminology (e.g., Work Location, Department, Job Type) with custom internal labels without breaking backend mappings. |
| Hide Job Posting Date | Checkbox | Hides the date a job was published from public portal listings. |
| Refresh Evergreen Job Dates | Checkbox | Displays a rolling, recently refreshed date (1st or 16th of the current month) for evergreen job posts to keep them looking current. |
| Career Portal Header / Footer | Rich Text Editors | Input areas that support formatting, links, and text to build customized headers and footers for your application portal. |
| Career Portal Default Title | Configurable Options | Checkboxes and alignment configurations (Center, Left, Right) controlling how titles, company names, and logos display together. |
| Branding Colors | Hex Color Pickers | Customizes the hex codes for colors used across the portal, buttons, background, and the Easy Apply feature interface. |
| Preview Career Portal | Button | Launches a live preview window of the portal to check formatting and styles before saving. |
| Save Preferences | Button | Permanently saves all changes made across the configurations. |
Step-by-Step Instructions
-
Click on the [🌐 CAREER PORTAL] tab at the top of the Preferences Manager screen.
-
In the Career Portal Logo section, click Choose File to upload your company's high-quality logo asset.
-
Configure your layout preferences by entering a value in Job Openings Per Page and checking Open Jobs In New Tab if desired.
-
Customize the field terms visible to candidates under the Relabel and Hide Fields section by checking the box next to a field and typing your preferred text (e.g., changing "Department" to "Business Unit").
-
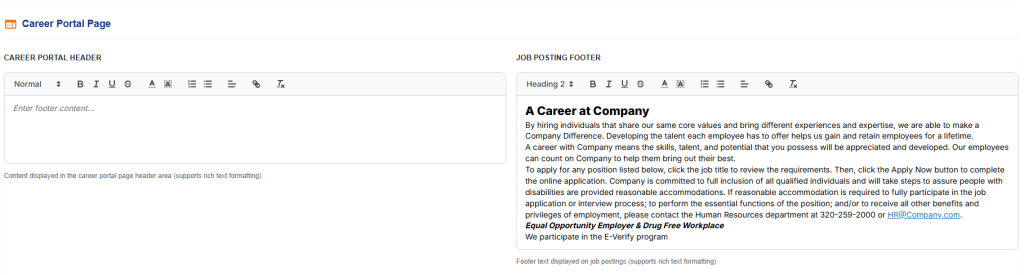
Scroll down to the Career Portal Page area and use the text editors to craft an inviting Job Posting Footer or header outlining candidate compliance or equal opportunity terms.
- Under Branding Colors, click into the primary and accent text fields to paste your company's exact brand hex codes (e.g., #5280FF).

- Click the Preview Career Portal button to verify the visual layout.
- Once satisfied, click the Save Preferences button at the bottom of the screen to push the changes live.
Pro-Tips / Important Notes
💡 Branding Accuracy: Always use standard 6-digit hex codes (e.g., #A9CEFE) for the Branding Colors fields to maintain consistent visual fidelity. If a custom color looks incorrect, you can clear the text and type DEFAULT to reset it.
💡 Relabel Fields: Can be used to include labels in other languages (e.g., Experience/Experiencia) allowing you to reach a broader audience.
🔄 Evergreen Date Strategy: Enabling Refresh Evergreen Job Dates is highly recommended for ongoing, high-volume roles. It ensures your listings never look stale or abandoned to prospective candidates, without requiring manual administrative recreation.
The Live Preview Panel (Interactive Sidebar)
To help you design a cohesive candidate experience, the right side of the screen features a dynamic, real-time Live Preview Panel. This panel allows you to audit your visual branding, text alignment, and layout selections instantly before saving your configuration.
The panel features two distinct view modes that you can toggle between using the tabs at the top of the sidebar:
- Career Portal View: Displays a live rendering of your external job board. You can preview your company logo placement, layout color schemes (such as your Primary Brand Color and action button Accent Colors), search/filter dropdown fields, and default sorting layouts exactly as an applicant would see them.
- Easy Apply View: Switches the panel to display the streamlined application interface. This allows you to verify the application's multi-step progress tracker, drag-and-drop resume upload zone, captcha security layout, and specific color profiles configured under your Easy Apply Branding Colors.
💡 Pro-Tip: Use this sidebar to test color contrast and layout readability. If a color element or font choice looks hard to read in the preview panel, adjust your hex codes in the configuration form on the left until the preview panel displays crisp, accessible contrast.
Subtab 3: Applications Settings
Page Overview
The Applications subtab gives administrators granular control over automated post-application workflows. This section allows you to define exactly when professional reference checks are triggered during the candidate journey, specify the volume of references required, and configure strategic time-delays for automated candidate rejection emails.
Key UI Elements & Fields
| UI Element/Field Name | Type | Description & Purpose for the User |
|---|---|---|
| Reference Request Stage | Dropdown | Select the candidate pipeline status (e.g., In-Progress, Offer, Hired) that automatically triggers the system to send reference request forms to the applicant. |
| References Number | Text Field (Number) | Specify the exact number of professional references an applicant must provide when prompted. |
| Default Delay Hours for Reject | Text Field (Number) | Set a deliberate buffer period (in hours) between a recruiter marking an applicant as "Rejected" and the system actually sending out the automated rejection email. |
| Reset | Button | Reverts any unsaved modifications on the current screen back to your last saved state. |
| Save Preferences | Button | Pushes all active changes made within the Applications settings live. |
Step-by-Step Instructions
- Click on the [📝 APPLICATIONS] subtab from the top preference navigation bar.
- Click the Reference Request Stage dropdown and choose the ideal milestone for initiating background checks (e.g., choose In-Progress if you pre-screen references, or Offer if you only check final candidates).
- Click into the References Number box and type the total number of references you require candidates to supply (e.g., 3).
- In the Default Delay Hours for Reject field, type your preferred buffer time in hours (e.g., typing 24 ensures a candidate will not receive an immediate, automated rejection notice, creating a more humanized candidate experience).
- Review your entries and click the Save Preferences button at the bottom right to secure your rules.
Pro-Tips / Important Notes
💡 Candidate Experience Best Practice: Leaving the Default Delay Hours for Reject field empty or setting it to 0 means rejection notices are delivered instantly the moment a recruiter changes a candidate's status. Setting a delay of 24 to 48 hours is highly recommended to prevent automated responses from feeling cold or immediate to candidates.
🔄 Reference Automation: Ensure that you have a standard email template mapped out for reference collection before setting a Reference Request Stage, as the system will immediately dispatch forms to any candidate who enters that status.
Subtab 4: Job Openings Settings
Page Overview
The Job Openings subtab provides global configurations for managing the lifecycle, compliance, and initial screening requirements of new job requisitions. This section allows NetSuite Administrators and HR managers to define default expiration behaviors, default screening and Equal Employment Opportunity (EEO) questionnaire groups, and baseline visibility settings for compensation and work authorization.
Key UI Elements & Fields
| UI Element/Field Name | Type | Description & Purpose for the User |
|---|---|---|
| Default Expiration Days | Text Field (Number) | Set the default number of days a job opening remains active and visible on your job board before it expires. |
| Expiration Notice Days | Text Field (Number) | Specify how many days prior to a job's expiration date the system should send a warning notice to the assigned recruiter. |
| Enable Job Expiration Process | Checkbox | When checked, the system will automatically archive and unpublish job openings once they hit their expiration date. |
| Default Screening Questions | Dropdown | Select the default pre-configured screening questionnaire group that should automatically attach to all newly created job openings. |
| Default EEO Questions | Dropdown | Select the default questionnaire group used to gather Equal Employment Opportunity demographics for compliance tracking. |
| Confidential Compensation By Default | Checkbox | If enabled, any salary or compensation details entered on new job openings will be marked as confidential and hidden from the public-facing portal by default. |
| Default Work Authorization Country | Dropdown | Set the default country value used for the "Must be Legally Authorized to Work In" field when creating new job requisitions. |
| Reset | Button | Reverts any unsaved changes on this subtab back to the last saved configuration. |
| Save Preferences | Button | Commits and applies all configuration changes across your preferences manager. |
Step-by-Step Instructions
- Click on the [💼 JOB OPENINGS] subtab from the main preferences subnavigation bar.
- Enter your desired posting lifecycle numbers in Default Expiration Days (e.g., 89) and Expiration Notice Days (e.g., 3).
- Check the Enable Job Expiration Process box if you want the system to clean up and pull down old postings without manual intervention.
- Select your baseline applicant questionnaires by choosing an option from the Default Screening Questions and Default EEO Questions dropdown menus.
- If compensation details should remain internal until manually overridden, check the Confidential Compensation By Default checkbox.
- Choose the primary operational region from the Default Work Authorization Country dropdown (e.g., Canada).
- Review your selections and click the Save Preferences button to apply the defaults to all future job postings.
Pro-Tips / Important Notes
⏳ Expiration Automation Note: The Enable Job Expiration Process checkbox is a powerful housekeeping tool. However, ensure your Expiration Notice Days buffer gives recruiters enough time (e.g., 3 to 5 days) to renew evergreen or high-priority openings before they are taken offline automatically.
🔀 Baseline Overrides: Settings configured on this page act strictly as defaults for new records. Recruiters and hiring managers can still manually change screening questions, work authorization country, or toggle compensation confidentiality on an individual job-by-job basis when creating a specific requisition.
Subtab 5: Interviews Settings
Page Overview
The Interviews subtab allows administrators to standardize the candidate interviewing framework across the organization. This screen controls structural scheduling parameters (such as standard appointment durations and link expirations), maps your sequence of up to five custom recruitment interview stages, and links automated invitation email templates to each respective stage.
Key UI Elements & Fields
| UI Element/Field Name | Type | Description & Purpose for the User |
|---|---|---|
| Default Interview Duration | Dropdown | Sets the default time block (e.g., 30 Minutes, 60 Minutes) allocated for newly scheduled interview appointments. |
| Schedule Expiration Days | Text Field (Number) | Defines the number of days an invitation link remains active before expiring if a candidate fails to pick an interview time slot. |
| Use BCC for Interview Emails | Checkbox | When enabled, automatically blind-carbon-copies (BCC) the system or designated coordinator on outgoing interview invitations for record-keeping. |
| Auto Complete Interviews | Checkbox | When checked, automatically switches the status of an interview record to "Complete" once the scheduled chronological time has elapsed. |
| Interview First to Fifth Stage | Text Fields | Custom text parameters that label your operational pipeline sequence (e.g., Phone Screening, Hiring Manager Interview, Panel Interview). |
| Interview 1 to 5 Template | Dropdown | Links a specific, pre-configured NetSuite email communication template to trigger dynamically for each respective interview stage. |
| Reset | Button | Discards pending, unsaved modifications on this subtab. |
| Save Preferences | Button | Commits all updated scheduling logic, custom stage labels, and email templates globally. |
Step-by-Step Instructions
- Click on the [📅 INTERVIEWS] subtab from the main preferences subnavigation bar.
- Under the General Settings section, use the Default Interview Duration dropdown to choose your standard timeline block.
- Establish a link deadline by entering a value in Schedule Expiration Days (e.g., 2).
- Check Auto Complete Interviews if you want the system to clean up active schedules automatically after the meeting ends.
- In the Interview Stages column, enter your customized tracking terminology sequentially into the Interview First Stage through Interview Fifth Stage fields.
- Move to the Interview Templates column and match each stage with its appropriate automated notification email text (e.g., link Interview First Stage to the Phone Screening - First Meeting template).
- Scroll to the bottom of the page and click Save Preferences to activate your hiring pipeline defaults.
Pro-Tips / Important Notes
⏳ Link Expiration Urgency: Keeping Schedule Expiration Days to a shorter window (such as 2–3 days) drives applicant responsiveness and helps secure top talent quickly before calendar slots fill up.
📧 Template Alignment: Always verify that the name assigned in an Interview Stage logically matches the text within the selected Interview Template. For example, if Stage 2 is labeled "Technical Panel," make sure your template layout contains the relevant engineering calendar links rather than initial phone screening context.
Subtab 6: Hiring Portal Settings
Page Overview
The Hiring Portal subtab enables NetSuite Administrators to define the workspace boundaries and permissions for internal hiring managers. This screen controls what candidate pipeline stages are visible to managers, delegates direct scheduling and application rejection capabilities, and determines which interview sub-stages appear in their portal dashboards.
Key UI Elements & Fields
| UI Element/Field Name | Type | Description & Purpose for the User |
|---|---|---|
| Hiring Portal Stages | Multi-Select List | Select which candidate pipeline stages (e.g., Approval, In-Progress, Offer, Hired) hiring managers are allowed to view within their portal. |
| Enable Schedule Interview | Checkbox | When checked, grants hiring managers permission to schedule interviews directly with candidates through the hiring portal interface. |
| Enable Rejection Ability | Checkbox | When checked, allows hiring managers to officially reject applications directly from the hiring portal. |
| Enable Score Summary | Checkbox | When enabled, displays the Interview Score Summary report button within the hiring manager portal view. |
| Visible Interview Sub-Stages | Checkbox List | Select which specific interview sub-stages (Not Started, Phone Screening, Hiring Manager Interview, Panel Interview, Final Round) are visible to managers. |
| Reset | Button | Discards any unsaved adjustments on this subtab. |
| Save Preferences | Button | Commits and applies all hiring portal configurations globally. |
Step-by-Step Instructions
- Click on the [🏢 HIRING PORTAL] subtab from the main preferences subnavigation bar.
- Under the Hiring Portal Stages list, hold Ctrl (Windows) or Cmd (Mac) and select the specific pipeline milestones you want managers to track.
- Configure administrative permissions by checking Enable Schedule Interview and Enable Rejection Ability to delegate autonomy to your hiring managers, or leave them unchecked to keep those actions restricted to HR.
- Check Enable Score Summary if you want your managers to see aggregated interview evaluation scores directly in their portal dashboards.
- In the Visible Interview Sub-Stages section, select the checkboxes next to the specific sub-stages you want visible (e.g., check Hiring Manager Interview, Panel Interview, and Final Round).
- Scroll down and click the Save Preferences button to deploy the dashboard restrictions to your internal teams.
Pro-Tips / Important Notes
💡 Multi-Select Caution: Just like other multi-select elements in NetSuite, you must hold down the Ctrl or Cmd key while clicking options in the Hiring Portal Stages field. Failing to do so will clear your previously highlighted selections.
⚙️ Sub-Stage Visibility Logic: If you leave all boxes under Visible Interview Sub-Stages completely unchecked, the system will default to showing all configured interview sub-stages to hiring managers in the portal. Specifying options is only necessary if you want to actively hide particular stages (like early-stage Phone Screening results) from their view.
Subtab 7: Social Media Settings
Page Overview
The Social Media subtab allows administrators to link corporate social media channels to the public career portal. By configuring these URLs, you can automatically display interactive icons on your external job board, making it seamless for candidates to research your company's digital presence and culture.
Key UI Elements & Fields
| UI Element/Field Name | Type | Description & Purpose for the User |
|---|---|---|
| Facebook URL | Text Field | Enter your company’s official Facebook page URL (e.g., www.facebook.com/yourcompany). |
| LinkedIn URL | Text Field | Enter your company’s public corporate LinkedIn page link to direct candidates to your professional profile. |
| Instagram URL | Text Field | Input your corporate Instagram account URL to showcase your workplace culture and visual media. |
| Twitter URL | Text Field | Provide your company's X (formerly Twitter) handle or profile link to share real-time updates and brand news. |
| TikTok URL | Text Field | Enter your corporate TikTok profile link to engage candidates with short-form video content and employer branding. |
| Company Website URL | Text Field | Input your primary corporate website root homepage address. |
| Reset | Button | Discards any unsaved text changes in the social media fields and restores the previous configuration. |
| Save Preferences | Button | Commits the active social media links globally across your SuiteApp. |
Step-by-Step Instructions
- Click on the [🔗 SOCIAL MEDIA] subtab from the main preferences navigation bar.
- Review the fields and enter your complete corporate web links in the text boxes provided (e.g., Facebook URL, LinkedIn URL, Instagram URL).
- If your company does not use a specific channel, leave that text box completely empty.
- Verify that the Company Website URL field is populated so candidates can easily loop back to your main site from the job board.
- Review your entries for typos, then click the Save Preferences button at the bottom right corner to push the icons live to your public portal.
Pro-Tips / Important Notes
🚫 Visibility Dependency: Social media icons are dynamically hidden or shown based on text presence. If you leave a field entirely blank, its respective icon will not appear on your candidate-facing career portal.
🔗 URL Formatting: For a cleaner layout and consistent link routing, verify that you are pasting full domain paths (e.g., starting with www. or https://) rather than just your account handles (e.g., @YourCompany).
ATS360™ Preferences Manager User Guide
Subtab 8: Advanced Settings
Page Overview
The Advanced subtab gives system administrators and advanced HR managers control over background automation features, AI matchmaking settings, and specific hiring classification overrides. This screen allows you to fine-tune automation flags such as resume parsing rules, candidate-to-vendor conversions, and custom team notifications.
Key UI Elements & Fields
| UI Element/Field Name | Type | Description & Purpose for the User |
|---|---|---|
| Enable Resume Parsing | Checkbox | When enabled, the system automatically extracts candidate data from uploaded resumes using AI to pre-populate applicant profiles. |
| Enable Filled Job Reminders | Checkbox | When checked, sends automated reminder alerts to recruiters or hiring managers regarding closed or filled job positions. |
| Weekly Job Newsletter | Checkbox | When enabled, activates the automated weekly job newsletter feature to dispatch open listings to your talent pool. |
| Enable AI Match Notification | Checkbox | Toggles automated system notifications when the AI matching engine identifies a high-scoring candidate for an open requisition. |
| Enable Culture Questions | Checkbox | When checked, displays culture-related questions on the public application form to gather candidate alignment data. |
| Toggle Convert to Vendor | Checkbox | When active, changes the default hiring workflow to convert an accepted applicant into a Vendor record instead of a standard Employee record in NetSuite. |
| Employees to Receive AI Match Notification | Multi-Select List | Select specific employees from your company directory who should receive email alerts when the AI identifies matching candidates. |
| Reset | Button | Discards any unsaved checkbox or list selections on this subtab. |
| Save Preferences | Button | Commits all advanced automation toggles globally. |
Step-by-Step Instructions
- Click on the [🔧 ADVANCED] subtab from the preferences navigation menu.
- Toggle your core data automation features by checking or unchecking Enable Resume Parsing, Enable Filled Job Reminders, and Enable Culture Questions based on your workflow needs.
- If you want the system to alert your team when top candidates match your job requirements, check Enable AI Match Notification.
- Go to the Employees to Receive AI Match Notification multi-select box, scroll through your team directory, and select the users who need these updates.
- If your organization hires independent contractors or freelancers through this portal, check Toggle Convert to Vendor to route their onboarding records correctly.
- Click the Save Preferences button at the bottom right to apply these settings.
Pro-Tips / Important Notes
👥 Multi-Select Reminder: As with all NetSuite list boxes, remember to hold down the Ctrl key (Windows) or Cmd key (Mac) while clicking names in the Employees to Receive AI Match Notification field to select multiple people without losing your selection.
🔄 Vendor Conversion Workflow: The Toggle Convert to Vendor option permanently changes the target record type upon clicking "Hire" in the applicant file. Only turn this on if your NetSuite account primarily utilizes the ATS to onboard independent contractors rather than traditional W-2 payroll employees.
Subtab 9: License Usage Settings
Page Overview
The License Usage subtab provides NetSuite Administrators with a comprehensive overview of system asset consumption, team seating allocations, and AI credits. This control dashboard enables real-time auditing of user seats, tracking of remaining automated processing tokens, and immediate point-of-click additions or removals for team member profiles.
Key UI Elements & Fields
| UI Element/Field Name | Type | Description & Purpose for the User |
|---|---|---|
| AI Token Usage (Cards) | Progress Trackers | Visual indicators displaying consumed versus remaining token metrics for Resume Parsing, AI Scoring, and daily AI Search & Match operations. |
| Request More | Button | Spawns an automated outreach request to your account manager to purchase additional user seats or AI processing credits. |
| ATS Users Table | Core User Table | Lists all internal active ATS operational seats with a search lookup bar by name or email address. |
| Hiring Managers Table | Management User Table | Displays assigned hiring manager portal seats alongside active consumption progress bars. |
| ATS GO Users Table | Add-on User Table | Manages seating for the mobile or specialized ATS GO add-on application layer. |
| Add [User Type] | Button | Found under each respective user table to officially provisioning a new user seat. |
| Delete (Trash Icon) | Button | Instantly removes the corresponding user from the table list, revoking access and freeing up the license seat. |
| Reset | Button | Discards pending, unsaved modifications on this subtab. |
| Save Preferences | Button | Saves all active credentialing allocations. |
Step-by-Step Instructions
- Click on the [🔑 LICENSE USAGE] subtab from the main preferences navigation bar.
- Review the top metrics row to monitor your remaining AI Token Usage credits before launching large sourcing batches.
- To add a standard user, go to the ATS Users section, type their identification details into the look-up box, and click the Add button.
- To provision an internal manager dashboard, locate the Hiring Managers module and use its dedicated text bar to add them.
- If your team utilizes mobile workflows, go to the ATS GO Users add-on section below to assign available specialized licenses.
- To free up an occupied seat, click the red Delete (Trash Icon) button next to the targeted employee's name.
- Click the Save Preferences button at the bottom of the page to lock in the revised team directory mappings.
Pro-Tips / Important Notes
📱 Add-on Provisioning: The ATS GO suite functions as a distinct operational add-on. If your team runs out of seats within the ATS GO Users block, adding users to the standard ATS Users grid will not grant them mobile application privileges. Use the local Request More mail button to add additional mobile licenses.
🔄 Live Seat Counts: Seat usage counters (e.g., 0 / 3 used) update instantly upon clicking Save Preferences. If a text search box does not show a team member, ensure their foundational Employee record is correctly created and active in your core NetSuite instance first.
Subtab 10: Audit Trail
Page Overview
The Audit Trail subtab acts as the accountability ledger for your application settings, providing a transparent history of system changes. This view tracks real-time modifications across all preference modules, ensuring that NetSuite Administrators can instantly identify who adjusted a setting, when the change occurred, and what the historical values were prior to the update.
Key UI Elements & Fields
| UI Element/Field Name | Type | Description & Purpose for the User |
|---|---|---|
| Recent Preference Changes Feed | Summary Activity Feed | Chronologically maps the historical timeline of configurations committed across all preference subtabs. |
| User Label (e.g., Matthew Gardiner) | Metadata Link | Identifies the specific employee record or administrator who committed the preference update. |
| Timestamp (e.g., Jun 29, 2026, 11:29 AM) | Text Element | Marks the exact date and operational time the preference change was saved to the system. |
| Setting Name (e.g., INTERVIEW FIRST STAGE) | Label Text | Displays the precise system configuration field parameter that was modified. |
| Historical Transition (Old Value → New Value) | Comparative Text | Displays the precise value mutation (e.g., 1st Interview → Phone Screening) so you can roll back or track historical workflow drift. |
| Reset | Button | Refreshes the active view pane to pull the absolute newest audit log entries from the database. |
Step-by-Step Instructions
- Click on the [📋 AUDIT TRAIL] subtab from the final slot of the preference navigation bar.
- Review the Recent Preference Changes header block to look at the global feed stack.
- Locate the specific record block you need to audit by scanning chronologically down the feed layout.
- Read left-to-right to identify the active user profile, the exact operational timestamp, and the modified setting name.
- Review the specific value shift indicated by the gray strike-through text (the old setting value) pointing to the green bold text (the current live setting value).
- To pull down the most recent edits made by other concurrent users, click the Reset refresh icon button at the bottom of the screen.
Pro-Tips / Important Notes
🔍 Immutable Logging: The Audit Trail feed is a read-only database tracking log. Individual entry lines cannot be deleted, cleared, or manually overridden by any user level, ensuring total compliance transparency for internal IT and HR system audits.
🔄 Value Recovery: If an automated workflow or layout rule breaks unexpectedly after an update, use this screen to find the exact timestamp of the error, look at the previous working text or selection state before the → arrow, and manually change it back in the corresponding configuration subtab.