
Talent Pool Module Guide (June 2026 Release)
Last updated
Overview
The Talent Pool page serves as your long-term candidate relationship management library. This screen acts as a central repository for all historical, passive, and silver-medalist applicants who have ever entered your system, allowing recruiters to source matching profiles for brand-new requisitions before spending resources on external job boards.
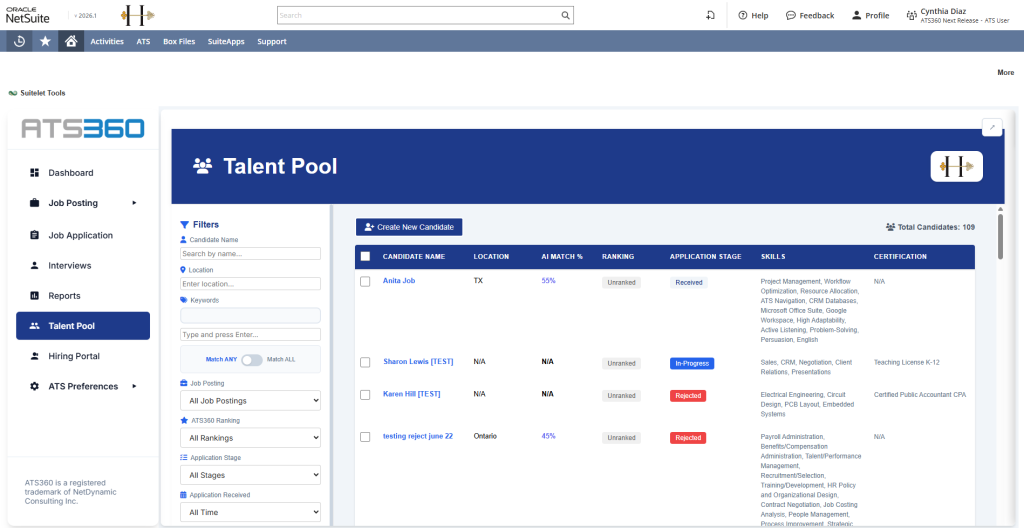
Key UI Elements & Fields
| UI Element/Field Name | Type | Description & Purpose for the User |
|---|---|---|
| Talent Pool | Left Sidebar Menu Item | The navigational gateway button inside the ATS360 menu tree used to jump from the main Dashboard into the global candidate ledger. |
| Search candidate… | Text Search Bar | A global search field that scans across first names, last names, internal tracking IDs, and embedded resume attachment text. |
| FILTER Job Posting | Dropdown Menu Filter | Filters the candidate ledger rows to exclusively show individuals who historically applied to a specific requisition. |
| AI Score ≥ | Numerical Input Filter | Limits your visible rows to high-performing profiles by filtering for an AI Match Score at or above your specified percentage threshold. |
| SORT Dropdown | Dropdown Menu | Rearranges candidate rows chronologically or alphabetically (Date Applied, Oldest First, Name A–Z, Name Z–A, AI Score High–Low, AI Score Low–High). |
| Reset | Button | Instantly clears all keyword filters, score thresholds, and sorting selections, restoring the full global talent ledger list. |
| Edit | Action Button | Positioned inline next to each applicant name. Launches the system backend candidate record form to modify core contact profiles. |
| View | Action Button | Positioned inline next to each applicant name. Opens the interactive slide-out drawer profile window to preview histories, text logs, and resumes. |
Step-by-Step Instructions
- Navigate from the Dashboard: Look at the left-hand navigation sidebar on your main ATS360 screen. Move your cursor below the Reports tab and click directly on the Talent Pool link.
- Execute a Keyword or Skill Search: Click into the Search candidate… box. Type a specific professional credential or skill (e.g., NetSuite, Swift, Accounting) to immediately isolate profiles possessing those terms within their application records.
- Isolate High-Tier Talent: Click the AI Score ≥ input bar and type a minimum quality score threshold (e.g., 70%). Press your Enter key to filter out lower-matching profiles.
- Organize Your Talent Ledger: Click the SORT dropdown menu and select AI Score High–Low to surface your most qualified historical applicants to the very top of the list view.
- Inspect an Applicant Profile: Move to your target candidate line and click the View button. This slides open the familiar side window drawer containing their full resume data, historical feedback ratings, and previous communication threads.
Pro-Tips / Important Notes
💡 Important Notes & Best Practices
- Deep Context Searching: The master Search candidate… bar doesn't just look at names; it reads directly through the text files of attached resumes. Typing specialized technical certifications into this bar will safely flag candidates who mentioned them inside their employment paperwork.
- Cross-Role Sourcing: Sourcing out of the Talent Pool is a great way to save money on external advertising. If a new position opens up, come here first, use the FILTER Job Posting tool to check who applied to similar historical roles, and reuse the Emails tab inside their drawer to send them a fresh welcome request.
- If something goes wrong: If the candidate table list becomes stuck or fails to load new filtered rows after typing a query, click the Reset button on the right to flush your tracking state and refresh your system filters.
Advanced Search & Filter System
Overview
The Filters sidebar panel is an advanced search engine built directly into the Talent Pool interface. It empowers recruiters and HR personnel to narrow down a massive global database of historical applicants by combining deep text searches, geographical locations, match thresholds, and specific requisition parameters to surface target candidate files instantly.
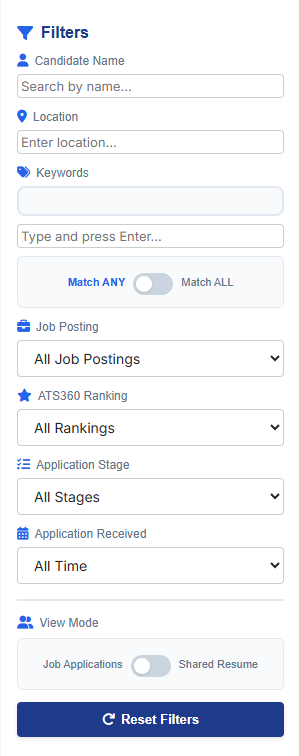
Key UI Elements & Fields
| UI Element/Field Name | Type | Description & Purpose for the User |
|---|---|---|
| Candidate Name | Text Field | Allows you to quickly isolate a candidate row by typing a partial or full name string (e.g., Search by name...). |
| Location | Text Field | Filters the database table rows based on geographic location parameters (e.g., typing Ontario or TX). |
| Keywords | Structured Input Field | Allows users to type key criteria or core competencies and press Enter to stack multiple search tags. |
| Match ANY / Match ALL | Radio Slider Button | Controls the search logic rules for your keywords:Match ANY: Surfaces candidates possessing at least one of your typed keywords.Match ALL: Restricts results strictly to candidates whose files contain every listed keyword. |
| Job Posting | Dropdown Menu Filter | Isolates individuals who previously applied to a specific corporate requisition (e.g., Phlebotomist, Septic Tank Cleaner, Astronaut From Home). |
| ATS360 Ranking | Dropdown Menu Filter | Filters the candidate ledger rows based on designated tier groups (defaults to All Rankings or Unranked). |
| Application Stage | Dropdown Menu Filter | Filters candidates according to their placement in the pipeline lifecycle (e.g., Approval, Hired, In-Progress, Offer, Received, Rejected). |
| Application Received | Dropdown Menu Filter | Filters profiles based on the date their application form hit the system (e.g., Today, Last 7 Days, Last 30 Days, Last 60 Days, Last 90 Days, Last 6 Months, Last Year, All Time). |
| View Mode | Radio Selection Buttons | Switches the baseline presentation grid format between the detailed Job Applications columns or a simplified Shared Resume overview. |
| Reset Filters | Action Button | Instantly wipes all active input selections, checkmarks, text rules, and dropdown filters, returning the display grid to the full company candidate ledger view. |
Step-by-Step Instructions
- Access the Sourcing Engine: Move your focus to the left sidebar menu panel labeled Filters on your Talent Pool screen.
- Apply Core Skill Parameters: Click into the Keywords input bar, type a highly requested skill or toolset parameter (e.g., Payroll Administration), and press your keyboard's Enter key to log the search tag.
- Configure Your Sourcing Match Logic: Adjust the Match ANY / Match ALL slider switch. Slide it to Match ALL if you are searching for a highly specialized profile that must satisfy every single keyword requirement you've listed.
- Isolate Specific Requisition Pipelines: Click the Job Posting dropdown menu to look at applicants from past similar vacancy listings, or use the Application Stage dropdown to review only individuals who reached the Hired or Offer stage previously.
- Set Your Target Time Windows: Click the Application Received dropdown filter and select a timeframe preset, such as Last 90 Days, to keep your focus on fresh, highly engageable talent.
- Flush Filters to Start Fresh: Click the circular arrow icon link labeled Reset Filters at the base of the sidebar whenever you need to clear your active parameters and rebuild a completely new search sequence.
Pro-Tips / Important Notes
💡 Important Notes & Best Practices
- The Auto-Filtering Behavior: This advanced filtering workspace dynamically updates the center candidate ledger grid view in real time. As soon as you finish typing a location or change a dropdown value, the page filters the data rows immediately without requiring you to click a manual "Search" or "Submit" button.
- The Multi-Tag Trick: You can enter an unlimited number of tags inside the Keywords search input box. Each time you finish typing a word or phrase, simply hit your keyboard's Enter key to lock that term into your search criteria stack.
- If something goes wrong: If your screen displays zero records and states "Total Candidates: 0" after configuring a search, double-check your Match ANY / Match ALL slider toggle. Setting it to Match ALL with highly conflicting terms (e.g., searching for both an Electrical Engineering certificate and a Phlebotomist role concurrently) will over-restrict the system database results.
Selecting & Acting on Candidates
Overview
Once you have filtered the Talent Pool down to the candidates you want, this is where you act on them. ATS360 lets you select one candidate or many at once and then either create an application on their behalf for an open role, or invite them to apply themselves. This is the core purpose of the Talent Pool: turning your historical, pre-qualified candidates into active applicants for a new requisition without sourcing from scratch.
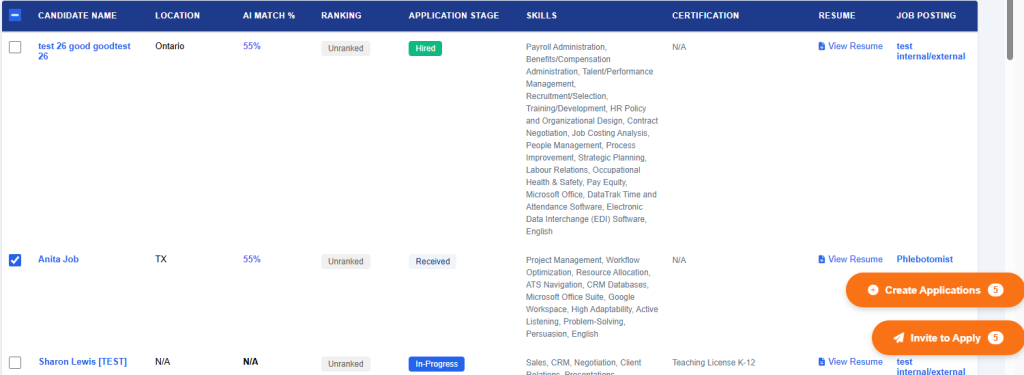
Key UI Elements & Fields
| UI Element/Field Name | Type | Description & Purpose for the User |
|---|---|---|
| Selection Checkbox | Checkbox | Located at the start of each candidate row. Marks an individual candidate for a bulk action. |
| Select All / Bulk Select | Checkbox | Located in the header row of the candidate list. Selects every candidate currently visible so you can act on the whole filtered group at once. |
| Create Application(s) | Action Button | Appears once one or more candidates are selected. Creates a job application on the candidate's behalf for a job posting you choose. |
| Invite to Apply | Action Button | Appears once one or more candidates are selected. Sends the chosen candidates an email inviting them to apply to a job posting themselves. |
| Job Posting Selector | Dropdown Menu | Appears inside the Create Application or Invite to Apply window. Lets you pick which open role the action applies to. |
| Send Invitations | Confirmation Button | Confirms and sends the "Invite to Apply" emails to the selected candidates. |
Step-by-Step Instructions
- Select Your Candidates: In the candidate list, click the Selection Checkbox next to each person you want, or click the Select All checkbox in the header row to choose everyone currently shown by your filters.
- Choose How to Engage Them: With your candidates selected, decide between two paths:
- Create Application(s) — to place the candidate directly into a role's pipeline yourself.
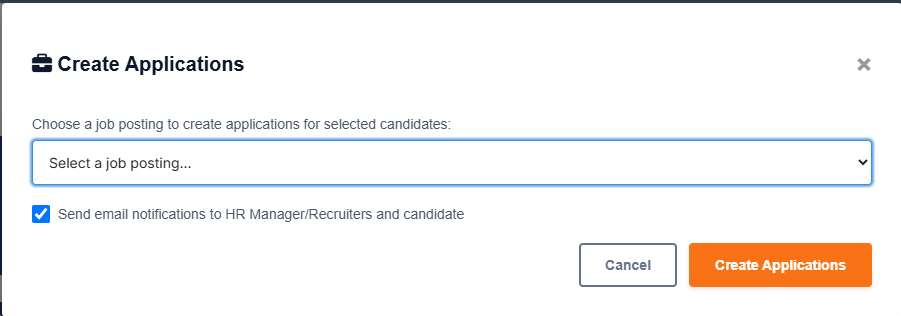
- Create Applications (Path A): Click Create Application(s), select the desired role from the Job Posting dropdown, then click Create Application(s) again to confirm. The system creates an application for each selected candidate under that job posting and notifies them.
- Invite to Apply — to email the candidate and let them apply on their own.
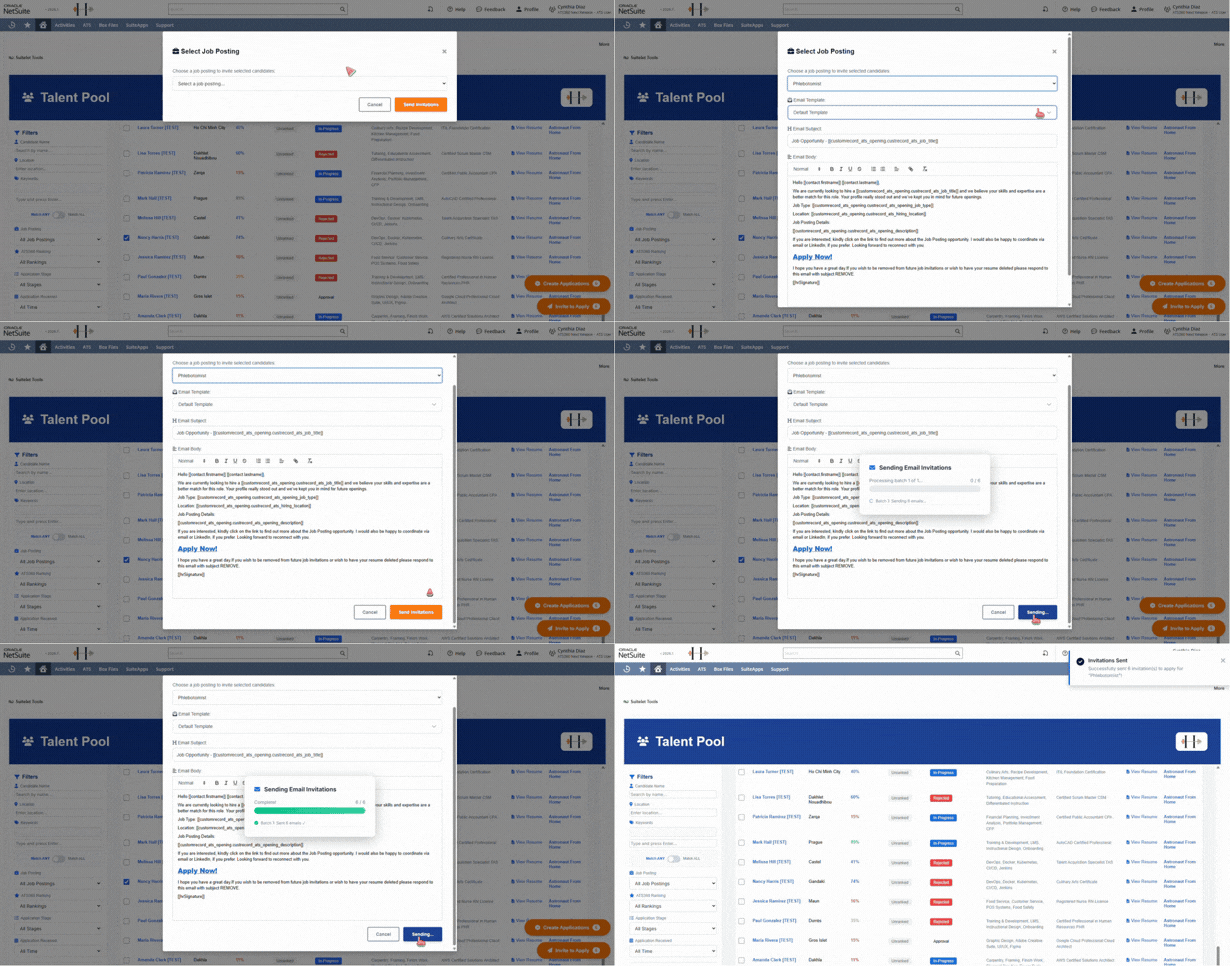
- Invite to Apply (Path B): Click Invite to Apply, select the desired role from the Job Posting dropdown, then click Send Invitations. The system emails each selected candidate inviting them to apply to that posting.
- Confirm the Result: The selected candidates now appear in that job posting's applicant pipeline (Path A) or receive their invitation email (Path B), ready for the normal Received → Hired workflow.
Pro-Tips / Important Notes
💡 Important Notes & Best Practices
- Create vs. Invite: Create Application(s) does the work for the candidate by putting them straight into the pipeline, which is ideal for strong silver-medalists you already know. Invite to Apply asks the candidate to opt in themselves, which is better for fresh outreach where you want confirmed interest and up-to-date information.
- Bulk by design: Both actions work on a single candidate or a whole filtered group, so filter first (by skill, ranking, or past role), then select all and act once instead of repeating the process per person.
- If something goes wrong: If the Create Application(s) or Invite to Apply button doesn't appear, make sure at least one candidate checkbox is selected — the action buttons only show once a selection is active.
Adding New Candidates (Create New Candidate)
Overview
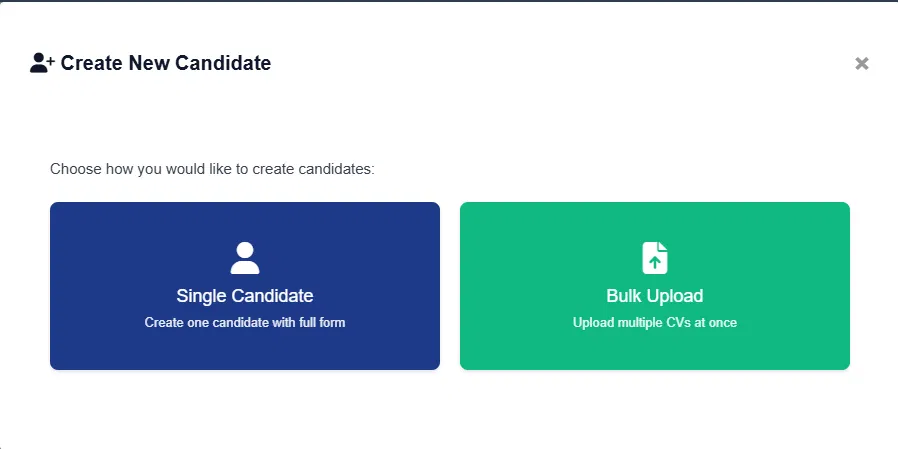
The Talent Pool isn't only for people who already applied — you can add new candidates manually, such as someone you sourced on LinkedIn or met at an event. Clicking Create New Candidate lets you choose between adding one candidate at a time with a guided form, or uploading many CVs at once in bulk. Either way, ATS360 parses the resume(s) and the new candidate(s) land directly in your Talent Pool, ready to be engaged.
Key UI Elements & Fields
| UI Element/Field Name | Type | Description & Purpose for the User |
|---|---|---|
| Create New Candidate | Action Button | Located at the top of the candidate list. Opens the creation chooser. |
| Single Candidate | Selection Card | Starts the guided, one-candidate flow ("Create one candidate with full form"). |
| Bulk Upload | Selection Card | Starts the multi-candidate flow ("Upload multiple CVs at once") |
| Upload File / Paste Content | Tab Toggle | (Single Candidate) Switches between uploading a CV file and pasting the candidate's profile text |
| Upload your CV | Drag-and-Drop Field | The area where you drag and drop a CV or click to browse. Supports PDF and Word. |
| Next | Navigation Button | |
| (Single Candidate) Advances from Step 1 (Upload Resume) to Step 2 (Profile Information). | ||
| Profile Information | Navigation Button | (Single Candidate) Advances from Step 1 (Upload Resume) to Step 2 (Profile Information). |
| Drag & drop CV files here | Drag-and-Drop Field | (Bulk Upload) The area where you drop or browse for multiple CV files at once. |
| Process CVs | Action Button | (Bulk Upload) Parses all uploaded CVs and creates a candidate profile for each. |
| Cancel | Button | (Bulk Upload) Closes the upload window without creating any candidates. |
Step-by-Step Instructions
- Open the Talent Pool: From the ATS Dashboard, select Talent Pool.
- Start a New Candidate: Click the Create New Candidate button at the top of the candidate list. A chooser appears asking how you'd like to create candidates.
- Choose Your Method: Select Single Candidate to add one person with a guided form, or Bulk Upload to add several at once from multiple CVs. Path A — Single Candidate:
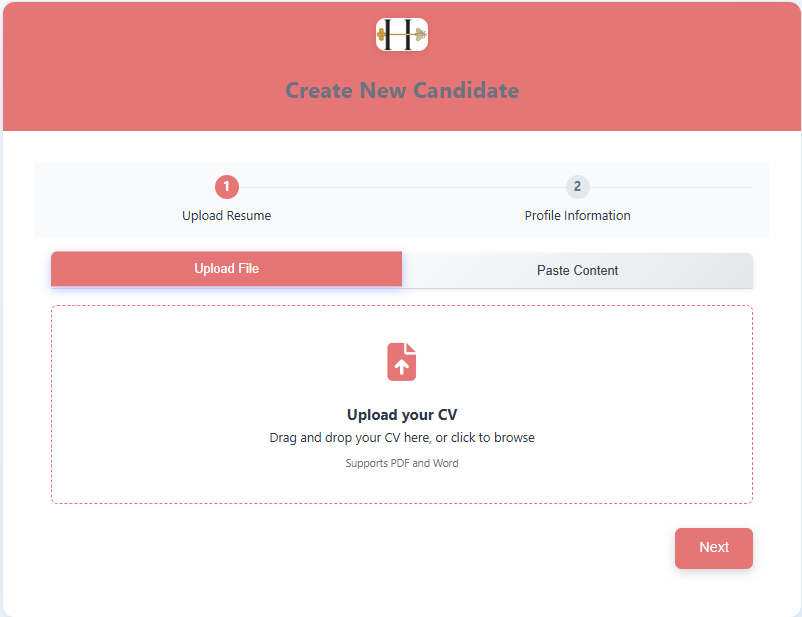
- On Step 1 – Upload Resume, keep the Upload File tab selected and drag and drop the CV into the upload box (or click to browse). Supports PDF and Word. Alternatively, switch to the Paste Content tab and paste the candidate's profile text instead.
- Click Next to move to Step 2 – Profile Information, where ATS360 shows the parsed details for you to review and complete.
- Save to create the candidate.
- Path B — Bulk Upload:
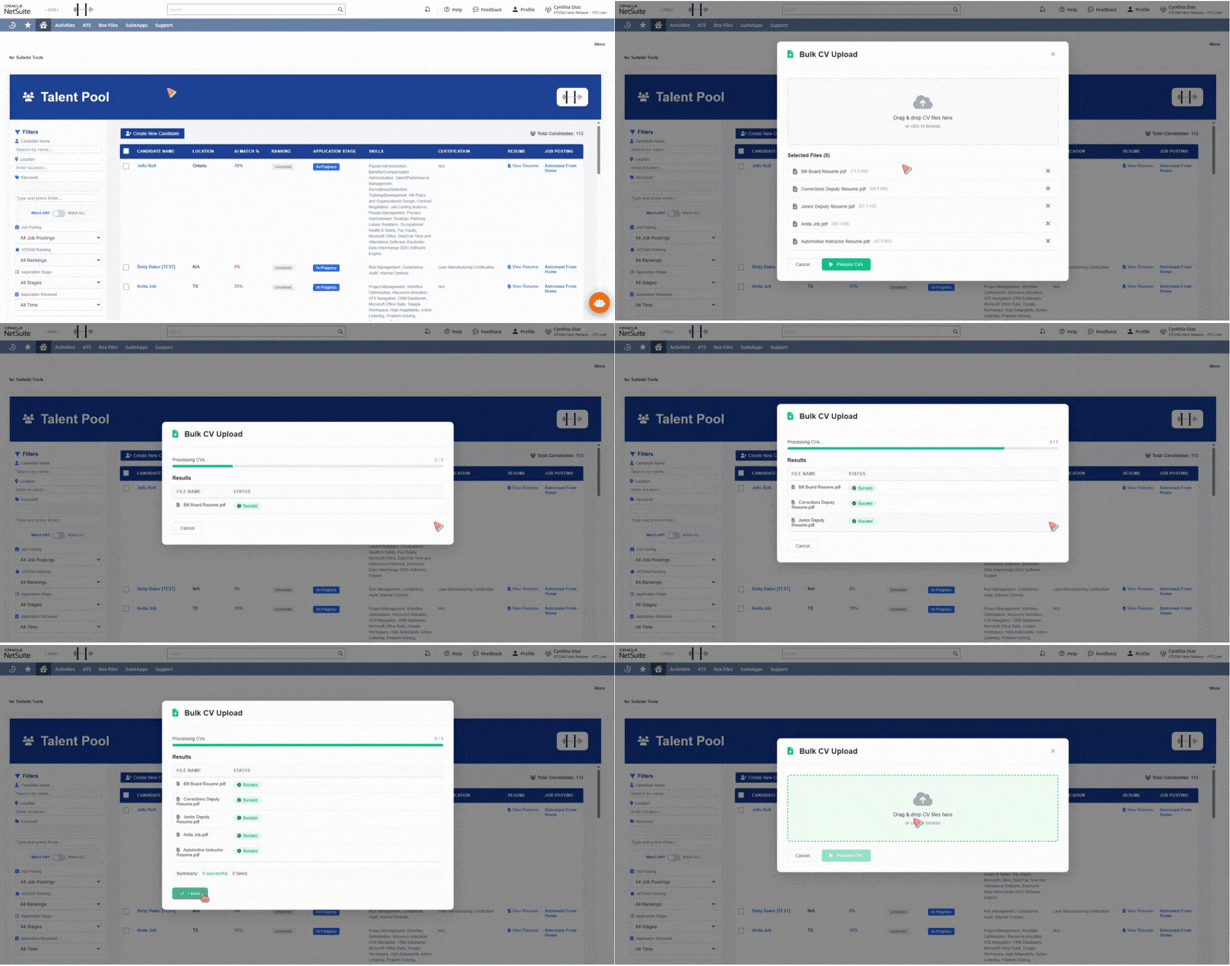
In the Bulk CV Upload window, drag and drop all the CV files into the box (or click to browse).
- Click Process CVs. ATS360 parses each file and creates a candidate profile for every CV. (Click Cancel to back out without creating anyone.)
- Confirm They're Pooled: The new candidate(s) are added to your Talent Pool automatically and appear in the candidate list, ready for filtering, Create Application(s), or Invite to Apply.
Pro-Tips / Important Notes
💡 Important Notes & Best Practices
- Pick the method that fits the volume: Use Single Candidate when you want to review one profile carefully through the guided form; use Bulk Upload when you're loading a stack of resumes (e.g., after a job fair or a sourcing batch) and want them all parsed in one pass.
- Parsing saves typing: Whether you upload a file, paste content, or bulk-load CVs, the parser populates the candidate's details for you — you're reviewing, not typing from scratch.
- Clean files parse best: Stick to PDF or Word. If parsed details come back incomplete or jumbled, the source file was likely hard to read — re-upload a cleaner version or use Paste Content for that candidate.
- If something goes wrong: If a bulk file won't process, remove it and re-add it individually — one unreadable CV can stall the batch.